background image

19 


Screen Calibration


WARNING


Screen calibration is a simple but extremely important process and could render 
the Smart Screen unusable if done incorrectly. 

Only do this if the touch screen 

does not respond properly when touched. 

We recommend you use a blunt fine 

point to follow this process. Avoid using a sharp object as it may damage the 
screen. This process should be undertaken with caution.


The Smart Display is a touch screen display. It has been pre

-

calibrated at the factory and very 

rarely will need calibration. If the screen button become miss

-

aligned due to changes in oper-

ating conditions it may be necessary to recalibrate the touch screen. Screen calibration is 


ONLY used to realign the touch screen with the display.


Note


Before starting, find something with a fine 
point, avoid using sharp items..


Step 1


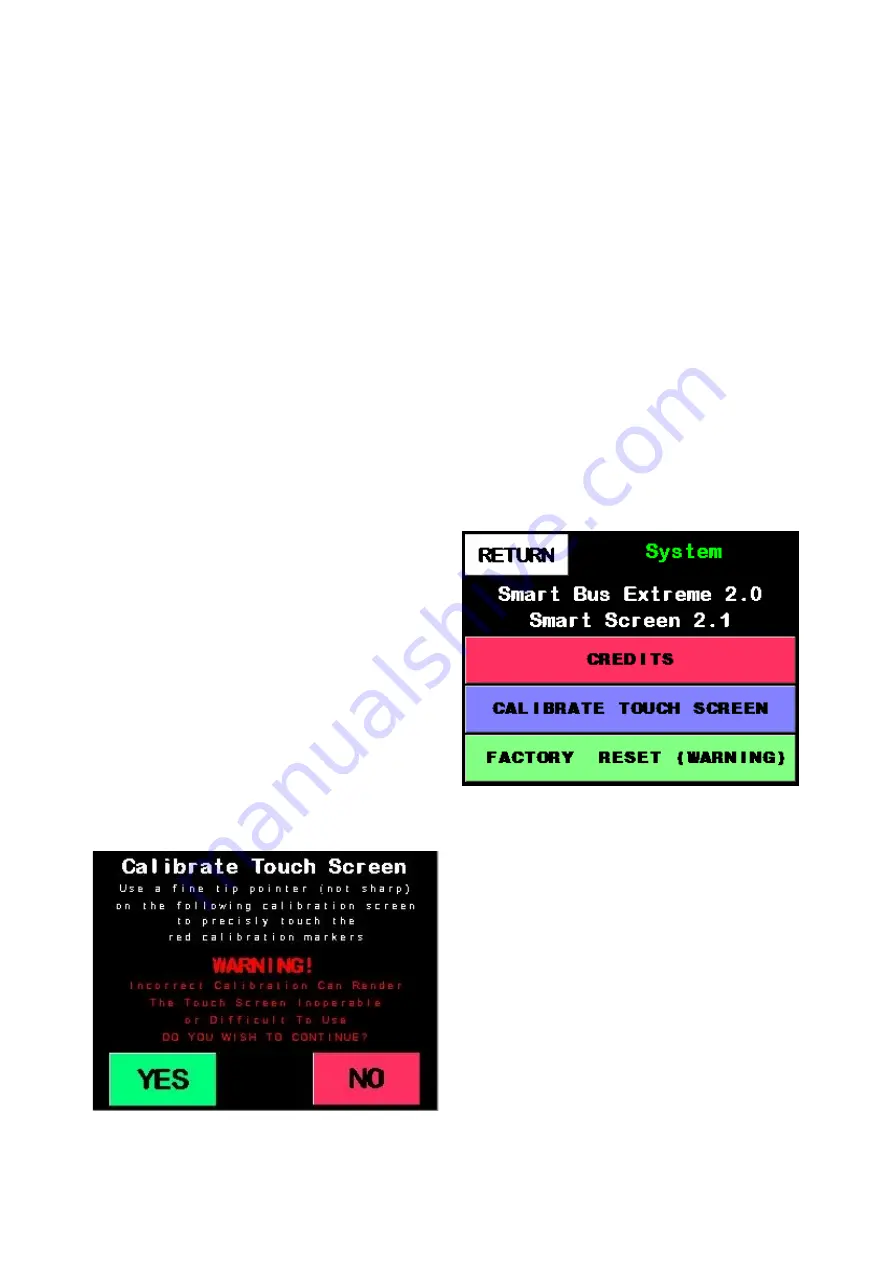
Using the Smart Display, go into the sys-
tem menu, once here press the 

Calibrate 

button


Step 2


A warning and instructions will appear on 
screen. Please Read this as it is an important 
process. When ready press 

Yes 

to continue 

or 

No 

to go back to the system screen.


Step 3


Small crosshairs will appear on the screen, 
using the fine pointer. Press in the 

center 

of 

each of the crosshairs. Once you have 
pressed all the crosshairs, the Smart Screen 
will restart and you will be taken back to the 
system screen. You have now finished the 
screen calibration.


Содержание Smart Bus

Страница 1: ...Smart Bus Quick Start Guide ...

Страница 2: ...pplied with the Smart Bus should be protected from vibration Before installation please ensure that your batteries are fully charged The Smart Bus relies on this to know how much you have used in each pack WARNING The Smart Screen shows you how much you have used out of each pack and displays this as an indicator on the Smart Screen NEVER FLY WITH BATTERY PACKS THAT HAVE 35 OR LESS CAPACITY RED ZO...

Страница 3: ...vo reverse on 5 channels and all 6 adjustable outputs 3 point matching on 5 channels and all 6 adjustable outputs 15 point matching on 5 channels and 6 adjustable outputs Smart Bus Extreme only Digitally selectable regulator output via the Smart Screen Regulator selectable to 6 0 volts 7 2volts and 8 4volts 8 4volts Extreme 3s only Maximum Battery Power Balancing Using dual battery perfect diode t...

Страница 4: ...rits Wait a moment for this to dry Mounting the Smart Bus The Smart Bus is supplied with 4 rubber shock mounts in the base plate Similar to rubber mounts on servos these can be used to give the Smart bus a Shock mount Elite and Extreme versions The Smart Bus Extreme and Smart Bus Plus have a built in digital regulator that uses the base plate as a heat sink It is important that the Smart Bus shoul...

Страница 5: ...een drill a hole where you placed the dots Now simply screw the Smart Display in place NOTE Hard mounting the Smart Display provides little to no protection against vibration Use this method if you are using a non vibration model or only where there is little to no vibration AVOID MOUNTING IN HIGH VIBRATION AREAS Option 1 Using the 3M Velcro Dots we can mount the back of the screen to a surface NO...

Страница 6: ...a spare part Channel Assignment The numbers below the Receiver Inputs correspond to the output channel near the center of the Smart Bus For example Receiver input 1 connects to output 1 AIL 1A and AIL 1B Likewise Receiver input 2 connects to output 2 AIL 2A and AIL 2B Input 3 to output 3 and so on See picture left for details The first 5 B and C channels on the Smart Bus are adjust able These chan...

Страница 7: ...nition port on the side of the Smart Bus Connect an ignition battery to the JR FEMALE yellow battery lead Connect the ignition system to the JR MALE yellow power output lead Connect a signal from the receiver to input 12 of the Smart Bus Set the channel connected to input 12 on the transmitter to switch ON OFF the ignition system Information Input channel 12 is a special dual function channel It i...

Страница 8: ...the fail safe design To switch the Smart Bus ON or OFF do the following Press button A and within 2 seconds press button B If the Smart Bus is in the ON position it will turn OFF If the Smart Bus is in the OFF position it will turn on Pressing button A and B too fast will do nothing Also pressing button A and button B too slow will do nothing These are safety features so you cannot accidentally sw...

Страница 9: ...r the Main Menu Last mA Shows milliamps since model has was last powered up and resets when model is turned off Press here to reset flight timer and Last mA FL T Flight timer since model was turned on The timer only operated while on the main screen FL N Flight number since reset Gives an indication about how many flights on the models airframe Battery Indicators Shows the remaining capacity in th...

Страница 10: ...you to Screen calibration For more information see page 12 Credit Shows credits screen Servo Voltage Selector Sets the regulator output voltage servo voltage Please make sure your battery packs are fully charged before making the servo output volt age selection The Smart Bus will read the battery voltage and will make available only the voltages that will work for your selected battery type All ot...

Страница 11: ... this ser vo for sub trim RUD B Rudder B slave channel select Selects this servo for sub trim RUD C Rudder C Slave channel select Selects this servo for sub trim 3 Point Match Return Returns you back to the previous screen Norm Reverse Reverses the selected servo direction Reset Resets sub trim values to default Multi Takes you to the Multi point match page only available on Smart Bus Extreme Vert...

Страница 12: ... Matching Return Takes you back to the previous screen Reset Resets the sub trim values back to default Vertical Bars Shows the sub trim applied to the servo The sub trim values can be changed using the DEC INC buttons ...

Страница 13: ...We recommend you do not have any servos connected to the Smart Bus during the first time setup Step 1 Ensure that both batteries are plugged into the Smart Bus You will also need to ensure the Smart display is plugged into the switch as it is used for programming Upon power up you will see the AR logo After a few seconds the Smart Screen will be shown Step 2 Press the green Total mA text on the sm...

Страница 14: ... enter is correct and accurate If you are unsure about the capacity of your batteries or if your packs are not new We recommend cycling your packs by discharging them and recharging them to full This will give you the best possible result for the battery packs you are using Step 5 Using the 6 0v 7 2v and 8 4v buttons select the regulator voltage of your choice This will change the output voltage t...

Страница 15: ...atched Little to no Buzz Sound and both servos are moving in the same direction before continuing Step 1 Ensure that both batteries are plugged into the Smart Bus You will need to plug the smart display is into the switch as it is used for programming Ensure your receiver is plugged into the Smart Bus and your trans mitter is on and bound to your receiver For more information on this see page 6 Up...

Страница 16: ...b trim the servo at the center point Step 5 Move and hold the transmitter stick for that channel in 1 direction either the Min or Max columns will change colour from blue to green Use the DEC INC buttons to move and sub trim the servo at this point Step 6 Move and hold the transmitter stick for that channel in the other direction the other MIN or Max column will change colour from blue to green Us...

Страница 17: ... from one side to the other if at any point you hear servo buzz Hold the trans mitter stick in that position and use the DEC INC buttons to sub trim at that point Sub trim the servo until the servo buzz lessens or dis appears Step 4 Repeat step 3 for the entire range of the ser vo this can be repeated as many times as you wish Step 5 Once you are happy with the sub trim press the back button to mo...

Страница 18: ...orming a Factory Reset will erase all sub trim data and is an irreversible pro cess Only do this if you are sure you want to reset the Smart Bus to factory settings Step 1 Using the Smart Display go into the sys tem menu once here press the FACTORY RESET button Step 2 A warning and instructions will appear on screen Please Read this as it is an im portant process When ready press Yes to continue o...

Страница 19: ...oper ating conditions it may be necessary to recalibrate the touch screen Screen calibration is ONLY used to realign the touch screen with the display Note Before starting find something with a fine point avoid using sharp items Step 1 Using the Smart Display go into the sys tem menu once here press the Calibrate button Step 2 A warning and instructions will appear on screen Please Read this as it...

Страница 20: ...mulation screens that simulate a real cockpit These include an artificial hori zon and instrumentation To view these new screens touch the bottom center of the smart screen page An example can be seen to the right If you want to return to the smart screen simply press the center of the display ...

Страница 21: ...e you have set up the correct battery capacity for your battery packs If I change the batteries in my model or move the Smart Bus to a different model will I have to setup the switch again Yes The switch relies on the information that you program into it to be accurate It can not work to its best if this information is not accurate Does the Smart Bus Regulate the voltage Yes the Smart Bus Extreme ...

Страница 22: ...22 Notes ...

Страница 23: ...23 Notes ...

Страница 24: ...rrent usage beyond stated specification Damage due to system failure negligence abuse accident im proper installation vibration damage damage to improper mounting or freezing Loss of time inconvenience loss of model or other incidental or consequential damages Contact Information Booma RC Advanced Radio support support boomarc com For more sales information contact us at sales boomarc com sales1 b...

Отзывы: