Stereo Sound & CD-ROM
2. Hardware Installation
2.1 Install the Stereo Sound and CD-ROM card
Step 1. Turn off the system and ail peripheral devices.
Step 2. Disconnect the power cord and all peripheral devices from the
system.
Step 3. Remove the system cover, and identify an unused 16 bit slot.
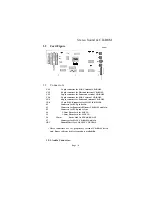
Step 4. Setting the jumpers on the sound card if you would like to changc
the default settings from the factory. Note that makes sure the
settings you selected arc correct otherwise we recommend it as
the default settings.
Step 5. Unscrew the slot cover plate, plug in the sound card, and lighten
it with the screw.
Step 6. If you have speakers or amplifiers, plug the cable into J6 jack on
the back of the sound card.
If you do not need to connect a CD-ROM device to the sound card, disable
CD-ROM I/O port by setting all the jumpers of \S1
?
to "ON" position. Put
back the system cover, reconnect the system power cord and all peripheral
devices. Check and make sure all connections are correct before you turn
on the svstcm.
If you need to install a CD-ROM drive. Please follow the steps below:
2.1.1 Install an internal Panasonic CD-ROM drive
Step 7. Plug one end of the 40 pin flat ribbon cable into CN5 on the
sound card. Pin 1 of the ribbon cable is usually denoted with a
red stripe.
Step 8. Plug the other end of the 40 pin ribbon cable into the back of the
CD-ROM drive, and connect the power plug from your system
power into the CD-ROM drive power connector.
Step 9. Connect J2 on the sound card and the Audio output at the back of
the CD-ROM drive. Make sure pin 1 of J2 is connected to the left
most pin of the CD-ROM Audio output.
Page - 7


