background image

13

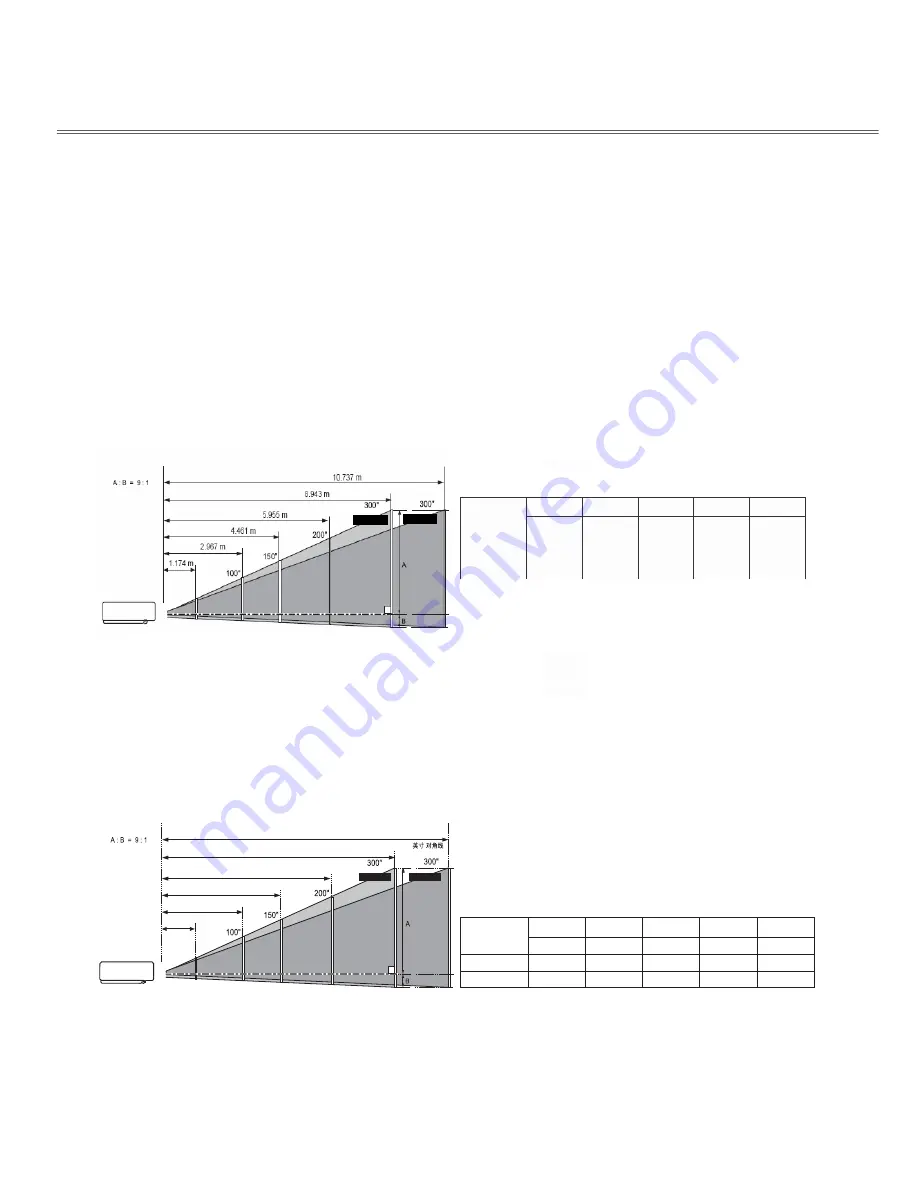
40"

100"

150"

200"

300"

Screen size 

(W x H) mm

4:3 aspect ratio

813 x 610

2032 x 1524

3048 x 2286

4064 x 3048

6096 x 4572

(  

m

o

o

Z

max

)

1.174 m

2.967 m

4.461 m

5.955 m

8.943 m

m

o

o

Z

min

)

1.413 m

3.564 m

5.358 m

7.151 m

10.737 m

Installation

Positioning the projector

Note:

  The brightness in a room has a great influence on picture quality. It is recommended to limit the ambient lighting in order to

get the best image. 

All 

measurements are approximate and may vary from the actual sizes.

LX200

 series

Center

Zoom (max) 

Zoom (min)

Inch Diagonal

屏幕尺寸

(W x H) mm

16 : 10 

宽高比

变焦

 (

最大

)

40"

变焦

 (

最小

)

862 x 539

1.255m

1.255 m

100"

2154 x 1346

3.171 m

3.171 m

3.811 m

150"

3230 x 2019

4.767 m

4.767 m

5.728 m

200"

4308 x 2692

6.363 m

6.363 m

7.645 m

300"

6462 x 4039

9.556 m

9.556  m

11.478 m

11.478 m

1.511m

(

)

最大变焦

最小变焦

(中心)

Wide

Содержание LX200

Страница 1: ...Multimedia projector Model LX200 series Owner s Manual P N 4100100502 ...

Страница 2: ...2 Note The screen menu and pictures in the manual may slightly differ from the real product The manual is subject to change without prior notice ...

Страница 3: ...Sound adjustment 23 Full menu operation 23 Operating the remote control 24 25 Computer input 26 32 Selecting an input source VGA 1 VGA 2 26 Selecting computer system 27 Auto PC adjustment 28 Manual PC adjustment 29 Selecting image mode 30 Adjusting image quality 31 Adjusting screen size 32 Video input 33 39 Selecting an input source Video S Video Component HDMI 33 Selecting a video system 34 Selec...

Страница 4: ...in the manual Environment friendly use conditions The environment friendly life time of the projector and remote control is 10 years the lamp consumable 5 years and the provided batteries consumable 5 years The use conditions of the environment friendly use period are the same with that of the product Properly operate and effectively maintain the projector according to the requirements in this man...

Страница 5: ...s a cabinet unless proper ventilation is provided Do not let any object fall into the projector through the vent as they may touch dangerous voltage positioning or short circuit parts which could result in accidents like a fire or electric shock Keep the projector away from drips or splashes Do not place the projector near an exhaust pipe or air conditioning equipment Use the type of power source ...

Страница 6: ...ctor The fan s running speed is changed according to the temperature inside the projector 20 20 30 30 Do not roll the projector over 20 degrees from side to side Do not pitch the projector over 30 degrees backward and forward Do not point the projector up to project an image Do not point the projector down to project an image Do not put the projector on either side to project an image Moving the p...

Страница 7: ...s around because heat is exhausted through corresponding vent 1 Air filter 2 Remote receiver 3 Zoom ring Rear 4 Projector lens 5 Lens cap 6 Speaker 7 Focus ring Front 8 Power cord connector 9 Safety lock 10 Speaker 11 Robbery protection rob 12 Terminals and connectors 13 Top control and indicators 14 Lamp cap ...

Страница 8: ...gnals complex Y or component video output 4 S VIDEO To the S Video output signals of a video device 5 VGA 1 input To the RGB signals from a PC 6 Control terminal To a PC with a serial control line when the projector is under the control of the PC 7 HDMI To the HDMI digital output signals 8 Audio input To the audio output from a video device connected to 5 or 9 Refer to Page 14 16 9 VGA 2 input mon...

Страница 9: ...vertical keystone distortion When the signal source is from a PC press it to adjust fine sync total dots image position and other displayed parameters When there is no signal input press it to automatically switch a channel for signal search 8 ON STAND BY button To turn on off the projector 9 POWER indicator Lights red when the projector is in stand by mode Lights green during operations Flashes g...

Страница 10: ... for the model 7 button Select an item or adjust the value in the on screen menu Pan the image in Digital zoom mode 8 F MENU button Open or close the full menu 9 S MENU button Open or close the shortcut menu 10 LENS button N A for the model 11 ZOOM button N A for the model 12 SCREENbutton Select a screen display mode 13 D ZOOM button Select the digital zoom mode 14 AUTOSET button Enter the AUTOSET...

Страница 11: ...22 TIMER button Enable the timer function 23 FOCUS button N A for the model 24 LAMP button Select a lamp mode 25 BLANK button Temporarily close the image on the screen 26 FREEZE button Freeze the projected image 27 MUTE button Mute the sound 28 IMAGE button Select an image mode 29 VOLUME button Increase the volume To ensure safe operation observe the following precautions Do not bend drop or expos...

Страница 12: ...a t s n i d n a n a e l c e s a c e h t e p i w y l l u f e r a c l o r t n o c e t o m e r e h t n o d e k a e l s a h y r e t t a b e h t f I Risk of explosion if a battery is replaced by an incorrect type Dispose of used batteries according to the instructions on the battery or local regulations or guides Operating range Point the remote control toward the projector when pressing any button The...

Страница 13: ...s a great influence on picture quality It is recommended to limit the ambient lighting in order to get the best image All measurements are approximate and may vary from the actual sizes LX200 series Center Zoom max Zoom min Inch Diagonal 屏幕尺寸 W x H mm 16 10宽高比 变焦 最大 40 变焦 最小 862 x 539 1 255m 1 255 m 100 2154 x 1346 3 171 m 3 171 m 3 811 m 150 3230 x 2019 4 767 m 4 767 m 5 728 m 200 4308 x 2692 6 3...

Страница 14: ... e v o s s o r c l a i r e S 1 e l b a c A G V HDMI cable Monitor output Computer VGA output Serial output HDMI terminal VGA cable VGA cable Serial crossover cable HDMI cable Analog output Analog input Control terminal HDMI Unplug the power cords of both the projector and external equipment from the AC outlet before connecting the cables ...

Страница 15: ...ot supplied with the projector Video cable RCA x 1 or RCA x 3 S Video cable Component Video output RCA cable Y Pb Cb Pr Cr Composite video Video S Video output S Video cable S VIDEO Unplug the power cords of both the projector and external equipment from the AC outlet before connecting the cables ...

Страница 16: ...rnal audio equipment Audio input R L Audio cable Stereo Audio output Stereo Audio cable R L Note The left and right channels are combined when there is only the L mono is inserted AUDIO IN Audio cable Stereo Audio output Unplug the power cords of both the projector and external equipment from the AC outlet before connecting the cables ...

Страница 17: ...hen the projector is not in use When the projector is connected to an outlet with AC power cord it is in stand by mode and consumes a little electric power Note on the power cord AC power cord must meet the requirements of the country where you use the projector Confirm the AC plug type with the chart below and proper AC power cord must be used If the supplied AC power cord does not match your AC ...

Страница 18: ...n incorrect number move the cursor to the number you want to correct by pressing the button and then select the correct number by pressing button Repeat this step to complete entering a three digit number After entering the three digit number move the cursor to Set then you can start to operate the projector If you entered an incorrect PIN code the PIN code and the number turn red Enter the correc...

Страница 19: ...e projector and let it stand for about an hour in every 24 hours Note When the Auto start function is On this projector is turned on automatically by connecting the AC power cord to an AC outlet The running speed of cooling fans is changed according to the temperature inside the projector Do not put the projector in a case before it is cooled enough If the WARNING indicator flashes or emits a red ...

Страница 20: ...menu entry Press the buttons to adjust settings 3 Press the menu button on the side control or the S MENU button on the remote control again to quit the shortcut menu Or press the SELECT button again to show the full menu Full menu 1 Press the menu button on the side control to display the shortcut menu and then the SELECT button again to show the full menu Or you may directly press the F MENU but...

Страница 21: ...modes are Dynamic Normal Cinema Blackboard green Colorboard or User Image 4 Image adjust menu If a computer is selected as a signal source the following image adjusting options are available Contrast Brightness Color temp White balance R G B Sharpness and Gamma If video equipment is selected as a signal source the following image adjusting options are available Contrast Brightness Color Time White...

Страница 22: ...one If a projected picture has keystone distortion follow the steps below to manually correct the image Press the KEYSTONE button on the remote control The keystone dialog box appears Correct keystone distortion with the arrow buttons Keystone adjustment can be stored Keystone The arrows are white when there is no correction The arrows that are used for correction turns red The arrows disappear at...

Страница 23: ...s also effective for AUDIO OUT jack Remote control Mute button Volume button Volume button Full menu operation 1 Press the F MENU button to display the full screen menu Use the button to move the cursor to the Sound Menu icon Press SELECT or the button to enter the submenu entry 2 Use the button to move the cursor to the desired item and then press the SELECT button Sound menu Volume Press to turn...

Страница 24: ...ect an input source FREEZE button Press the FREEZE button to freeze the picture on the screen To cancel the Freeze function press the FREEZE button again or press any other button Computer button Video button S video button Component button Arrow buttons Lamp control button Freeze button Lamp control button Press the LAMP button to select a lamp mode to change the brightness of the screen Normal N...

Страница 25: ...TIMER button The timer display 00 00 appears on the screen and the timer starts to count time 00 00 59 59 To stop the Timer press the TIMER button Press the TIMER button again and then the P Timer display disappears 02 02 Timer display Timer button IMAGE button Press the IMAGE button on the remote control to select your required image mode Screen mode button Blank button SCREEN button Press the SC...

Страница 26: ...y when the VGA2 property in the easy menu is set to Input Remote control COMPUTER button VGA 1 VGA 2 HDMI VGA 1 VGA 2 Component Full menu button S Video Video Full menu operation 1 Press the F MENU button to display the full screen menu Use the button to select the input source icon and press the button or SELECT button 2 Press the button to select VGA1or VGA2 and then press the SELECT button Inpu...

Страница 27: ...on the System Menu icon and the Auto PC Adjustment function works to display proper images If images are not projected properly adjust manually VGA system menu There is no signal input from a computer Check the connection between your computer and projector The PC system menu displays the selected system Selecting computer system manually The system can also be selected manually 1 Press the F MENU...

Страница 28: ...on and press the or SELECT button 2 Press the button to select AUTO PC Adjustment and then press the SELECT button To store the adjusted parameters The system parameters adjusted in the Auto PC Adjustment can be stored in the projector Note Total dots and horizontal vertical positions of some computers cannot be fully adjusted with this Auto PC Adjustment function When the image is not provided pr...

Страница 29: ...izontal period to match your PC image Horizontal Press to adjust the horizontal picture position Vertical Press to adjust the vertical picture position Clamp Press to adjust the clamp level When the image has dark bars try this function for adjustment Display area H Press to adjust the horizontal area displayed by the projector Display area V Press to adjust the vertical area displayed by the proj...

Страница 30: ...ired item and then press SELECT Dynamic For viewing images in a bright room Normal Normal image quality preset by the system on the projector Cinema For watching movies with multiple gray scale levels Image quality menu Blackboard Green For viewing the image projected on a blackboard green by enhancing the image quality This is mainly effective on a green colored board instead of a black colored b...

Страница 31: ...temp Press to select your desired color temperature from Low Mid and High Red Press to lighten the red tone and to deepen it Green Press to lighten the green tone and to deepen it Blue Press to lighten the blue tone and to deepen it Sharpness Press to decrease the sharpness of an image and to increase it Gamma Press to adjust the gray scale level for better balance of contrast Note After white bal...

Страница 32: ...en position Common Save the adjusted scale to all the inputs Press SELECT at Common to display a confirmation box To save the scale press SELECT When Custom is selected the saved scale is used Reset Reset all the adjusted values Press SELECT at Reset to display a confirmation box To set press SELECT at Yes Digital zoom Select Digital zoom The on screen menu disappears and D zoom appears Press the ...

Страница 33: ...o display the full screen menu Use to select the Input source icon and press or SELECT Input menu 2 Press to select S Video or Video and then press SELECT Select it when the input source is from the video equipment connected to Y Cb Pb and Cr Pr terminals with a VGA cable Video S Video Select it when the video input signal is connected to VIDEO terminal Select it when the video input signal is con...

Страница 34: ...sts itself to optimize its performance When Video System is PAL M or PAL N select the system manually PAL SECAM NTSC NTSC4 43 PAL M PAL N If the projector cannot reproduce proper video images select a specific broadcast signal format from PAL SECAM NTSC NTSC 4 43 PAL M and PAL N Component Auto The projector automatically detects an incoming video system and adjusts itself to optimize its performan...

Страница 35: ...T Image button Dynamic For viewing images in a bright room Normal Normal image quality preset by the system on the projector Image quality menu Cinema Vivid image mode with fine tone adjusted Blackboard green For viewing the image projected on a blackboard green by enhancing the image quality This is mainly effective on a green colored board instead of a black colored board Colorboard For images p...

Страница 36: ...ess to lighten the red tone and to deepen it White balance Green Press to lighten the green tone and to deepen it White balance Blue Press to lighten the blue tone and to deepen it Sharpness Press to decrease the sharpness of an image and to increase it Gamma Press to adjust the gray scale level for better balance of contrast Noise reduction To reduce snow interference on the screen Select the fun...

Страница 37: ...n To adjust your required item press H V scale Adjust the horizontal vertical screen scale H V When set to On the aspect ratio is fixed The Scale V appears dimmed and becomes unavailable Adjust Scale H and then the screen scale is automatically modified based on the aspect ratio H V position Adjust the horizontal vertical screen position Common Save the adjusted scale to all the inputs Press SELEC...

Страница 38: ...h Chinese German French Italian Portuguese Dutch Romanian Spanish Polish Finnish Russian Hungarian Thai Swedish Korean and Japanese OSD setting Press to select the Menu icon and then press SELECT or Menu position Allows you to adjust the display position of the on screen menu Choose Menu setup and press SELECT The screen position changes as follows every time you press SELECT Top left Top right Ce...

Страница 39: ...e synch total dots and horizontal vertical positions of some computers can be fully adjusted with the Auto PC Adjustment function When the image is not provided properly with this function manual adjustments are required Auto keystone Off Disabled Auto To correct keystone distortion depending on the slope of the projector all the time Manual To enable the function by pressing AUTOSET on the top co...

Страница 40: ...tured Default The factory set logo Off No logo Capture Enables you to capture the image being projected and use it for a startup display or interval of presentations Upon capturing the projected image press SELECT A confirmation box appears Select Yes to capture it After capturing the projected image go to Select a logo and set it to User Then the captured image is displayed when the projector is ...

Страница 41: ... Change the PIN code Press to switch between On and Off and press SELECT for confirmation Logo PIN code change Logo PIN code can be changed to your desired three digit number Press SELECT to select Change the logo PIN code The corresponding confirmation box pops up Then press to enter a correct code A dialog box of New PIN code shows up Set a new code and then a confirmation box appears Select Yes...

Страница 42: ...ojection lamp when the projector is out of service within a certain period Options are Ready When the lamp has been fully cooled down the POWER indicator changes to flash in green In this condition the projection lamp is turned on if the input signal is reconnected or any button on the control panel or remote control is pressed Shut down When the lamp has been fully cooled down the power is turned...

Страница 43: ...C or Auto in the video system The icon of Closed Caption appears dimmed when unavailable Closed Caption cannot be selected when the screen menu and Timer is displayed Lamp control Allows you to change the brightness of the screen s s e n t h g i r b l a m r o N l a m r o N Eco Lower brightness reducing power consumption and extending the lamp life Test Pattern Allows you to set the internal signal...

Страница 44: ...rect number by pressing button Repeat this step to complete entering a three digit number After entering the three digit number move the cursor to Set Press SELECT and you can start to operate the projector If you entered an incorrect PIN code the PIN code and the number turn red Enter the correct PIN code all over again Change the PIN code lock setting Press to select Off or On and then press SEL...

Страница 45: ... o s i r o t c e j o r p e h t f i o s t i t e S f f O n a h t r e t s a F n O Filter counter Allows you to set a frequency for cleaning the filter When the projector reaches a specified time between cleanings a Filter warning icon appears on the screen notifying the cleaning is necessary After cleaning be sure to select Reset and set the timer The Filter warning icon will not turn off until the f...

Страница 46: ...ays the h sync frequency of input signal in KHz and KHz when there is no signal V sync frequency Displays the h sync frequency of input signal in Hz and Hz when there is no signal When progressive displaying is activated frequency in Hz will be multiplied Screen Displays the selected screen mode Language Displays what OSD language is used Lamp status Displays the selected lamp mode Lamp counter Di...

Страница 47: ...ator stops blinking Check the items below Did you provide appropriate space for the projector to be ventilated Check the installing condition to see if ventilation slots are not blocked Has the projector been installed near the duct or vent of an air conditioning Move the installation of the projector away from the duct or vent Are the air filters clean Clean the air filters periodically The proje...

Страница 48: ...e quality Do not put any small objects into the air intake vents Otherwise it may result in malfunction of the projector Recommendation Air filter Resetting the filter counter Be sure to reset the filter counter after cleaning or replacing the filter We recommend avoiding dusty smoky environments when you operate the projector Usage in these environments may cause poor image quality When you use t...

Страница 49: ...ng an excessive amount of cleaner Abrasive cleaners solvents or other harsh chemicals might scratch the surface of lens Cleaning the projector cabinet Unplug the AC power cord before cleaning Gently wipe the projector surface with a soft dry cleaning cloth When the cabinet is heavily soiled use a small amount of mild detergent and finish with a soft dry cleaning cloth Avoid using an excessive amou...

Страница 50: ... cause injury When a lamp is not illuminated it may indicate that the lamp has been damaged When you replace a ceiling mounted lamp stand beside the lamp cover but not under it for the broken glass may fall down to hurt you Remove the lamp cover gently to avoid being hurt by the shattered glass If the shard of glass drops into your eyes or mouth go to hospital immediately Follow these steps to rep...

Страница 51: ...llow carefully the instructions in the Lamp Replacement section of this manual Continuous use of the lamp with the LAMP REPLACE indicator lighted may increase the risk of lamp explosion A Lamp may explode as a result of vibration or shock It may be depredated as it comes to the end of life Risk of explosion may differ according to the environment or conditions in which the projector and lamp are b...

Страница 52: ...ay The initial display is not same with the standard setting Make sure User or Off are not chosen in the submenu of Startup logo menu Input signal switches automatically or does not switch automatically Make sure Input search function is adjusted properly When the projector is on and you press the input button an icon other than the Lamp mode icon appears That is the Filter warning icon An icon ot...

Страница 53: ...s the Mute button When the AUDIO OUT is plugged in the projector s built in speaker is not available Is the image projected The sound can only be heard when the image is projected The color is strange Check the input signal color system video system or computer system mode Make sure that Blackboard is not selected in the menu of Image quality Some displays are not seen during the operation Check t...

Страница 54: ... the remote control Indicators lights or blinks Refer to Indicators and projector condition to check the status of the projector Exclamatory mark appears on the screen Your operation is invalid Operate correctly You can not operate with the side control Go to Setup Security to unlock the keys of the side control Unable to unlock the Logo PIN code Security key lock or Security PIN code lock Contact...

Страница 55: ...normal the POWER indicator lights red and the projector can be turned on The WARNING indicator keeps blinking The projector has been cooled down enough and the temperature returns to normal When turning on the projector the WARNING indicator stops blinking The projector detects an abnormal condition and cannot be turned on Unplug the AC power cord and plug it again to turn on the projector If the ...

Страница 56: ...digital computer signals with the DCLK less than 140 MHz Refer to the table below for details about the resolution and correspondent field frequencies Signal format Resolution Field freq HZ 640x400 60 640x400 70 640x400 85 640x480 60 640x480 65 640x480 72 640x480 75 VG A 640x480 85 800x600 50 800x600 60 800x600 65 800x600 72 800x600 75 800x600 85 800x600 120 SVGA 832x624 75 1024x768 60 1024x768 65...

Страница 57: ... 1 COMPUTER IN 2 MONITOR OUT ANALOG Terminal Analog RGB D sub 15 pin 5 4 3 10 13 12 CONTROL PORT connector D sub 9 pin LAN connector 1 TX 5 2 TX 6 RX 3 RX 7 4 8 8 7 6 5 4 3 2 1 PIN code memo Write down the PIN code number in the column below and keep it with this manual securely If you forgot or lost the number and unable to operate the projector contact the service station PIN code lock No Factor...

Страница 58: ... OUTPUT terminal Mini D sub 15 pin x 1 9 1 l a n i m r e t e p y t A I M D H l a n i m r e t t u p n i I M D H pin x 1 COMPUTER 1 COMPUTER 2 audio input terminal Mini jack stereo x 1 2 x e p y t A C R l a n i m r e t t u p n i o i d u A e l b a h c t i w s t u p t u o 1 x o e r e t s g u l p i n i M l a n i m r e t t u p t u o o i d u A 1 x n i p 9 b u s D l a n i m r e t l o r t n o c l a r t n e...

Страница 59: ... PCB assembly Body Other parts Remote control Accessori es Cable Indicates that this toxic or hazardous substance contained in all of the homogeneous materials for this part is below the limit requirement in SJ T11363 2006 Indicates that this toxic or hazardous substance contained in at least one of the homogeneous materials used for this part is above the limit requirement in SJ T11363 2006 327 2...

Страница 60: ......

Отзывы: