background image

IRIS 3000® DIGITAL VIDEO PHONE USER MANUAL

22

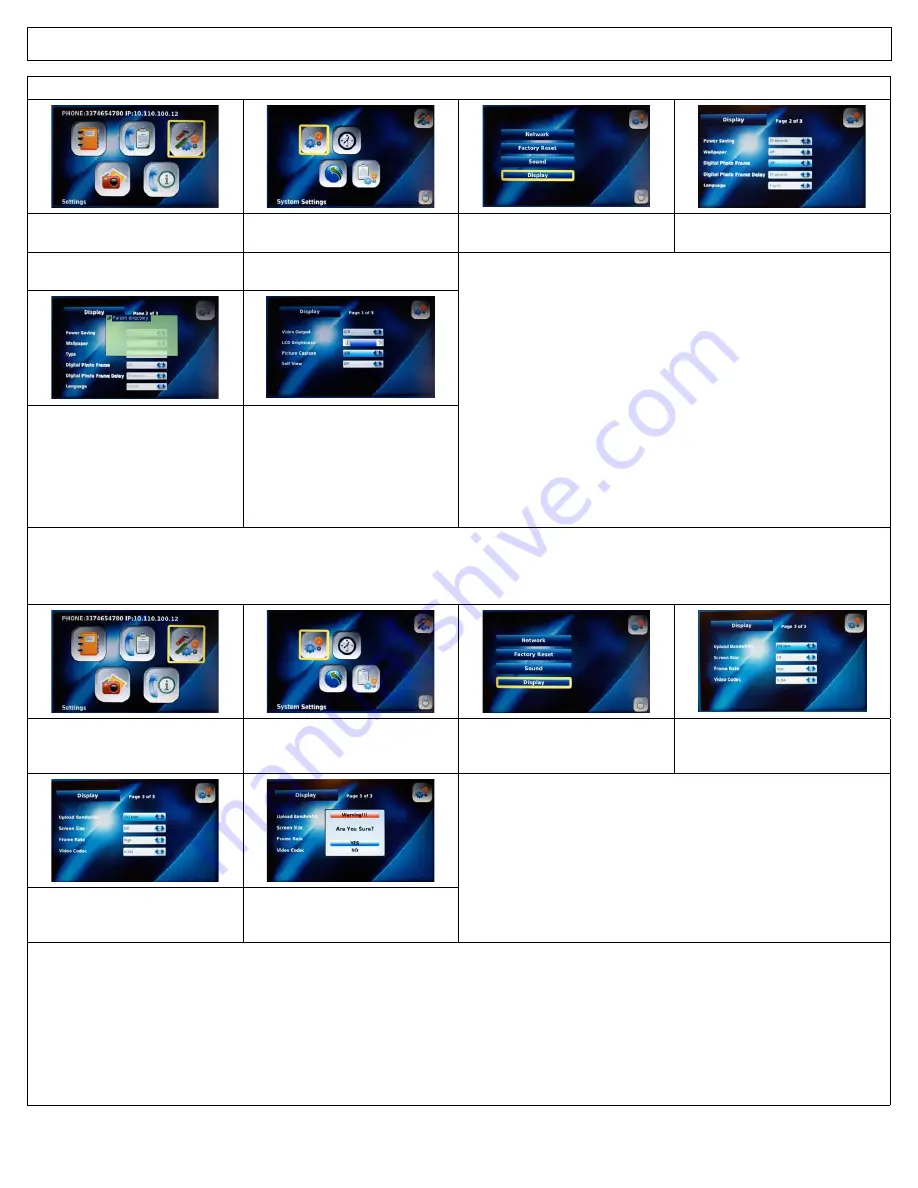
4-6-2-1.  Digital Photo Frame On/Off

Select “

Settings

” in the Main Menu 

and Press 

OK

Select “

System Settings

” in the 

Settings Menu and Press 

OK

Select “

Display

” in the 

System Settings Menu

To enable Digital Photo Frame, select 

On

”.  To disable, select “

Off

”.

4-6-2-2.  Digital Photo Frame 

Delay

4-6-2-3.  Language

See Section 

4.7 Digital Photo Frame

for more details

Select the delay you wish in between 

each Digital Photo Frame  

from 10-15-20 seconds 

NOTE:  If you are displaying large photo files 

(greater than 3 mega pixels or larger than 

600 x 800 pixels), set the delay in between 

each picture to 20 seconds. This will allow 

ample time for each photo to load.

Use the Navigation buttons to 

change the language displayed on 

the screen.  You can choose between 

English, Spanish or French, Francais, 

Español - US, Svenska, Nederlands, 

Norsk, Dansk, Haliano, Polski, Deutsch,  

Portugisisk, Español - EU, Suomia

4-6-2-4.  Upload Bandwidth 

Upload Bandwidth is the capacity at which the digital video phone can upload data over your Internet connection.  The IRIS 3000® Digital 

Video Phone comes with pre-set optimal factory settings.  If the video image you are sending is not as clear as you would like, you can 

adjust the upload bandwidth speed of your video phone.  

Select “

Settings

” in the Main Menu 

and Press 

OK

Select “

System Settings

” in the 

Settings Menu and Press 

OK

Select “

Display

” in the 

System Settings Menu

From the Display Menu, use the  

Navigation buttons to select  

Upload Bandwidth

Select appropriate  

Upload Bandwidth

” speed 128, 

256, 384 or 512 kbps

Press 

BACK 

when finished then, “

YES

” 

and Press 

OK 

to save your settings

If your upload bandwidth is less than 200 kbps, please contact your ISP about higher speed service. 

If your upload bandwidth is between 200 kbps and 365 kbps, you should select an Upload bandwidth speed of 128 kbps. 

If your upload bandwidth is between 366 kbps and 531 kbps, you should select an Upload bandwidth speed of 256 kbps. 

If your upload bandwidth is between 532 kbps and 698 kbps, you should select an Upload bandwidth speed of 384 kbps. 

If your upload bandwidth is greater than 699 kbps, you should select an Upload bandwidth speed of 512 kbps.

Note:  You cannot change your display settings while on a call.  You must make and save your selection prior to making calls.  To see the 

effects of the change, you’ll need to place a call.  The party you have called will be able to tell you if your picture is clearer.  If you set the upload 

bandwidth speed too high, it will distort the quality of picture.  To adjust, simply reset your upload bandwidth speed to the next setting down.   

Содержание IRIS 3000

Страница 1: ...IRIS 3000 DIGITAL VIDEO PHONE USER MANUAL IRIS 3000 DIGITAL VIDEO PHONE...

Страница 2: ...4 3 1 Entering Numbers 12 4 3 2 Entering Letters 12 4 3 3 Entering Numbers and Letters 12 4 4 Phonebook 12 4 4 1 All Contacts 12 4 4 1 1 Add New Entry 13 4 4 1 2 Make a Call 13 4 4 1 3 Edit Contact 1...

Страница 3: ...t occurs due to such mishandling To avoid damage overheating or shock do not install in a humid location Do not install the unit in direct sunlight or near heat sources such as radiators To avoid elec...

Страница 4: ...phone on off 2 POWER DC IN Connects to the power adapter 3 USB Universal Serial Bus port used to store data on the digital video phone 4 LAN Local Area Network connection 5 WAN Connects to Internet vi...

Страница 5: ...se 9 Enters 10 NUMERIC KEYPAD Enters numbers or letters 11 Enters or rejects incoming call 12 MENU Activates the Main Menu 13 BACK Moves to the previous menu finishes a sequence or deletes characters...

Страница 6: ...ll is completed press the HOLD button to reconnect to the original caller To switch between calls press HOLD Call Conference Press HOLD during the initial call the call can be incoming or outgoing Thi...

Страница 7: ...e OK button Use the Navigation buttons to select the icon Make A Call Press the OK button Select Call Log and Press OK Select the type of Call Log Menu and Press OK Select the desired number and Press...

Страница 8: ...he SPEAKER button NOTE Your call data is stored in the Call Log 3 5 Listening to Your Voice Mail An envelope will appear in the bottom right hand corner of your screen to indicate you have a voice mai...

Страница 9: ...o image is displayed on the other party s screen If you want to release privacy mode press the PRIVACY button again 3 7 3 Volume Control To adjust the volume during a call Lowers the volume Raises the...

Страница 10: ...al video phone 3 7 7 Call Waiting You will hear a call waiting tone to indicate Incoming Call signal and the Caller ID information will be displayed To accept the incoming call press 1 the current cal...

Страница 11: ...such as NTP D S T and G M T In the Upgrade Menu you can set the upgrade server address and the upgrade method The Administrator Menu provides access to more complex settings such as SIP A V Codec set...

Страница 12: ...ode to A Press buttons S K Y consecutively 7 7 7 7 5 5 9 9 9 4 3 3 Entering Numbers and Letters Example To enter 123 com You will press the corresponding key until the desired letter appears Press the...

Страница 13: ...t All Contacts in the Phonebook Menu and Press OK Select Add New Entry in the All Contacts Menu and Press OK Enter information in Add New Entry window and select Save 4 4 1 2 Make Call You can make a...

Страница 14: ...ect Save and Press OK 4 4 1 4 Delete Contact You can delete contact information that you do not need anymore Select Phonebook in the Main Menu and Press OK Select All Contacts in the Phonebook Menu an...

Страница 15: ...nu and Press OK Select Search in the Phonebook Menu and Press OK Select Search by number in the Search Menu and Press OK Enter the phone number you wish to find in the Search by number window and Pres...

Страница 16: ...isted in Total Calls You can make a call by selecting the desired number Select Call Log from the Main Menu and Press OK Select Total Calls from the Call Log Menu and Press OK Select the number or con...

Страница 17: ...a call by the number selected and record the number in Phonebook Select Call Log from the Main Menu and Press OK Select Missed in the Call Log Menu and Press OK Select the number in the Missed Calls w...

Страница 18: ...ct Call Log from the Main Menu and Press OK Select the type of call from the Call Log Menu and Press OK Select the desired number from the list to delete Select Delete in the menu and Press OK Select...

Страница 19: ...ss OK Select the Net Settings or Interface PLEASE DO NOT ATTEMPT TO ADJUST ITEMS IN THE NETWORK MENUS PLEASE CONTACT IRIS 3000 DIGITAL VIDEO PHONE CUSTOMER SUPPORT FOR ASSISTANCE 1 866 619 6444 4 6 1...

Страница 20: ...s the BACK button then Select Yes and Press OK Always press the BACK button to save and exit the menu After each entry you will see a screen asking you to verify your changes Select Yes or No and sele...

Страница 21: ...the interval at which the phone will switch to power saving mode from 30 60 90 seconds 4 6 2 Wallpaper The wallpaper is the background displayed on your LCD screen You can choose a different wallpape...

Страница 22: ...ke you can adjust the upload bandwidth speed of your video phone Select Settings in the Main Menu and Press OK Select System Settings in the Settings Menu and Press OK Select Display in the System Set...

Страница 23: ...w Normal or High Press the BACK button when finished and select YES to save your settings then Press OK 4 6 2 7 Video Codec Video Codec represents the video compression on your phone The IRIS 3000 Dig...

Страница 24: ...STANCE 1 866 619 6444 4 7 Digital Photo Frame Your digital video phone provides you with the functionality of displaying digital photos taken on other devices such as cameras camera phones etc Insert...

Страница 25: ...w Another Picture Next Picture Previous Picture Select View Another Picture Select the file type you want to display and Press OK Select Next Picture in the window to view the next photo and Press OK...

Страница 26: ...wer cycle the digital video phone by turning the phone off and then on again When I receive a call the screen is turned on but there is no ringing sound Verify the ringtone volume level is set higher...

Страница 27: ...tal video phone Phone FXS port Verify phone cable from the digital video phone to the alternate phone is securely connected Verify that the alternate phone is set to TONE dialing not PULSE Connect the...

Страница 28: ...here is no response During a Call Hold You are in Hold mode Video Audio On Hold The call was put on hold by other phone Privacy On You are in Privacy mode Mute On You are in Mute mode Extension In Use...

Отзывы: