ACME CA-1612J Скачать руководство пользователя страница 15


15C 


6. Tap the Scene button you wish to copy the scene to.


  4-2.4 Delete a Scene   

1. Tap the desired Scene button to select the scene you wish to delete


2. Press and hold down the Auto/Del button.While holding down 

the Auto/Del button, tap the Scene button that stores the scene 

you wish to delete. 


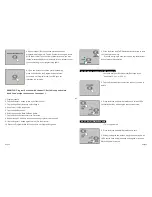
  4-2.5 Delete all Scenes   

This function will reset all DMX channel to 0 output.


1. With the power off, press and hold down the Program and 

Bank Down buttons at a time.


2. Apply power again, all scenes should be cleared.


Page 13


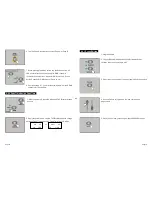
2. Press and hold down the Auto/Del button. Tap the Chase 

button while holding down the Auto/Del button, all LEDs will 

flash three times briefly indicating this chase has been deleted.


  4-3.5 Delete all Chases   


1. With the power off, press and hold down the Auto/Del and 

Bank Down buttons at the same time. 


2. Apply the power again.


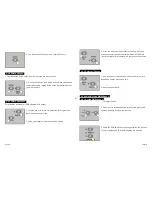
  4-4 Assign/Reverse DMX channel   

  4-4.1 Assign DMX channel   

1. Program enable. 


2. Press the Fine and Mode buttons at a time,the Assign LED 

lights up indicating Assign mode is active.


3.  Use  Bank  Up/Down  button to  change  between  the  Pan and 

Tilt, the corresponding LED lights indicating this selection. 


Page 18


Содержание CA-1612J

Страница 1: ...put 3 pin female XLR MIDI Signal 5 pin standard interface Audio Input By built in microphone or line in Dimensions 482x132x73mm Weight appro 2 5 kg Innovation Quality Performance DMX MASTER Profession...

Страница 2: ...ete a Step Page 17 4 3 4 Delete a Chase Page 17 4 3 5 Delete all Chases Page 18 4 4 Assign Reverse DMX channel Page 18 4 4 1 Assign DMX channel Page 18 4 4 2 Reverse DMX channel Page 20 4 4 3 Fade Tim...

Страница 3: ...channels M 8 CH 16 CH mode for Assigned or Reversed DMX channels N Blackout master O Manual override P Built in microphone for Music triggering Q MIDI control over banks chases and Blackout R LCD dis...

Страница 4: ...O NOT make any inflammable liquids water or metal objects enter the unit Should any liquid be spilled on the unit DISCONNECT the power supply to the unit immediately STOP using the unit immediately In...

Страница 5: ...ks 01 15 of scenes and 6 chases of scenes In addition blackout function can be activated by MIDI signal BANK NOTE NUMBER FUNCTION Bank 1 00 to 07 Turn on or off Scenes 1 8 of Bank 1 Bank 2 08 to 15 Tu...

Страница 6: ...tton for three seconds the LCD show the MIDI channel of last time Page 27 1 Scanner Buttons 1 12 12 scanners of 16 DMX channels fader control Scanners DMX channels Fader control LED 1 1 16 Off Off 2 1...

Страница 7: ...14 Music Bank Copy Activates Music mode or to copy a bank of scenes 15 Bank Up Down Press the Up Down button to select from 30 banks 16 Tap Display Used to create a standard beat or to change the val...

Страница 8: ...t the bank that holds the scenes you wish to run The scenes you ve selected will chase in a sequential order according to the music rhythms detected by the built in microphone 3 Tap the Music Bank Cop...

Страница 9: ...5 32S The time of the last two taps is 5 32 seconds FT 10 5S Fade Time is 10 5 seconds ASS 07 08 Assign DMX channels 7 and 8 RES 10 13 Reverse DMX Channels 10 and 13 SN 6 Scene 6 BK 03 Bank 03 4 1 Pr...

Страница 10: ...to turn on its fader control which is indicated by the lit LED You may select several scanners at a time by tapping of these Scanner buttons so you can set several scanners at a time 3 Move the fader...

Страница 11: ...tton 7 Tap the Scene 1 button to store the first scene 8 Repeat steps 4 7 until all 8 scenes have been programmed into bank 3 9 Tap the Scanner 1 button again to turn off its fader control 10 Press th...

Страница 12: ...ime Assign Fade Time 1 With the power off press the Mode and TAP Display buttons at a time 2 Apply the power again tap the TAP Display button to change between Fade Time and Assign Fade Time the LCD r...

Страница 13: ...d hold down the Scanner button you want to copy 2 While holding the Scanner button tap the Scanner button you want to copy to Page 11 4 4 2 Reverse DMX channel 1 Program enable 2 Press the Fine and Mo...

Страница 14: ...cating the DMX channel is assigned Scene button 1 stands for DMX channel 1 Scene button 2 stands for DMX channel 2 and so on 8 Continue steps 3 7 you may assign a maximum of 48 DMX channels for 12 sca...

Страница 15: ...r again all scenes should be cleared Page 13 2 Press and hold down the Auto Del button Tap the Chase button while holding down the Auto Del button all LEDs will flash three times briefly indicating th...

Страница 16: ...to Del button to delete the step all LEDs will flash three times briefly indicating that the step has been deleted 4 3 4 Delete a Chase 1 Select the chase you wish to delete Page 17 4 2 6 Bank Copy 1...

Страница 17: ...the MIDI Rec Copy button all LEDs will flash three times briefly indicating all 8 scenes in this bank have been programmed into this chase Page 15 4 3 2 Add a Step 1 Program enable 2 Select the chase...

Отзывы: