background image

6

16. 

INPUT

: Press this button to toggle between lan-

guages when selecting and searching for songs.
17. 

PREVIOUS/NEXT TRACK CONTROLS

Press these buttons to navigate forward and back 

through tracks.
18. 

FAST FORWARD/REWIND CONTROLS

Press these buttons to quickly navigate back and forth 

within a track. (This functionality is supported in 

DVD and VCD discs.)
19. 

SPEED

: This button not used (has no function). 

20. 

DELETE

: Press this button to clear a song from 

a the queue or the KOD-1000’s hard disk drive.
21. 

RETURN

: Press this button to return to the 

menu if the KOD-1000 is playing. 
22. 

ANGLE CONTROL

: Press this button to select 

a new angle. (This functionality is supported on some 

DVD discs).
23. 

+10 NUMERIC KEY

: Press this button to add 10 

to a selection. For example, press the +10 NUMERIC 

KEY and 4 to enter 14. This functionality is only sup-

ported on DVD and CD+G discs. On DVDs, it will 

only work when selecting music in the disc’s menu. 
24. 

REPEAT CONTROL

: Press to repeat a track or 

disc. If it is pressed once while a track is playing, REP 

1 will be shown in the KOD-1000’s display window 

and the track will repeat. If pressed a second time, 

REP ALL will display and the entire disc will repeat. 

Three presses will disable the repeat function.
25. 

TONE CONTROL

: Press these buttons to ad-

just the tone of the karaoke singer. Press the - button 

to flatten the voice by a half step. Press the + button to 

sharpen the voice by a half step.
26. 

MALE AND FEMALE TONE CONTROL

Use these buttons to adjust the tone of the karaoke 

singers, depending on their sex. Pressing the MALE 

KEY will flatten the voice a full step. Pressing the FE-

MALE KEY will sharpen the voice a full step. 
27. 

ENTER

: Press this button to enter a selection.

28. 

MUSIC VOLUME CONTROL

: Press these 

buttons to raise or lower the volume of the music.
29. 

PREVIOUS/NEXT PAGE CONTROL

: Press 

these buttons to advance or return to previous pages. 

(This functionality is only available in the KOD-

1000’s hard disk drive mode.)
30. 

ECHO CONTROL

: Press buttons to adjust the 

echo of a karaoke singer during their performance.
31. 

NTSC/PAL CONTROL

: Press this button to 

toggle between NTSC and PAL video. 
32. 

MUTE

: Press this button to silence or restore the 

volume of the KOD-1000 while it’s playing.
33. 

SUBTITLE

: Press this button to enable subtitles 

in video programming. (This functionality is only 

available on some discs.)
34. 

TITLE

: Press this button to quickly access a disc’s 

navigation menu. If this option is supported, users will 

be taken to menu where a disc’s different chapters can 

be accessed.
35. 

SETUP MENU

: Press this button to set the 

KOD-1000’s user preferences. Pressing this button 

while the hard disc drive is in playback will access 

advanced setup, languages, fonts and play interlude 

options, among others. Pressing this button while 

in disc playback mode will access video output, TV 

type options and others. See Page 19 to 23 for more 

information.
36. 

A-B SEGMENT REPEAT

: Press this button to 

repeat a segment of a track. Press the button once at 

the start of what you’d like repeated and again at the 

end of what you’d like repeated. Press again to stop 

the function. See Page 18 for more information.

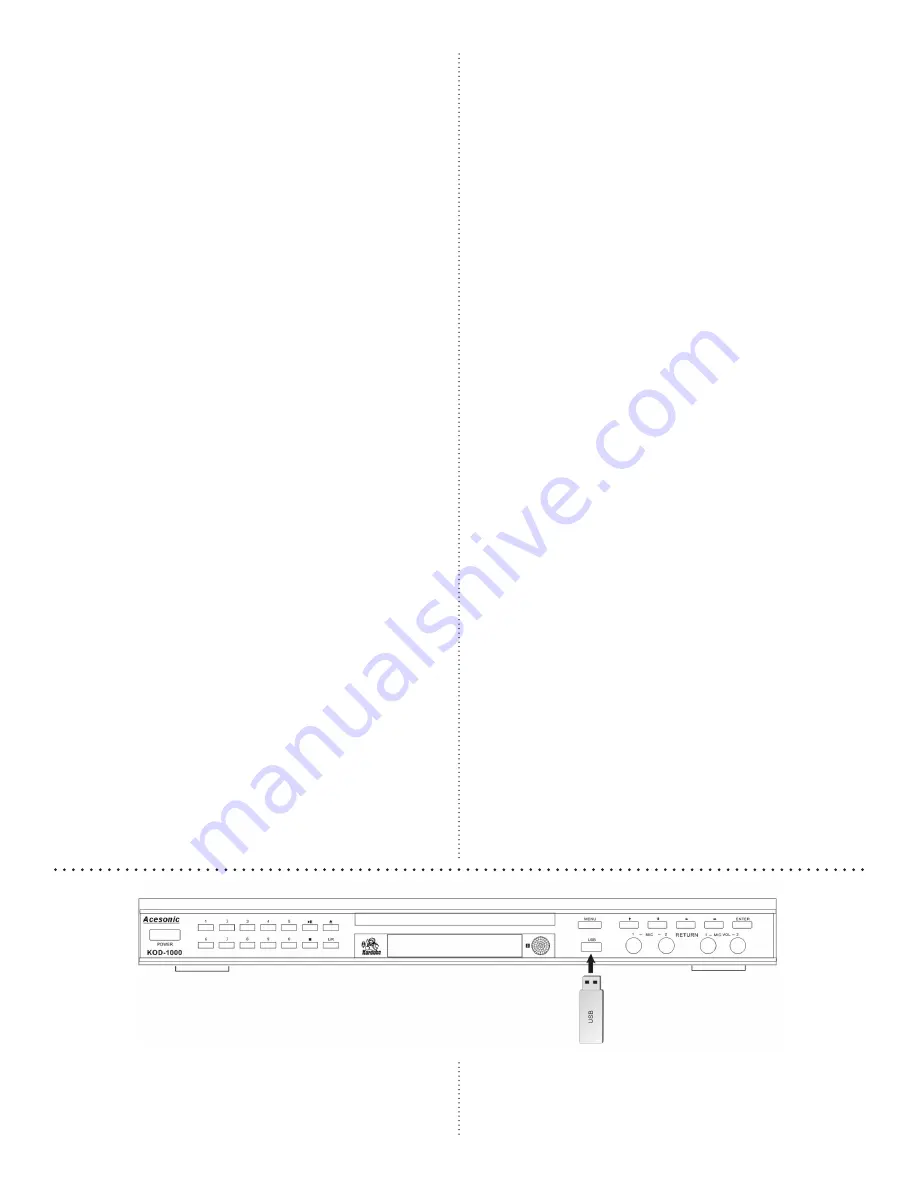
External Storage Devices

The KOD-1000 can accept music from most USB 

drives. These drives are also called thumb and flash 

drives and are often used to store and transport music 

files. To access the music on these devices, insert the 

flash drive or the USB cable into the USB port illus-

trated above. See Page 18 for information on access-

Содержание KOD-1000

Страница 1: ...pairs Care and cleaning Use a slightly damp cloth to clean the front panel and other surfaces of the KOD 1000 Do not use the device in areas that are wet or prone to dampness Always allow sufficient r...

Страница 2: ...is level dry and has a moderate temperature all year Do not use the player on its side Do not place the player next to items that vibrate such as speakers Do not put heavy objects on the top of your p...

Страница 3: ...in this manual are com patible with all discs Video Signal Formats The KOD 1000 supports NTSC a broadcast format generally found in the U S Canada most countries in South America Japan South Korea an...

Страница 4: ...hese jacks connect micro phones to the KOD 1000 through 1 4 inch plugs 13 ENTER Press this button to confirm selections 14 MIC 1 2 VOLUME KNOBS Use these knobs to control the volume of the microphones...

Страница 5: ...his button to record songs from VCD and CD G discs to the internal hard drive of the KOD 1000 See page 14 for more details 4 FAVORITE Press button to add songs to the MY FAVOR ITE folder of the KOD 10...

Страница 6: ...oice a full step 27 ENTER Press this button to enter a selection 28 MUSIC VOLUME CONTROL Press these buttons to raise or lower the volume of the music 29 PREVIOUS NEXT PAGE CONTROL Press these buttons...

Страница 7: ...Component video outputs and inputs allow for much better video than S video or RCA video Inputs for the microphones will be found on the front of the KOD 1000 The player also allows extended use with...

Страница 8: ...ur KOD 1000 to your video and audio components refer to the diagram below to connect the player to the power cord and an appropriate electrical outlet Please note that the KOD 1000 uses 100 V to 240 V...

Страница 9: ...disc into the player You are now in Hard Disk Drive Mode 3 Push the MENU key on your remote control or on the front panel of the player 4 You will see the following menu 5 Navigate through the menus u...

Страница 10: ...r EN TER on your remote control 4 Select what the song s language is in Use your remote control s DIRECTION CONTROL to navigate the menu or go to the letter or character directly by pressing its corre...

Страница 11: ...English and a Chinese character will appear in the upper right corner for searches in Chinese for example 2 Songs can be accessed by the first letter of each word in their title by their correspondin...

Страница 12: ...would be for the letters J and S 3 The NUMERIC KEYS have their correspond ing letters printed below them A can be chosen by pushing 2 once B can be chosen by pushing 2 twice and C can be chosen by pus...

Страница 13: ...isplayed press ENTER Use the DIRECTION CON TROLS to choose a song OK adds it to the queue 5 Once you are done searching for songs in your selection push MENU The list of songs displayed in your queue...

Страница 14: ...queue 3 Press the FAVORITES button The song will be added to MY FAVORITES To delete a song from My Favorites 1 Enter the MY FAVORITES folder in Text or Icon Mode 2 Search for and highlight the song S...

Страница 15: ...may be edited includes Number The numeric code of the song Entering this code will select this song but if it s just been added and has a number of 0001 to 9999 this number must be changed If it is n...

Страница 16: ...this button to increase the volume level of microphone audio 17 ECHO BUTTON Press the button to raise the echo level 18 DIRECTION Use these buttons to navigate the selection menus 19 PRIORITY BUTTON U...

Страница 17: ...ar on the screen remote control NUMERIC KEYS 0 9 and the DIRECTIONAL CONTROL buttons can be used for title and chapter selection For example to select track 12 on a remote control Press the 10 NUMERIC...

Страница 18: ...f a video 1 Press the A B SEGMENT REPEAT CONTROL button on the remote control to repeat a segment of a track 2 Press the A B SEGMENT REPEAT CONTROL again button once at the start of what you d like re...

Страница 19: ...odify 4 Press OK to confirm the language that you choose to change Language Sub Menu English Chinese Traditional Chinese Simplified Thai MENU SETUP If you select BMP MENU option the menu list will be...

Страница 20: ...tions you want to modify 4 Press OK to confirm change options if available Play Interlude Sub Menu No Interlude Interlude Timer When a song completes the selected time interval will elapse before the...

Страница 21: ...KEY to show SUB MENU 3 Press Direction KEY for ON or OFF 4 Press OK to confirm it NOTE The screen will change to Screen Saver mode if the player is idle for 20 minutes Video 1 Press Direction KEY to...

Страница 22: ...1 Press Direction KEY to choose AUDIO LANGUAGE 2 Press Direction KEY to show SUB MENU 3 Press Direction KEY to select language 4 Press OK to confirm it Subtitle Language 1 Press Direction KEY to choos...

Страница 23: ...R MIX MONO Troubleshooting For common problems please consult the chart below If these suggestions do not solve your problem please call Acesonic Customer Service at 626 820 0645 No Sound Inspect the...

Страница 24: ...Increasing the distance between the radio TV equipment and the KOD 1000 Connecting the radio TV equipment to an outlet on a different circuit than the one into which the receiver is plugged If necess...

Страница 25: ...cord or plug is damaged liquids have been spilled or objects introduced into the enclosure the device has been exposed to rain or moisture the product does not operate normally or it has been dropped...

Страница 26: ...ages of using Hard Disk Drive Mode is faster access to your karaoke library To enter hard drive mode simply start up the KOD 1000 without a disc JPEG JPG Stands for Joint Photographic Experts Group A...

Страница 27: ...r 6 How may songs I can record to my KOD 1000 HDD This depends entirely on the HDD capacity and the file format s in which you choose to save your songs 7 How do I use the songbook file on the HDD Use...

Страница 28: ...fetime Technical Support Designed in U S A Technical Support 626 820 0645 techsupport acesonic com Web site www acesonic com Acesonic USA Inc 161 S 8th Avenue City of Industry CA 91746 3208 U S A 2011...

Отзывы: