background image

4

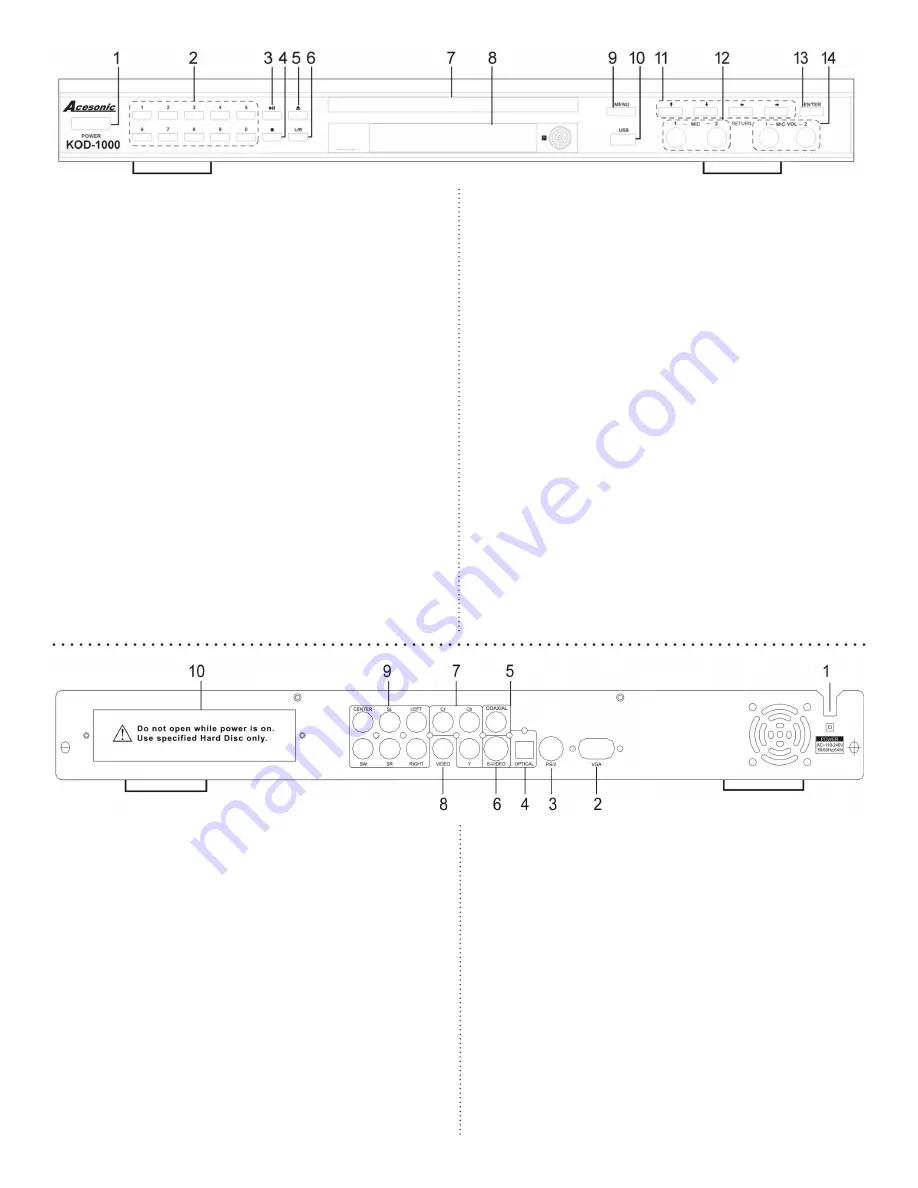
Front Panel Functions and Operation

1. 

POWER

: Press this button to toggle the KOD-

1000 on and off. Turning off the power on the player’s 

front panel, however, will not allow it to be powered 

on by the remote control.
2. 

NUMERIC KEYS

: Press these buttons to input 

track selections and song numbers.
3. 

PLAY/PAUSE

: Press this button to begin playing; 

press again to pause and press it again to resume.
4. 

STOP

: Press this button to stop playing the selec-

tion.
5. 

OPEN/CLOSE

: Press this button to open or close 

the disc tray.
6. 

L/R

: Press this button to isolate the left or right 

audio channel, or to select mono or stereo output for 

DVDs and CDs.
7. 

DISC TRAY

: To open, press OPEN/CLOSE. 

Place the disc in the tray. Press OPEN/CLOSE again 

or the PLAY/PAUSE button to close. The disc should 

play immediately. 
8. 

DISPLAY WINDOW

: Time, disc format or song 

number is displayed here.
9. 

MENU

: Press this button to display categories in 

Hard Disk Drive Mode and a chapter list when play-

ing a DVD.
10. 

USB INTERFACE

: This interface allows the 

KOD-1000 to access mass storage devices such as 

USB/flash/thumb drives as long as they are formatted 

as FAT32 (See Page 6 for more information).
11. 

DIRECTION

: Use these button to navigate on 

screen menus. 
12. 

MIC 1 & 2 JACKS

: These jacks connect micro-

phones to the KOD-1000 through 1/4 inch plugs.
13. 

ENTER

: Press this button to confirm selections.

14. 

MIC 1 & 2 VOLUME KNOBS

: Use these knobs 

to control the volume of the microphones.

Back Panel Functions and Operation

1. 

ELECTRIC PLUG

: An auto-detect power supply 

(100-240 V, 50-60Hz) connects to alternating current.
2. 

VGA PORT

: This port connects the KOD-1000 to 

a computer monitor. The RCA Video out will con-

tinue to work if the VGA port is enabled. For more 

information about using this port, see Page 7. 
3. 

PS/2 KEYBOARD

: This port connects to a com-

puter keyboard. For more information, see Page 7.
4. 

OPTICAL OUTPUT

: This connection is used 

for 5.1 surround sound (Dolby Digital and DTS). The 

SETUP menu must be set for this output. See Page 

22 about setting up the optical output. Microphones 

don’t work when this output is in use. 
5. 

COAXIAL OUTPUT

: This connection is used for 

5.1 surround sound (Dolby Digital and DTS). The 

SETUP menu must be set for this output. Micro-

phones will not work when this output is in use.
6. 

S-VIDEO OUTPUT

: This connection is for the 

s-video output. It is of better quality than the RCA 

Video Output, but not as good as the component 

output. See page 21 to set this output.
7. 

COMPONENT OUTPUT

: This connection is 

usually found on high definition televisions. Change 

Video setting to INTERLACE-YUV before connect-

ing a component cable or no picture will show on TV. 

See page 21 for more information.

Содержание KOD-1000

Страница 1: ...pairs Care and cleaning Use a slightly damp cloth to clean the front panel and other surfaces of the KOD 1000 Do not use the device in areas that are wet or prone to dampness Always allow sufficient r...

Страница 2: ...is level dry and has a moderate temperature all year Do not use the player on its side Do not place the player next to items that vibrate such as speakers Do not put heavy objects on the top of your p...

Страница 3: ...in this manual are com patible with all discs Video Signal Formats The KOD 1000 supports NTSC a broadcast format generally found in the U S Canada most countries in South America Japan South Korea an...

Страница 4: ...hese jacks connect micro phones to the KOD 1000 through 1 4 inch plugs 13 ENTER Press this button to confirm selections 14 MIC 1 2 VOLUME KNOBS Use these knobs to control the volume of the microphones...

Страница 5: ...his button to record songs from VCD and CD G discs to the internal hard drive of the KOD 1000 See page 14 for more details 4 FAVORITE Press button to add songs to the MY FAVOR ITE folder of the KOD 10...

Страница 6: ...oice a full step 27 ENTER Press this button to enter a selection 28 MUSIC VOLUME CONTROL Press these buttons to raise or lower the volume of the music 29 PREVIOUS NEXT PAGE CONTROL Press these buttons...

Страница 7: ...Component video outputs and inputs allow for much better video than S video or RCA video Inputs for the microphones will be found on the front of the KOD 1000 The player also allows extended use with...

Страница 8: ...ur KOD 1000 to your video and audio components refer to the diagram below to connect the player to the power cord and an appropriate electrical outlet Please note that the KOD 1000 uses 100 V to 240 V...

Страница 9: ...disc into the player You are now in Hard Disk Drive Mode 3 Push the MENU key on your remote control or on the front panel of the player 4 You will see the following menu 5 Navigate through the menus u...

Страница 10: ...r EN TER on your remote control 4 Select what the song s language is in Use your remote control s DIRECTION CONTROL to navigate the menu or go to the letter or character directly by pressing its corre...

Страница 11: ...English and a Chinese character will appear in the upper right corner for searches in Chinese for example 2 Songs can be accessed by the first letter of each word in their title by their correspondin...

Страница 12: ...would be for the letters J and S 3 The NUMERIC KEYS have their correspond ing letters printed below them A can be chosen by pushing 2 once B can be chosen by pushing 2 twice and C can be chosen by pus...

Страница 13: ...isplayed press ENTER Use the DIRECTION CON TROLS to choose a song OK adds it to the queue 5 Once you are done searching for songs in your selection push MENU The list of songs displayed in your queue...

Страница 14: ...queue 3 Press the FAVORITES button The song will be added to MY FAVORITES To delete a song from My Favorites 1 Enter the MY FAVORITES folder in Text or Icon Mode 2 Search for and highlight the song S...

Страница 15: ...may be edited includes Number The numeric code of the song Entering this code will select this song but if it s just been added and has a number of 0001 to 9999 this number must be changed If it is n...

Страница 16: ...this button to increase the volume level of microphone audio 17 ECHO BUTTON Press the button to raise the echo level 18 DIRECTION Use these buttons to navigate the selection menus 19 PRIORITY BUTTON U...

Страница 17: ...ar on the screen remote control NUMERIC KEYS 0 9 and the DIRECTIONAL CONTROL buttons can be used for title and chapter selection For example to select track 12 on a remote control Press the 10 NUMERIC...

Страница 18: ...f a video 1 Press the A B SEGMENT REPEAT CONTROL button on the remote control to repeat a segment of a track 2 Press the A B SEGMENT REPEAT CONTROL again button once at the start of what you d like re...

Страница 19: ...odify 4 Press OK to confirm the language that you choose to change Language Sub Menu English Chinese Traditional Chinese Simplified Thai MENU SETUP If you select BMP MENU option the menu list will be...

Страница 20: ...tions you want to modify 4 Press OK to confirm change options if available Play Interlude Sub Menu No Interlude Interlude Timer When a song completes the selected time interval will elapse before the...

Страница 21: ...KEY to show SUB MENU 3 Press Direction KEY for ON or OFF 4 Press OK to confirm it NOTE The screen will change to Screen Saver mode if the player is idle for 20 minutes Video 1 Press Direction KEY to...

Страница 22: ...1 Press Direction KEY to choose AUDIO LANGUAGE 2 Press Direction KEY to show SUB MENU 3 Press Direction KEY to select language 4 Press OK to confirm it Subtitle Language 1 Press Direction KEY to choos...

Страница 23: ...R MIX MONO Troubleshooting For common problems please consult the chart below If these suggestions do not solve your problem please call Acesonic Customer Service at 626 820 0645 No Sound Inspect the...

Страница 24: ...Increasing the distance between the radio TV equipment and the KOD 1000 Connecting the radio TV equipment to an outlet on a different circuit than the one into which the receiver is plugged If necess...

Страница 25: ...cord or plug is damaged liquids have been spilled or objects introduced into the enclosure the device has been exposed to rain or moisture the product does not operate normally or it has been dropped...

Страница 26: ...ages of using Hard Disk Drive Mode is faster access to your karaoke library To enter hard drive mode simply start up the KOD 1000 without a disc JPEG JPG Stands for Joint Photographic Experts Group A...

Страница 27: ...r 6 How may songs I can record to my KOD 1000 HDD This depends entirely on the HDD capacity and the file format s in which you choose to save your songs 7 How do I use the songbook file on the HDD Use...

Страница 28: ...fetime Technical Support Designed in U S A Technical Support 626 820 0645 techsupport acesonic com Web site www acesonic com Acesonic USA Inc 161 S 8th Avenue City of Industry CA 91746 3208 U S A 2011...

Отзывы: