Chapter 4
97
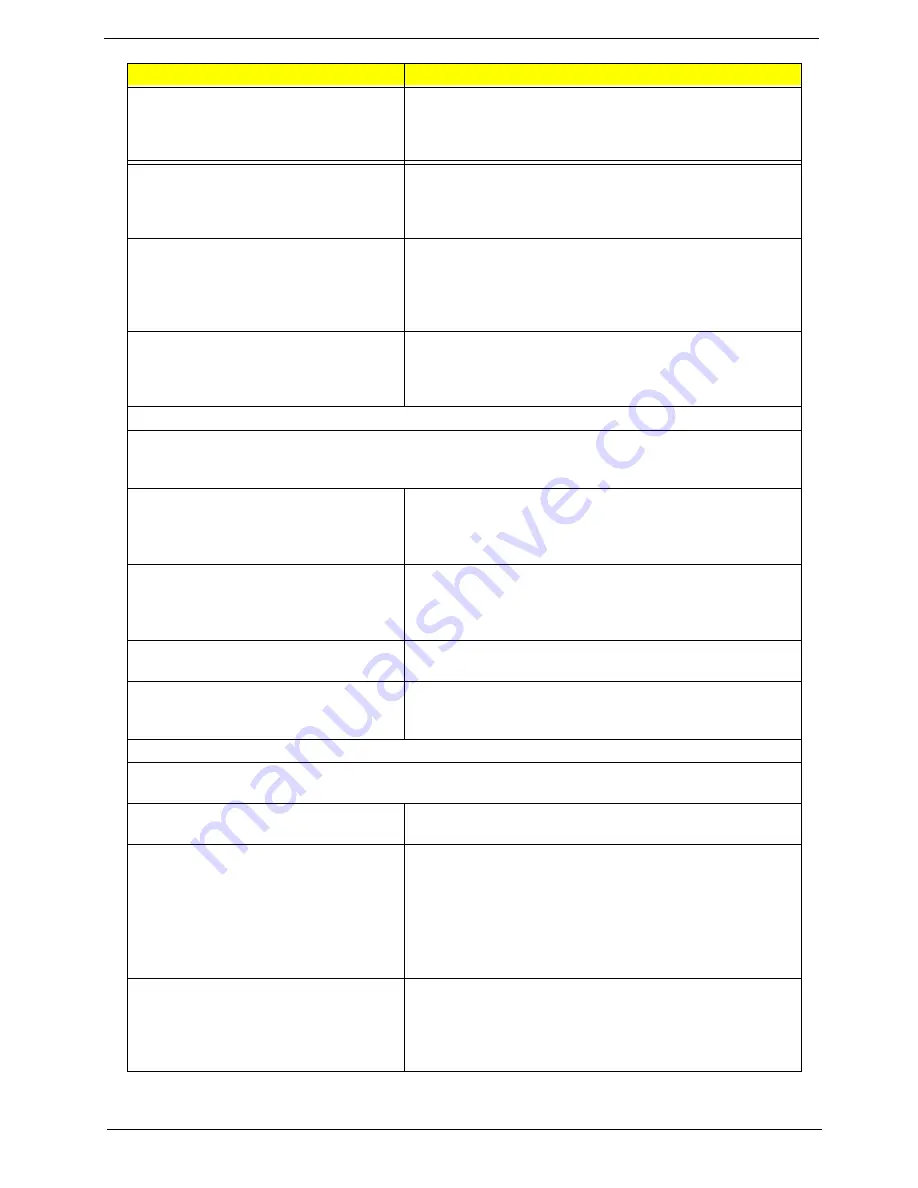
Diskette drive read/write error.
1. Diskette.
2. Diskette drive cable.
3. Diskette drive.
4. Main board.
Diskette drive LED comes on for more
than 2 minutes when reading data.
1. Diskette
2. Diskette drive connection/cable
3. Diskette drive
4. Main board
Diskette drive LED fails to light, and the
drive is unable to access for more than 2
minutes.
1. Diskette
2. Diskette drive power
3. Diskette drive connection/cable
4. Diskette drive
5. Main board
Diskette drive test failed.
1. Diskette
2. Diskette drive
3. Diskette drive cable
4. Main board
Hard Disk Drive
NOTE:
Ensure hard disk drive is configured correctly in BIOS Setup, cable/jumper are set correctly
before diagnosing any hard disk drive problems. (If only one drive is installed, please make
sure the drive is connected to master connector or the drive is set to master.)
Hard disk drive test failed.
1. Enter BIOS Setup and Load default settings.
2. Hard disk drive cable.
3. Hard disk drive.
4. Main board.
Hard disk drive cannot format
completely.
1. Enter BIOS Setup and Load default settings.
2. Hard disk drive cable.
3. Hard disk drive.
4. Main board.
Hard disk drive has write error.
1. Enter BIOS Setup and Load default settings.
2. Hard disk drive.
Hard disk drive LED fails to light, but
system operates normally.
1. With the system power on, measure the voltage of hard
disk LED connector.
2. Hard drive LED cable.
CD/DVD-ROM Drive
NOTE:
Ensure CD/DVD-ROM drive is configured correctly in BIOS Setup, cable/jumper are set
correctly and its laser beam is clean before diagnosing any CD/DVD-ROM drive problems.
CD/DVD-ROM drive LED doesn't come
on but works normally.
1. CD/DVD-ROM drive
CD/DVD-ROM drive LED flashes for
more than 30 seconds before LED
shutting off.
Software asks to reinstall disc.
Software displays a reading CD/DVD
error.
1. CD/DVD-ROM may have dirt or foreign material on it.
Check with a known good disc.
2. CD/DVD-ROM is not inserted properly.
3. CD/DVD-ROM is damaged.
CD/DVD-ROM drive cannot load or eject
when the system is turned on and its
eject button is pressed and held.
1. Disconnect all cables from CD/DVD-ROM drive except
power cable, then press eject button to try to unload the
disk.
2. CD/DVD-ROM drive power.
3. CD/DVD-ROM drive
Error Symptom
Action/FRU
Содержание Veriton 7900Pro
Страница 17: ...Chapter 1 11 Rear panel Veriton 5900Pro rear view Veriton 6900Pro rear view ...
Страница 24: ...18 Chapter 1 ...
Страница 34: ...28 Chapter 1 ...
Страница 42: ...36 Chapter 2 Total Memory Base Upper Extended Total Memory N A Parameter Description Options ...
Страница 73: ...Chapter 3 67 2 Detach the USB board with its upper bracket then pull out the USB audio cables ...
Страница 79: ...Chapter 3 73 2 Detach the ODD module from the chassis 3 Detach the card reader carefully ...
Страница 82: ...76 Chapter 3 4 Then remove the power supply from the chassis ...
Страница 90: ...84 Chapter 3 3 Remove the four screws holding the system fan 4 Detach the system fan ...
Страница 92: ...86 Chapter 3 4 Remove the screw fastening the LED module then detach the LED module ...
Страница 108: ...102 Chapter 4 ...
Страница 112: ...106 Chapter 6 Veriton 7900Pro Exploded Diagram ...
Страница 113: ...Chapter 6 107 Veriton 6900Pro Exploded Diagram ...
Страница 114: ...108 Chapter 6 Veriton 5900Pro Exploded Diagram 1 3 4 5 6 7 8 9 10 11 3 4 5 6 7 8 9 21 22 23 FAN60 60 25 ...
Страница 116: ...110 Chapter 6 ...


