


Chapter 4
82
5.
Select CD to Disk Revocery.
6.
Put the Recovery CD to the optical drive. This step is to create image files to the system, you do not have
to put the Recovery CD to the optical drive in order. Place one Recovery CD to the drive at one time till
you finish all Recovery CDs.
After you place the Recovery CD to the optical drive, you will see the display below.
Содержание TravelMate 4150
Страница 9: ...X Table of Contents...
Страница 14: ...Chapter 1 5 Mainboard Placement Top View...
Страница 15: ...6 Chapter 1 Bottom View...
Страница 96: ...87 Chapter 4 8 You will see the screen displaying PASS when the system has buit NAPP Master hard disc drive...
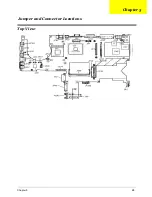
Страница 97: ...Chapter 5 88 Top View Jumper and Connector Locations Chapter 5...
Страница 98: ...89 Chapter 5 Rear View...
Страница 100: ...91 Chapter 5 VGA Board Item Description JP1 VGA Board to MB connector JP2 LCD Connector...
Страница 103: ...Chapter 5 94 Hot Swap ODD Board Item Description JP1 Hot Swap JP2 ODD device Connector...
Страница 104: ...95 Chapter 5 DVI Board Item Description JP1 DVI Board Connector...
Страница 105: ...Chapter 5 96 Clear CMOS...
Страница 107: ...98 Chapter 6 Exploded Diagram...
Страница 108: ...Chapter 6 99...
Страница 126: ...117 Appendix B...