


58
Chapter 3
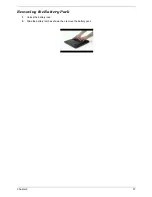
Removing the HDD and ODD Module
1.
Remove the one screw holding the HDD cover.
2.
Detach the HDD module then remove it.
3.
Press the latch and detach the ODD module from the system.
Removing the RAM
1.
Remove the one screw that secure the RAM door and remove it away.
2.
Pop up the memory then remove it.
Removing the Keyboard
1.
Pull the strip cover.
2.
Remove the two screws to release the keyboard. Pull the keyboard forward and turn it over.
3.
Release the tab to disconnect the FFC then take the entire keyboard out from the system
4.
Remove the one screw to release the power switch board from the system.
5.
Detach the power switch board.
Содержание TravelMate 4150
Страница 9: ...X Table of Contents...
Страница 14: ...Chapter 1 5 Mainboard Placement Top View...
Страница 15: ...6 Chapter 1 Bottom View...
Страница 96: ...87 Chapter 4 8 You will see the screen displaying PASS when the system has buit NAPP Master hard disc drive...
Страница 97: ...Chapter 5 88 Top View Jumper and Connector Locations Chapter 5...
Страница 98: ...89 Chapter 5 Rear View...
Страница 100: ...91 Chapter 5 VGA Board Item Description JP1 VGA Board to MB connector JP2 LCD Connector...
Страница 103: ...Chapter 5 94 Hot Swap ODD Board Item Description JP1 Hot Swap JP2 ODD device Connector...
Страница 104: ...95 Chapter 5 DVI Board Item Description JP1 DVI Board Connector...
Страница 105: ...Chapter 5 96 Clear CMOS...
Страница 107: ...98 Chapter 6 Exploded Diagram...
Страница 108: ...Chapter 6 99...
Страница 126: ...117 Appendix B...


