background image

63

Custom Setting

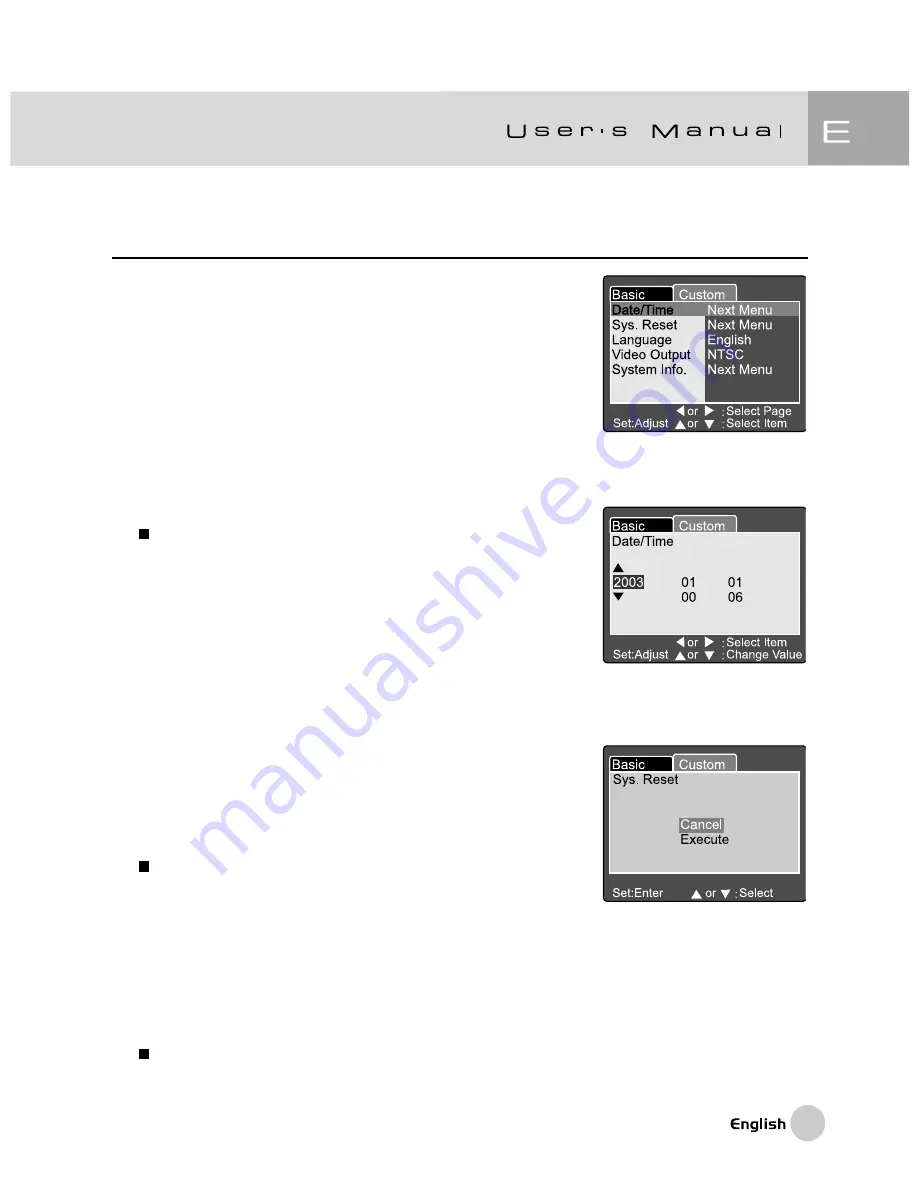
The Custom Setting contains 5 items: Date/Time,
System Reset, Language, Video Output and System
Information.

Date/Time

Set the Date and Time.
1. Set the mode dial to [

SET-UP

] and power on the

camera.

2. Use the  

c

 or 

d

  button to select Date/Time.

3. Press the 

SET

 button.

The Date/Time menu is displayed on the LCD
monitor.

4. Use the 

e

or 

f

 button to select the item to set.

5. Use the 

c

 or 

d

 button to set the value for each

item.

6. Press the 

SET

 button to confirm the setting after all

item values are set.

System Reset

Set all the parameter to default settings.
1. Set the mode dial to [

SET-UP

] and power on the

camera.

2. Use the 

c

 or 

d

 button to select System Reset.

3. Press the 

SET

 button.

The System Reset menu is displayed on
the LCD monitor.

4. Use the 

c

 or 

d

 button to select Execute/Cancel.

[Execute]

: Return to default setting.

[Cancel]

:

Retain the current setting.

5. Press the 

SET

 button to confirm the setting.

Note:

Date/Time cannot be reset.

Содержание CR-5130

Страница 1: ...ations However there is no guarantee that interference will not occur in a particular installation If this equipment does cause harmful interference to radio or television reception which can be determined by turning the equipment off and on the user is encouraged to try to correct the interference by one or more of the following measures Reorient or relocate the receiving antenna Increase the sep...

Страница 2: ...and accessories that come with your camera may be different from those described in this manual This is due to the fact that different retailers often specify slightly different product inclusions and accessories to suit their market requirements customer demographics and geographical preferences Products very often vary between retailers especially with accessories such as batteries chargers AC a...

Страница 3: ...rical shock Do not place the camera in any unstable locations such as on a wobbly table or slopping surface where the camera may fall or tip over and cause damage If the camera has been dropped or if the camera case has been damaged turn the camera off and then disconnect the power source Then contact to your dealer or a local authorized service facility Do not continue to use the camera as this m...

Страница 4: ... camera from the power source for safety Failure to do so could result in a fire Do not use battery other than those specified for use with the camera The use of unsuitable battery may result in the battery splitting or leaking and causing a fire injury or soiling of the battery compartment When fitting battery into the camera check the polarity markings on the battery and to ensure that you inser...

Страница 5: ...Viewfinder LED Indicator 14 LCD Monitor Information 15 GETTING STARTED 17 Installing the Battery 17 Using an AC Power Adapter 18 Charging the Battery 19 Inserting an SD Memory Card 20 Attaching the Strap 21 TAKING PHOTOGRAPHS 22 Photography in the Auto Capture Mode 22 Using the Viewfinder 22 Using the LCD Monitor 23 LCD Monitor Display Capture Mode 23 ...

Страница 6: ...hutter Speed priority Mode Tv 34 Photography in the Aperture priority Mode Av 35 Photography in the Full Manual Mode M 36 Photography in the Portrait Mode 36 Photography in the Sports Mode 37 Photography in the Night Scene Mode 37 Making Movies 38 CHANGING THE PRESET CONDITIONS IN CAPTURE MODE 39 Picture setting 40 Size 40 Quality 40 Sharpness 41 Contrast 41 Color 41 Function setting 42 Capture Mo...

Страница 7: ...S 47 Playing Back Photographed images Single Frame Playback 47 Voice Record 48 Playing Back Movies 49 Thumbnail Display 51 Zoom Playback 52 Slideshow Display 53 DPOF Digital Print Order Format 54 Protect 55 LCD Brightness 56 LCD Monitor Display Playback Mode 56 ERASINGIMAGES 57 ErasingSingleImage 57 ErasingAllImages 57 ...

Страница 8: ... 63 Date Time 63 System Reset 63 Language 64 Video Output 64 System Information 65 TRANSFERRING RECORDED IMAGES MOVIES TO YOUR COMPUTER 66 Step 1 Installing the USB Driver 67 Step 2 Connecting the Camera to Your Computer 67 Step 3 Downloading Images Movies 67 INSTALLINGNTIPHOTOSUITE 69 CONNECTINGTHECAMERATOOTHERDEVICES 70 CAMERA SPECIFICATIONS 71 ...

Страница 9: ...phed Even if the camera s power is turned OFF the images saved on the SD Memory Card are not erased SD Memory Card can be repeated read and written Images you have taken can be downloaded to your computer using the USB cable USB driver required for Win 98 and Mac OS 8 6 You can enhance and retouch your images on your computer by using the provided editing software or image editing software you may...

Страница 10: ...In the event that any item is missing or if you find any mismatch or damage promptly contact to your dealer 1 x Digital camera 1 x Camera pouch 1 x SD card 1 x Rechargeable Li ion battery pack 1 x AC Mains Adapter Charger 1 x Camera strap 1 x USB cable 1 x TV cable Video cable 1 x User s manual ...

Страница 11: ...W THE CAMERA Front View 1 Self timer AF support LED 2 Optical viewfinder 3 Built in flash 4 Shutter button 5 Lens lens cover 6 POWER Power button 7 MIC Microphone 8 Mode dial 9 DC IN 5V terminal 10 USB A V OUT terminal ...

Страница 12: ... Arrow button right Flash button 5 Arrow button down Self timer button interval 1 Diopter adjustment dial 2 Viewfinder 3 Viewfinder LED 4 Zoom button 5 Speaker 6 Menu button 7 Display button 8 Strap attachment 9 Command dial 10 Delete button 11 Tripod socket 12 Battery SD Memory Card cover 13 LCD monitor ...

Страница 13: ...al 1 Auto mode 2 P Program mode 3 Tv Tv Shutter Speed priority 4 Av Av Aperture priority 5 M Manual mode 6 Portrait mode 7 Sports mode 8 Night scene mode 9 Movie mode 10 Set up mode 11 PC PC mode 12 Playback mode ...

Страница 14: ...harging button held half down Card is inserted Red On WritingtoSDMemory Accessing of SD In connecting to Cardinprogress MemoryCardin PC SDMemory Error progress Card isinserted Flashing When the image is Interval timer not in focus standing by Orange On Processing images Disconnection No battery Charging of flash SDMemoryCard in progress is inserted Flashing Hardware malfunction SD Memory Card is n...

Страница 15: ...15 LCD Monitor Information AUTO capture mode Program Tv Av Manual Portrait Sports Night scene mode ...

Страница 16: ...16 Movie mode Playback mode Standard Playback mode Detailed information ...

Страница 17: ...far as it can go 4 Close the battery SD Memory Card cover To remove the battery Open the battery SD Memory Card cover and then release the battery lock lever After the battery is slightly ejected pull out the battery slowly Note Use only the specified battery type Lithium Ion If you are not going to use the battery for an extended period of time remove it from the camera to prevent leakage or corr...

Страница 18: ...the other end of the AC power adapter to a power outlet Note Make sure to use only the AC power adapter specified for the camera Damage caused bythe use of an incorrect adapter is not covered under the warranty Using an AC power adapter while transferring images to your computer in order to prevent unexpected automatic power off of the camera ...

Страница 19: ...under the warranty When the charging is not started even if proceeding the operation above Press power button on at any mode after LCD indication appears then turn the power off Never use the battery unspecified for the camera Do not place the camera in hot temperature Use it at room temperature If you open the battery cover without removing the battery the power will not be quit If you remove the...

Страница 20: ... Close the battery SD Memory Card cover To remove the SD Memory Card make sure the camera is off Open the battery SD Memory Card card cover Press lightly on the edge of the memory card and it will eject Note If the camera is powered on without the card the NO CARD message appears on the LCD monitor To prevent valuable data from being accidentally erased from an SD Memory Card you can slide the wri...

Страница 21: ...ntal slippage during the use always use the strap Attach the hand strap as follows 1 Thread the small loop of the hand strap through the strap eyelet on the camera 2 Pull the large loop through the small loop until the strap is firmly secured ...

Страница 22: ...and examine all details However this may also consume you more battery power Using the Viewfinder 1 Turn the camera on by pressing the POWER button 2 Set the mode dial to 3 Compose your shot in the viewfinder Turn the diopter adjustment dial until the image appears clearly within the viewfinder 4 Press the shutter button down halfway then press it down fully The viewfinder LED indicator lights red...

Страница 23: ...D is activated at Auto and Macro mode when the LV value is under 6 LCD Monitor Display Capture Mode The Display button can select display format Whether in Still Image or Movie mode preview image with full OSD is displayed OSD on screen display full display OSD display OFF LCD monitor OFF Note The image in the LCD monitor darkens in strong sunlight or bright light This is not a malfunction Using t...

Страница 24: ...n 1 Set the mode dial to one of P Tv Av M and power on the camera 2 If required turn on the LCD monitor by pressing the button 3 Compose the picture by using the button Pressing the button zooms in on the subject and enlarges the subject on the LCD monitor Pressing the button provides a wider angle picture The lens position moves according to the zoom button setting 4 Press the shutter button down...

Страница 25: ...he LCD monitor by pressing the button 3 To enable the digital zoom is as follows a Press the MENU button b Press the e or fbutton to select Function page c Press the c or dbutton to select Digital Zoom and press the SET button d Press the c or d button again to select ON and press the SET button e Press the MENU button f To activate the digital zoom press the button completely and hold it until th...

Страница 26: ...mpty To activate the self timer by pressing the shutter button After selecting this mode self timer icon displays on LCD monitor and then LED on the front panel blinks fast for the last 3 seconds Using the self timer allows you to get into the scene when taking group images 1 Secure the camera to a tripod or place it on a stable surface 2 Set the mode dial to one of P Tv Av M and power on the came...

Страница 27: ...e to your circumstances If you change the flash mode the camera will retain that setting even if the camera is turned off 1 Set the mode dial to one of P Tv Av M and power on the camera 2 Press the button repeatedly until your desired flash mode appears When you toggle the flash button at mode the available flash modes are displayed in the following order 3 Compose the picture and press the shutte...

Страница 28: ...s mode when taking images of people and animals in low light conditions Forced Flash The flash will always fire regardless of the surrounding brightness Select this mode for recording images with high contrast back lighting and deep shadows Flash Off The flash will not fire Select this mode when taking images in a place where flash photography is prohibited or when the distance to the subject is b...

Страница 29: ...will focus on subjects in a distance of 3m to take photos 1m The camera will focus on subjects in a distance of 1m to take photos 3 Compose the picture 4 Press the shutter down halfway then press it down fully Note When shooting a close up in Macro mode use the LCD monitor to compose your shot avoiding the off center parallax phenomenon There is not a distinct point subject range at which Normal m...

Страница 30: ... mode Backlight compensation capturing mode and Exposure compensation adjusting mode cycling 1 Set the mode dial to one of P Tv Av and power on the camera 2 Toggle the button to select exposure compensation mode or backlight compensation mode 3 When exposure compensation mode is selected rotate the Command dial to adjust the exposure and press the button again to confirm Rotate the Command dial to...

Страница 31: ... as shots of green or dark foliage Note While selecting Backlight compensation capturing mode the EV value sets to 1 3 EV automatically and setting of exposure compensation value is ignored In Exposure compensation the default value is 0 0EV The setting range is as follows 2 0 1 7 1 3 1 0 0 7 0 3 0 default 0 3 0 7 1 0 1 3 1 7 2 0 Exposure Compensation cannot be set at mode The ideal brightness som...

Страница 32: ...s are recommended for printed output and situations requiring the finest detail Smaller quality images take up less memory space and may be quite suitable for sharing images via e mail in a report or on a web page To change image size or image quality 1 Set the mode dial to one of P Tv Av M and power on the camera 2 Press the MENU button The menu screen appears 3 Select Size or Quality by using th...

Страница 33: ...w show the approximate number of images that can be stored on Still Image and Movie Image mod The above data shows the standard testing results The actual capacity varies according to the shooting conditions and settings ...

Страница 34: ...his mode photographs are taken with the priority given to shutter speed The camera automatically sets the aperture value according to the shutter speed A fast shutter speed produces a photograph that looks as if a moving subject is still A slow shutter speed produces as photograph that makes you feel that it is flowing 1 Set the mode dial to Tv and power on the camera 2 Rotate the Command dial to ...

Страница 35: ...es A large aperture value produces sharp images on both close objects and distant objects like landscapes The larger the aperture value the larger the area for sharp images 1 Set the mode dial to Av and power on the camera 2 Rotate the Command dial to adjust the aperture value The aperture value and the shutter speed corresponding to that value are displayed on the LCD monitor 3 Compose the pictur...

Страница 36: ...tton to select the aperture or shutter speed Available function is displayed in blue on the LCD monitor Rotate the Command dial to adjust the value 3 Compose the picture press the shutter button down halfway and press it down fully Photography in the Portrait Mode Select this mode to make people stand out with the background out of focus Flash setting is fixed to red eye reduction mode automatical...

Страница 37: ... Press the shutter button down halfway and press it down fully Photography in the Night Scene Mode Select this mode to take photographs of people against a dusk or nigh time background Flash setting is fixed to Slow Synchro the flash is fired at a slower shutter speed 1 Set the mode dial to and power on the camera 2 Compose the picture 3 Press the shutter button down halfway and press it down full...

Страница 38: ...fway and press it down fully Photography begins REC appears on the LCD monitor 3 To stop making movies press the shutter button down fully again If you do not do this photography is automatically stopped when the maximum size that a single movie can be recorded is reached Note In mode EV compensation cannot be set or activated In mode the flash mode is automatically set to OFF The image size durin...

Страница 39: ...s the MENU button The menu screen is displayed 3 Use the e or f button to select the menu page 4 Use the c or d button to select the desired item and press the SET button The options are displayed 5 Use the c or d button to select the desired setting and press the SET button This saves the settings and returns the display to menu screen 6 To exit the menu screen press the MENU button The camera is...

Страница 40: ...960 pixels 640 x 480 640 x 480 pixels Note In the mode image size available in this setting is 320 x 240 pixels and 160 x 120 pixels Quality Set the quality compression ratio sharpness at which the image is to be recorded Fine 1 4compression still image 1 10 compression video clip Standard 1 8 compression still image 1 14 compression video clip Economy 1 16 compression still image 1 19 compression...

Страница 41: ...This function is not available in the mode Contrast Set the contrast of the image to be photographed Hard Hard contrast Normal Automatic standard setting default Soft Soft contrast Color Set the color of the images to be photographed Standard Standard color default Vivid Vivid color Sepia Sepia Monochrome Black and white ...

Страница 42: ... second speed interval The maximum number of photographs that can be taken continuously is 3 photographs Auto Exp In this mode the camera takes 3 consecutive pictures in the order of standard exposure underexposure and overexposure compensation Voice Memo Set the voice memo for still image In case of activating voice memo audio data which incoming from microphone is recorded 10 seconds at quickvie...

Страница 43: ...Digital Zoom Enlarge the center of the screen and takes photographs with the focal distance increased by factor of 4 0 ON Enable digital zoom photography default OFF Disable digital zoom photography Quickview SettodisplayaphotographedimageontheLCDmonitor immediately after you have taken the shot ON Enable display quickview default OFF Disable display quickview Note A photographed image is displaye...

Страница 44: ...ing the or button You can set the counts you want to take pictures by pressing the or button To cancel Interval Count while this function is activated press the power button to turn off or toggle the mode dial 2 2 shots can be taken 99 99 shots can be taken AE AWB Setting The AE AWB Setting contains 4 items White balance Metering ISO and Manual WB This menu is not available in the Auto and mode Wh...

Страница 45: ... is taken Multi Multi metering default T h e e x p o s u r e i s m e a s u r e d a n d calculated for the entire area of the screen By dividing the entire area of the screen the exposure level for each unit is calculated A well balance exposure can be obtained Spot Spot metering The exposure is measured in a very small area at the center of the screen It is possible to calculate the exposure of a ...

Страница 46: ...uring 400 the ISO will be fixed to ISO 400 In P mode ISO setting has 100 200 400 and Auto If Auto is selected the camera will automatically set the ISO value according to the ambient brightness Manual WB You may select Manual WB by using cor d button at AE AWB adjusting menu and press the SET button LCD monitor shows the manual WB menu Compose the picture with white object e g white paper inside t...

Страница 47: ... SET button to playback the voice memo data Images can be rotated by pressing theeorf button during playback Pressing thee button rotates an image counterclockwise and pressing the f button rotates it clockwise If no images in the SD Memory Card the message of NO IMAGE is displayed on the LCD monitor You can also playback your images on a TV screen First connect one end of the A V cable to the A V...

Страница 48: ...n down fully VOICE RECORDING is indicated on the LCD monitor for 10 seconds Pressing the shutter button down fully again VOICE RECORD END is indicated Note In the playback display mode voice icon is displayed for the voice recorded picture Voice record is also available at still image capture mode Voice record only can be done once ...

Страница 49: ...CD monitor and those made in HALF size are displayed in the center of the screen 1 Set the mode dial to and power on the camera The last recorded image appears on the LCD monitor 2 Rotate the Command dial or press the or button to select the movie to play back 3 Press the SET button Playback of the selected movie begins ...

Страница 50: ...lay pause backward picture or Movie thumbnail button Display forward picture or Movie thumbnail SET button Stop The Stop The Stop The Stop The Stop The Stop The Playback display display display display display display returns to returns to returns to returns to returns to returns to the 1st the 1st the 1st the 1st the 1st the 1st frame frame frame frame frame frame playback playback playback playb...

Страница 51: ...ial to and power on the camera The last image frame appears on the LCD monitor 2 Press the button Nine images are displayed simultaneously 3 Use the or button to move the cursor and select the image to be displayed at regular size 4 Press the SET button to display the selected image on the full screen Note In the thumbnail display mode movie icon is displayed for the movie data ...

Страница 52: ...operation as for thumbnail playback 3 Adjust the zoom ratio by using the or button Pressing the button will enlarge the image To return to normal magnification press the button The image is displayed enlarged and a white frame and green frame are displayed on the LCD monitor The white frame indicates the entire image while the green frame shows the location of the currently enlarged area 4 Use the...

Страница 53: ...esentation 1 Set the mode dial to and power on the camera The last image frame appears on the LCD monitor 2 Press the MENU button The menu screen appears 3 Select Slide Show by using the c or d button 4 Press the SET button The slideshow starts at 3 seconds interval and is displayed on the LCD monitor To stop the slideshow display press the SET button Note The Auto Off function does not operate du...

Страница 54: ...elect the Single or All option and press the SET button to confirm the selection 4 Print Number Date and Print Enable appear Use the c or d button to select one of them and press the SET button to confirm 5 Use the c d eor f button to make change and press the SET button to confirm The camera returns to Single All submenu To exit from the menu screen press the MENU button Print Number Select the i...

Страница 55: ...one of them and press the SET button to confirm 5 Use the c or d button to select the desired setting and press the SET button In Single All submenu use the c or d button to select the desired setting and press the SET button Set The one image displayed on the LCD monitor is locked and is displayed on the LCD monitor Cancel Protect Cancel image protection Exit Exit from the menu screen If Select i...

Страница 56: ...he cor dbutton to select the desired setting and press the SET button LCD Monitor Display Playback Mode The Display button can switch the display on the LCD monitor when playing back photographed images You can switch the display to show a list of detailed information 1 Set the mode dial to and power on the camera 2 Rotate the Command dial or press or button to select the image 3 Press the button ...

Страница 57: ...this image a Select Single and press the SET button to confirm the selection Delete This File sub menu is displayed on the LCD monitor b Use the c or d button to select Execute Cancel Execute Erase this image Cancel Cancel the deletion C Press the SET button to confirm the setting Erasing All Images All Erase all images a Select All and press the SET button to confirm the selection Delete All File...

Страница 58: ...D monitor b Use the c d eor f button to select the image you want to erase and press the button to confirm the selection icon appears on the selected image c Press the SET button to confirm deletion Note Images cannot be erased when they are protected or the SD Memory Card is write protected This function is available for all modes except for PC and SET UP modes ...

Страница 59: ...de Basic Setting The Basic Setting contains 6 items Card Information File Number Format Sound Beep and Auto Off Card Information Display the total and remaining memory size of the inserted SD Memory Card 1 Set the mode dial to SET UP and power on the camera 2 Use the c or d button to select Card Info 3 Press the SET button Card Information will be displayed 4 Press SET button once again to exit ...

Страница 60: ... setting Note If folder already exists on SD Memory Card it assigns older number than the existing folder Format Formatting erases all images and reformats the SD Memory Card loaded in your camera Protected images are also erased SD Memory Card cannot be formatted if it is write protected 1 Set the mode dial to SET UP and power on the camera 2 Use the c or d button to select Format 3 Press the SET...

Страница 61: ...d setting ON Enable the sound setting OFF Disable the sound setting 5 Press the SET button to confirm the setting Beep Set the beep ON OFF 1 Set the mode dial to SET UP and power on the camera 2 Use the c or d button to select Beep 3 Press the SET button The pull down menu for Beep is displayed on the LCD monitor 4 Use the c or d button to select ON OFF ON Enable the beep setting OFF Disable the b...

Страница 62: ...button to select Auto Off 3 Press the SET button The pull down menu for Auto Off is displayed on the LCD monitor 4 Use the c or d button to select the desired time setting 1 Min If no operation is carried out for 1 minute Auto Off is activated default 2 Min If no operation is carried out for 2 minutes Auto Off is activated 3 Min If no operation is carried out for 3 minutes Auto Off is activated 5 ...

Страница 63: ...em to set 5 Use the c or d button to set the value for each item 6 Press the SET button to confirm the setting after all item values are set System Reset Set all the parameter to default settings 1 Set the mode dial to SET UP and power on the camera 2 Use the c or d button to select System Reset 3 Press the SET button The System Reset menu is displayed on the LCD monitor 4 Use the c or d button to...

Страница 64: ...d OSD language 5 Press the SET button to confirm the setting Video Output Set the video output system according to the country in which your camera used 1 Set the mode dial to SET UP and power on the camera 2 Use the c or d button to select Video Output 3 Press the SET button The pull down menu for Video Output is displayed on the LCD monitor 4 Use the c or d button to select the desired setting N...

Страница 65: ...irmware version 1 Set the mode dial to SET UP and power on the camera 2 Use the c or d button to select System Info 3 Press the SET button The camera firmware version is displayed on the LCD monitor 4 To return to main menu press the SET button ...

Страница 66: ...he USB driver Step 2 Connecting the camera to your computer Step 3 Downloading images movies System Requirements System Requirements Windows Macintosh CPU Pentium 166 MHz processor or PowerPC G3 G4 higher OS Windows 98 98SE Me 2000 XP OS 8 6 or higher Memory 32MB 32MB 64MB RAM recommended 64MB RAM recommended Free Space on 128 MB hard disk space 128 MB hard disk space Hard Disk Required Devices A ...

Страница 67: ... to an available USB port on your computer 3 Connect the other end of the USB cable to the USB connector on the camera 4 Turn the camera on 5 From the Windows desktop double click on My Computer Look for a new removable disk icon appearing in the My Computer window Your recorded images movies will be in a folder on this removable disk For Mac users double click the untitled disk drive on the deskt...

Страница 68: ... Edit menu Open the destination location and choose Paste from the Edit menu You may also drag and drop image files from the camera to a desired location Macintosh Open the untitled disk window and the hard disk or the destination location Drag and drop from the camera disk to the desired destination Note Memory card users may prefer to use a memory card reader highly recommended ...

Страница 69: ...ore this amazing program To install NTI Photo Suite 1 Insert the CD ROM packaged with the camera into the CD ROM drive The welcome screen appears 2 Click Install NTI Photo Suite Follow the on screen instructions to complete the installation Note For information on how to use NTI Photo Suite to edit and retouch your recorded images please refer to its online help For Windows 2000 XP users make sure...

Страница 70: ...70 CONNECTING THE CAMERA TO OTHER DEVICES ...

Страница 71: ...ingle Continuous Auto exposure Digital zoom 4x Capture mode 2x and 4x Playback mode Exposure Program Tv Av Manual Portrait Sports Night scene Exposure compensation 2EV 2EV White balance Auto Incandescent Fluorescent 1 Fluorescent 2 Day light Cloudy Manual Flash Auto Red eye forced flash Suppressed flash Forced flash Flash effective range 0 5m 3 0m ISO sensitivity 100 400 Auto 100 100 200 100 400 E...

Отзывы: