23
8. Change Year. Press
the
SET(MODE)
button again to set the calendar year. Press the [+] button or [
-
]
button to adjust the calendar year.
9. Max/Min Clearing (default: ON)
. Press the
SET(MODE)
button again to set the max/min clearing mode
(CLR). The Max/Min can be programmed to clear daily (at midnight) or manually. Press the [+] button or
[
-
] button
to switch between “Clears 24h” and Clears Manually.
10. Temperature Units of Measure (default:
°C
):
Press the
SET(MODE)
button again to change the
temperature units of measure (the
UNITSET
icon will be displayed). Press the [+] button or [
-
] button to
switch between °F and °C units of measure.
11. Wind Speed Units of Measure (default: m/s)
. Press the
SET(MODE)
button again to change the wind
speed units of measure. Press the [+] button or [
-
] button to toggle the wind speed units between m/s,
km/h, mph, knots or bft.
12. Rainfall Units of Measure (default: mm)
. Press the
SET(MODE)
button again to change the Rainfall
units of measure. Press [+] button or [
-
] button to toggle the rainfall units between mm and inch.
13. Barometric Pressure Display Units (default: hPa)
. Press the
SET(MODE)
button again to change the
pressure units of measure. Press the [+] button or [
-
] button to toggle the pressure units between mmhg,
inHg or hPa.
14. Pressure Threshold Setting (default level 2).
Press the
SET(MODE)
button again to change the
pressure threshold. Press the [+] button or [
-
] button to change pressure threshold 2 mbar/hour to 4
mbar/hour. (For detailed information, refer to
‘Pressure Threshold Setting’ in section 9)
15. Weather Icons Setting (default: partly cloudy).
Press the
SET(MODE)
button again to change the initial
weather icon. Press the [+] button or [
-
] button to select the initial weather icon of Sunny, Cloudy, Partly
Cloudy or Rainy. (For detailed information of this part please refer to
‘Weather Icons’ in section 9).
16. Sunlight Display Units (default: W/
㎡
)
. Press the
SET(MODE)
button again to change the sunlight units
of measure. Press the [+] button or [
-
] button to toggle the sunlight units between, W/
㎡
, fc
or lux.
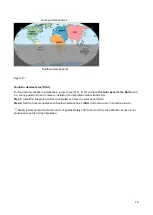
17. Location division. (default: Northern Hemisphere).
Press the
SET(MODE)
button again to change the
location division. Press the [+] button or [
-
] button to toggle the sunlight units Northern Hemisphere (NOR)
or Southern Hemisphere (SOU).
(refer to
‘Installation of Integrated Outdoor Transmitter’ in section 4).
5.3 Chanel Selection
Press the
C
button to switch the display between remote thermo-hygrometer sensors 1 through 8
and scroll mode
. In scroll mode, all of the detected thermo-hygrometer sensors will be displayed in five
second intervals.
5.4 Sensor Search Mode
If a sensor loses communication, dashes (--.-) will be displayed. If a specific channel is lost, press the
CH/+
button to display that channel prior to entering the search mode.
To reacquire the lost signal, press and hold the
CH/+
button for 3 seconds to enter the sensor search mode.
The icon
AIO
will appear in the time area. You can synchronise one or all of individual sensors. Press the [+]
or [-] button to toggle between the following sensors:
•
AIO
. Synchronises the Integrated outdoor transmitter.
•
CH*
. Synchronises Channel 1-8 Sensors (dependent on which channel is displayed before entering
the Sensor Search Mode).
•
ALL
. Synchronises All Sensors.
•
NOT
. Do nothing and exit the Sensor Search Mode.
Содержание DWS7100
Страница 1: ...User Manual ACCUR8 DWS7100 Weather Station...


