


5
www.acclaimlighting.com
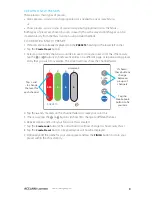
REMOVING AND REPLACING THE MICRO SD CARD
The Canvas controller uses a standard Micro SD memory card (4GB minimum) to store its
configuration data. On occasions it may be advantageous to remove the card so that it may
be copied as a backup or moved to another installation.
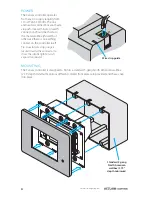
TO REMOVE THE MICRO SD MEMORY CARD
1 Ensure that power is removed
from the Canvas controller.
2 Gain access to the left hand
end of the controller back box.
3 Use a small flat bladed
screwdriver to engage with the
raised lip on the underside of
the Micro SD card and carefully
lever the card outwards from
the controller.
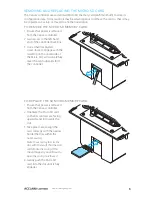
TO REPLACE THE SD MICRO MEMORY CARD
1 Ensure that power is removed
from the Canvas controller.
2 Orientate the Micro SD card
so that its contacts are facing
upwards and in towards the
slot.
3 Take great care to align the
card correctly with the narrow
holder that lies within the
outer casing.
Note: It is very easy to miss the
slot, with the result that the card
will fall into the casing. If this
should happen, you will need to
open the casing to retrieve it.
4 Gently push the Micro SD
card into the slot until it fully
engages.
Содержание Canvas
Страница 1: ...Canvas User guide canvas by Start canvas by Start...
Страница 2: ......
Страница 32: ...www acclaimlighting com...


