background image


14

1.9 How to pair your powerlines 


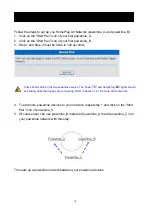
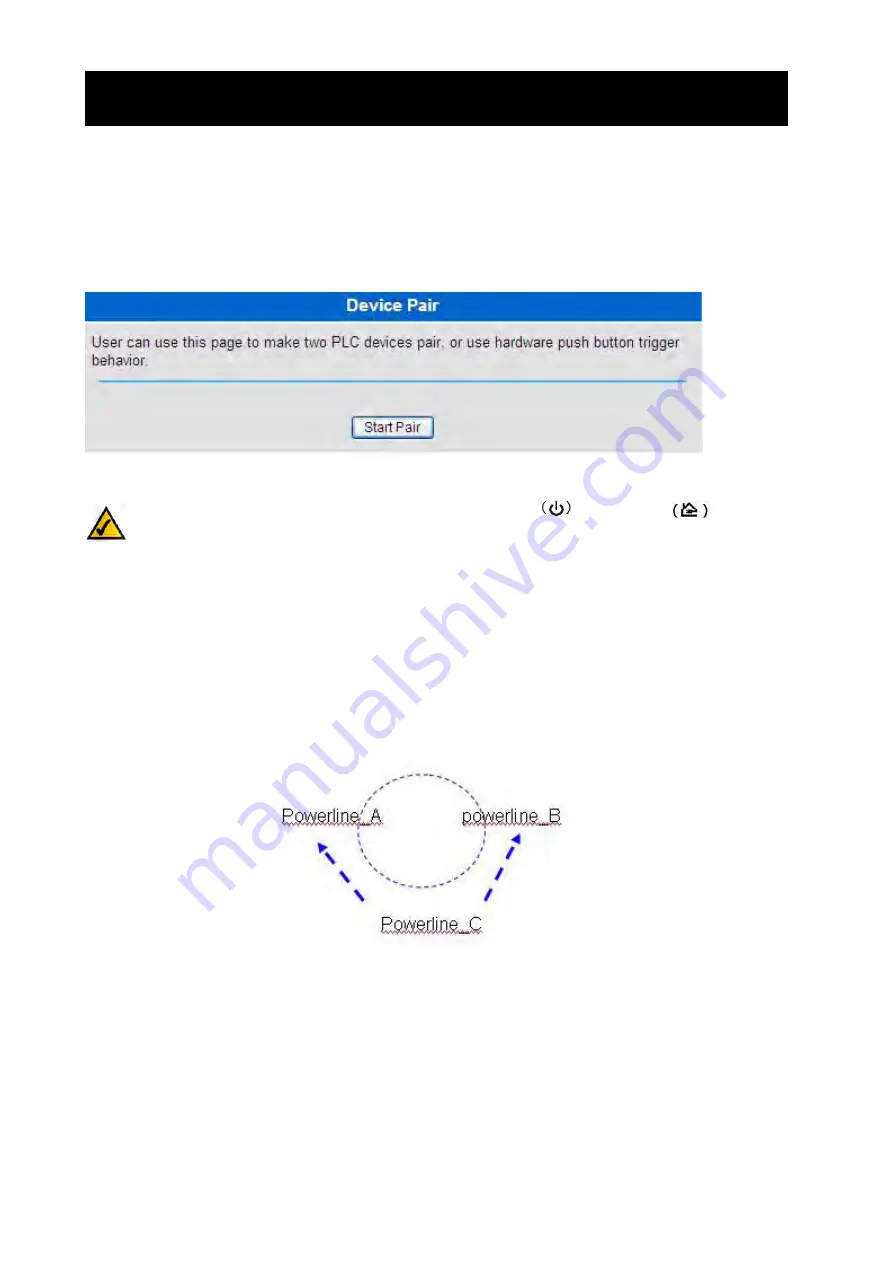
Follow the steps to set up you HomePlug AV Network (powerline_A and powerline_B): 

1.  Click on the “Start Pair” icon of your first powerline_A. 

2.  Click on the “Start Pair” icon of your first powerline_B. 

3.  Step 1 and Step 2 must be done in 120 seconds. 


Check Power LED on the two powerline devices. The Power

and HomePlug

lights should 

be blinking while the devices are connecting. Refer to Section 1.2.1 for more LED behaviors


4.  To add more powerline devices to your network, repeat step 1 and click on the “Start 

Pair” icon of powerline_C.


5.  Of course user can use powerline_B instead of powerline_A to add powerline_C into 

your powerline network with this step. 


This sets up a powerline network between your powerline devices. 

1.9 How to pair your powerlines 

Содержание PLW5Z

Страница 1: ...1 500Mbps Powerline Wireless N Extender PLW5Z User Manual...

Страница 2: ...ender easier than ever Look for the following items when reading this User Guide This checkmark means there is a note of interest and is something you should pay special attention to while using the P...

Страница 3: ...k 15 Chapter 2 WEB Configuration 16 2 1 Login 16 2 2 Network Settings 18 2 3 Wireless Settings 19 2 4 Power Line Communication 25 2 5 Administration 27 Chapter 3 PC Configuration 28 Overview 28 Wirele...

Страница 4: ...ul in homes and offices via the fast wireless network speed up to 300Mbps you can be very comfortable to have experience of high speed web surfing files downloading on line game playing and video conf...

Страница 5: ...bs Compatible with HomePlug AV 2 0 standard Powerline security 128 bits AES REBOOTion Bridge Wi Fi and Powerline network Two 10 100Mbps RJ45 ports 802 11 b g n compliant with up to 300Mbps data rate H...

Страница 6: ...ot detect another HomePlug device Blinking Data is being transmitted and or received Amber On The device detects another HomePlug device The PHY rate is between 20 80Mbps Off The HomePlug port does no...

Страница 7: ...while your power line is up All you need to do is to change a Network Name Although the power line is a plug and play network device we still recommend users to have secret password Network Name to li...

Страница 8: ...ine networks Connect a powerline to a switch on your first Ethernet network and assign a Network Name for example HomePlugAV1 to the powerline Add additional powerline devices to this network by assig...

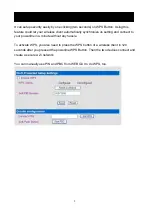
Страница 9: ...nchronize its setting and connect to your powerline in a minute without any hassle To activate WPS you also need to press the WPS button of a wireless client in 120 seconds after you pressed the power...

Страница 10: ...10 1 6 Reset the Powerline Press the RESET REBOOT Button for 5 seconds to reset your powerline to a factory default settings Refer to Section 1 7 for more details 1 6 Reset the Powerline...

Страница 11: ...Press the RESET REBOOT button for 5 seconds this reset the HomePlugAV device to a factory default settings This means all previously saved configurations will lose and to be reset to a default value...

Страница 12: ...ent time period Time period Action Power LED 2 seconds Reboot the device The Power LED is blinking until the device is ready It takes about 60 seconds 5 seconds Reset previously saved data to a factor...

Страница 13: ...power saving mode the power consumption will less than 0 5 Watt to meet ERP standard In power saving mode the Ethernet and HomePlug LEDs are turned off the Power LED will be blinking green at 15 seco...

Страница 14: ...LED on the two powerline devices The Power and HomePlug lights should be blinking while the devices are connecting Refer to Section 1 2 1 for more LED behaviors 4 To add more powerline devices to your...

Страница 15: ...ork Name for example powerline_new on A This disconnects A from B 2 Change the Network Name on C to be powerline_new too this must be done in 120 seconds after step1 in this section 3 Wait for about 6...

Страница 16: ...ion by an Ethernet cable between your computer and the HomePlugAV 2 Start your WEB Browser 3 In the Address box enter the IP address 192 168 123 253 4 After connected successfully the following screen...

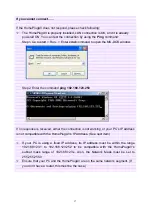
Страница 17: ...168 123 253 If no response is received either the connection is not working or your PC s IP address is not compatible with the HomePlugAV s IP Address See next item If your PC is using a fixed IP add...

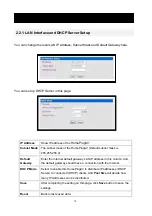
Страница 18: ...Enter the Internet default gateway LAN IP address in this column And the default gateway should have a connection with the Internet DHCP Mode Select to enable this HomePlugAV to distribute IP addresse...

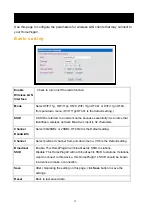
Страница 19: ...e that identifies a wireless network Maximum input is 32 characters Channel Bandwidth Select 40 20MHz or 20MHz HT20 40 is the Default setting Channel Select preferred channel from pull down menu CH6 i...

Страница 20: ...Multimedia Power Save is s set of features for Wi Fi networks that help conserve battery in small devices such as phones PDA and audio players The certification for both access point and client device...

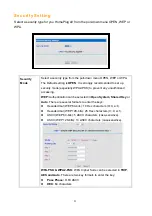
Страница 21: ...nauthorized accessing WEP Authentication can be selected in Open System Shared Key or Auto There are several formats to enter the keys Hexadecimal WEP 64 bits 10 Hex characters 0 9 a f Hexadecimal WEP...

Страница 22: ...rprise WPA Cipher Suite can be selected in TKIP and AES There are two key formats to enter the key Server RADIUS Server IP Address Port 1812 default port number Secret password for the device to acces...

Страница 23: ...sle Disable WPS Check to turn ON OFF WPS Save After completing the setting on this page click Save button to save the settings Reset Back to last saved data Reset Configure Reset WPS status to un conf...

Страница 24: ...ug AV and when Deny ACL MAC is selected those are in the list will not be able to connect to the HomePlug AV The policy supports 20 sets of MAC address MAC Address Enter a station MAC address in the b...

Страница 25: ...rk Network Name A Network Name is referred to a network name because essentially it is a name that identifies a powerline network User Name It is an identity for any powerline to join a powerline netw...

Страница 26: ...26 Device Pair Use this feature to pair you powerline devices Refer to Section 1 9 for more details...

Страница 27: ...setting on this page click Save button to save the settings Reset Back to last saved data Upgrade Firmware Select files Click the Browse button find and open the firmware file the browser will display...

Страница 28: ...ol be installed and configured on each PC If using default HomePlugAV settings the Windows TCP IP settings need to be made By default DHCP Server is disable for the HomePlugAV must use a Fixed specifi...

Страница 29: ...es button You should then see a screen like the following 3 Ensure your TCP IP settings are correct as describe below Using DHCP To use DHCP select the radio button Obtain an IP address automatically...

Страница 30: ...inistrator can advise you of the IP address they assigned to the HomePlugAV If the DNS Server fields are empty select Use the following DNS server addresses and enters the DNS address or addresses pro...

Страница 31: ...dress If your PC is already configured check with your network administrator before making the following changes In the Default gateway field enter the HomePlugAV s IP address and click OK Your LAN ad...

Страница 32: ...s If you wish to continue using a fixed IP address make the following changes to your configuration Set your Default Gateway to the IP address of the HomePlugAV Ensure your DNS Domain Name server sett...

Страница 33: ...d on the HomePlugAV the security of each station should be disabled as well And you can connect the HomePlugAV without security but it is NOT recommended WEP auto By default WEP on the HomePlugAV is d...

Страница 34: ...nt If your PC is set to Obtain an IP Address automatically please enable the DHCP Server of the HomePlug AV to assign IP Address to your PC If your PC uses a Fixed IP address ensure that it is using a...

Страница 35: ...t possible speed depending on the distance and the environment To obtain the highest possible connection speed you can experiment with the following HomePlugAV location Try adjusting the location and...

Страница 36: ...to reduce interference In Infrastructure mode Wireless Stations normally scan all channels looking for an HomePlug AV If more than one HomePlug AV can be used the one with the strongest signal is use...

Страница 37: ...set to Infrastructure mode SSID ESSID The network name must match the value used on the HomePlugAV Note The SSID is case sensitive Open Shared Key If there is no security is enabled on the HomePlugAV...

Страница 38: ...quipment into an outlet on a circuit different from that to which the receiver is connected Consult the dealer or an experienced radio TV technician for help FCC Caution Any changes or modifications n...

Отзывы: