41-748.31B
10
KLF-1 Loss-of-Field Relay
7.1
COMPENSATOR (T
A
AND T
C
)
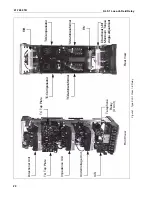
Each set of compensator taps terminates in inserts
which are grouped on a socket and form approxi-
mately three-quarters of a circle around a center
insert. This is the common connection for all taps.
Electrical connections between common insert and
tap inserts are made with a link. That is held in place
with two connector screws, one in the common and
one in the tap.
A compensator tap setting is made by loosening the
connector screw in the center. Remove the connec-
tor screw in the tap end of the link, swing the link
around until it is in position over the insert for the
desired tap setting, replace the connector screw to
bind the link to this insert, and retighten the connec-
tor screw in the center. Since the link and connector
screws carry operating current, be sure that the
screws are turned to bind snugly. DO NOT OVER-
TIGHTEN.
Compensator T
C
requires an additional setting for
including or excluding the origin of R-X diagram from
the impedance unit characteristic. If the desired char-
acteristic is similar to that shown on Figure 5(b)
(page 23). The links should be set vertically in the
+T
C
arrow direction. If a characteristic similar to that
shown in Figure 5(c) is desired, set links horizontally
in the -T
C
arrow direction.
7.2
AUTOTRANSFORMER PRIMARY
(S
A
AND S
C
)
Primary tap connections are made through a single
lead for each transformer. The lead comes out of the
tap plate through a small hole located just below the
taps and is held in place on the proper tap by a con-
nector screw.
An S setting is made by removing the connector
screw, placing the connector in position over the
insert of the desired setting, replacing and tightening
the connector screw. The connector should never
make electrical contact with more than one tap at a
time.
7.3
AUTOTRANSFORMER SECONDARY
(M
A
AND S
C
)
Secondary tap connections are made through two
leads identified as L and R for each transformer.
These leads come out of the tap plate each through a
small hole, one on each side of the vertical row of M
tap inserts. The lead connectors are held in place on
the proper tap by connector screws.
Values for which an M setting can be made are from
-.15 to +.15 in steps of .03. The value of a setting is
the sum of the numbers that are crossed when going
from the R lead position to the L lead position. The
sign of the M value is determined by which lead is in
the higher position on the tap plate. The sign is posi-
tive (+) if the L lead is higher and negative (-) if the R
lead is higher.
An M setting may be made in the following manner:
Remove the connector screws so that the L and R
leads are free. Determine from the Table 3 (page
10). The desired M value and tap positions. Neither
lead connector should make electrical contact with
more than one tap at a time.
7.4
INDICATING CONTACTOR SWITCH (ICS)
There are no settings to make on the indicating con-
tactor switch (ICS).
7.5
UNDERVOLTAGE UNIT
The voltage unit is calibrated to close its contact
when the applied voltage is reduced to 53 volts. The
voltage unit can be set to close its contacts from 40
volts to 70 volts by adjusting the resistor located in
the rear, second from the bottom (R
V
). The spiral
spring is not disturbed when making any setting other
than the calibrated setting of 53 volts.
7.6
DIRECTIONAL SETTING
There is no setting to be made on directional unit.
8.0
INSTALLATION
The relays should be mounted on switchboard pan-
els or their equivalent in a location free from dirt,
moisture, excessive vibration, and heat. Mount the
relay vertically by means of the four mounting holes
on the flange for semi-flush mounting. The mounting
Table 3: TABULATED SETTINGS
Z
M
L Lead
R Lead
0.87 TS
0.89 TS
0.92 TS
0.94 TS
0.97 TS
+.15
+.12
+.09
+.06
+.03
Upper .06
Upper .06
Lower .06
Upper .06
.03
0
.03
0
Lower .06
0
TS
0
0
0
1.03TS
1.06 TS
1.1 TS
1.14 TS
1.18 TS
-.03
-.06
-.09
-.12
-.15
0
Lower .06
0
.03
0
.03
Upper .06
Lower .06
Upper .06
Upper .06


