background image

ControlMaster CM10, CM30 and CM50

Universal process controllers, 

1

/

8

1

/

4

 and 

1

/

2

 DIN

7 Advanced Level

IM/CM/S–EN Rev. R

91

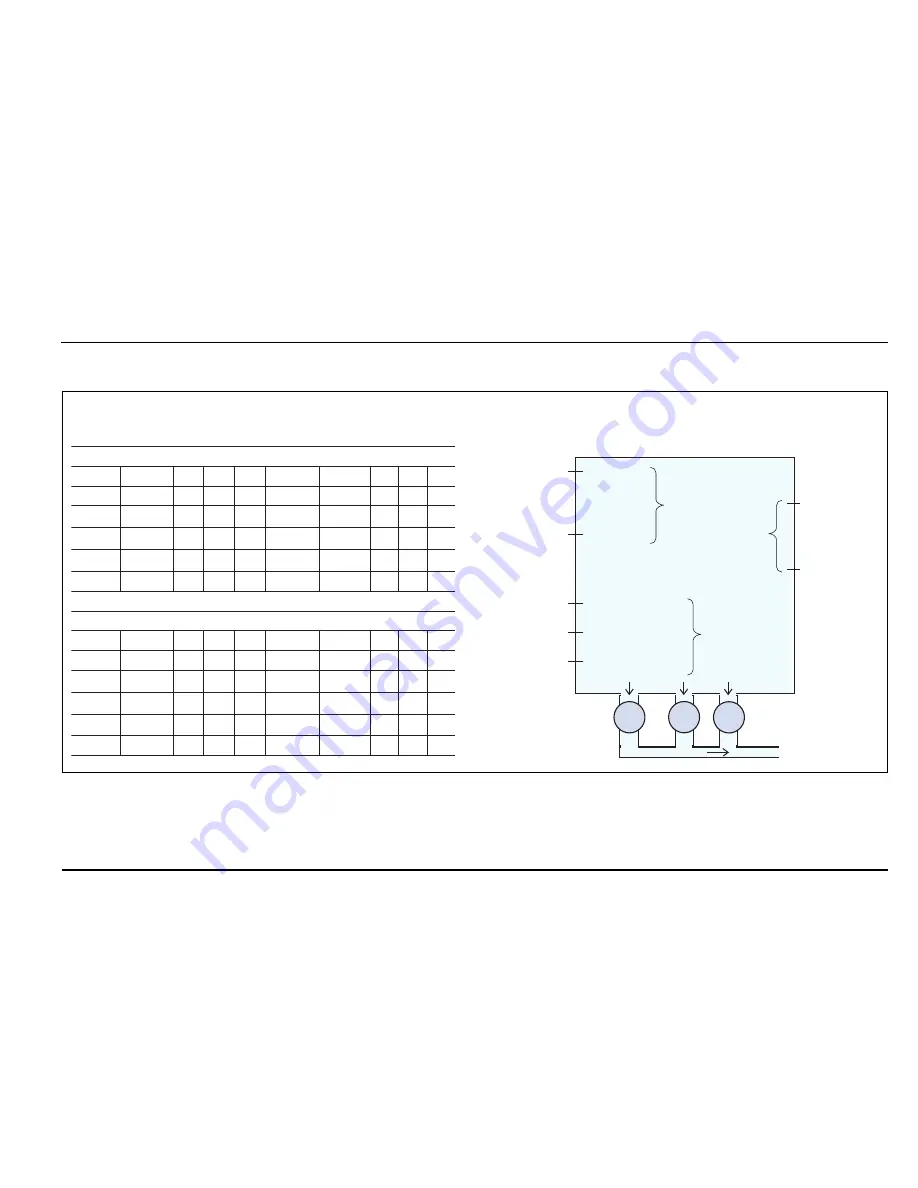
…Functions / …Bank Control

…Bank Control

 Using 

First In First Out

 (

FIFO

) and 

Rotate

 modes on a 3 pump system


P1

P2

P3

4 m

3 m

2 m

1 m

First In First Out (FIFO)

Level

P1

P2

P3

Level

P1

P2 P3 

Seq. 1

1.3 m

Seq. 6

2.2 m

Seq. 2

2.2 m

Seq. 7

0.8 m

Seq. 3

3.6 m

Seq. 8

1.8 m

Seq. 4

4.3 m

Seq. 9

0.8 m

Seq. 5

2.8 m

Seq. 10

1.8 m

Rotate Pump Cycling

Level

P1

P2

P3

Level

P1

P2 P3 

Seq. 1

1.3 m

Seq. 6

2.2 m

Seq. 2

2.2 m

Seq. 7

0.8 m

Seq. 3

3.6 m

Seq. 8

1.8 m

Seq. 4

4.3 m

Seq. 9

0.8 m

Seq. 5

2.8 m

Seq. 10

1.8 m

On trip 

at 4 m

Off trip 

at 3 m

On trip at 1.5 m

Off trip at 1 m

Pump 2

Pump 3

Pump 1

On trip 

at 3.5 m

Off trip 

at 2.5 m

Содержание ControlMaster CM10

Страница 1: ...nalysis and environmental applications As a part of ABB a world leader in process automation technology we offer customers application expertise service and support worldwide We are committed to teamwork high quality manufacturing advanced technology and unrivalled service and support The quality accuracy and performance of the Company s products result from over 100 years experience combined with...

Страница 2: ... 2 Max Input 2 Max OP 2 Loop 1 Time Prop Cycle Time 1 Cycle Time 2 Basic Device Setup Display Input Output Control Menu Menu Menu Exit Select Exit Select Exit Select Exit Select Exit Select Initial Setup App Template Loop 1 Output Type Loop 1 Split O P Instrument Tag Mains Freq Config Action Custom Template Reset to Defaults Security Setup Basic Password Advanced Password Reset Passwords Custom Co...

Страница 3: ...6 4 Installation 8 4 1 Siting and Environmental Requirements 8 4 2 Dimensions 9 4 3 Mounting 11 4 4 Jumper Links for Relay Outputs 12 4 4 1 Removing the Controller from its Case 12 4 4 2 Resetting Jumper Links 13 4 5 Electrical Connections 14 4 5 1 CM10 Electrical Connections 15 4 5 2 CM30 Electrical Connections 16 4 5 3 CM50 Electrical Connections 17 4 5 4 Analog Inputs 18 4 5 5 Frequency Pulse I...

Страница 4: ...Info 100 8 Templates and Functionality 101 8 1 Basic Templates 101 8 1 1 Single Loop Single Loop with Remote Setpoint 101 8 2 Standard Templates 103 8 2 1 Auto Manual Station Low Signal Selection Digital Signal Selection 103 8 2 2 Analog Backup Station Low Signal Selection Digital Signal Selection 104 8 2 3 Single Indicator 106 8 2 4 Dual Indicator 106 9 PC Configuration 107 10 Specification 108 A...

Страница 5: ...irements of CEI IEC 61010 1 2010 3rd edition Safety Requirements for Electrical Equipment for Measurement Control and Laboratory Use and complies with US NEC 500 NIST and OSHA If the equipment is used in a manner NOT specified by the Company the protection provided by the equipment may be impaired 1 2 Symbols One or more of the following symbols may appear on the equipment labelling Warning Refer ...

Страница 6: ...d The relevant sections of these instructions must be read carefully before proceeding Warning labels on containers and packages must be observed Installation operation maintenance and servicing must be carried out only by suitably trained personnel and in accordance with the information given Normal safety precautions must be taken to avoid the possibility of an accident occurring when operating ...

Страница 7: ...Access Level Manual Control Mode Local Setpoint Remote Setpoint Output Value Auto Control Mode Operator Level Icons See Table 3 1 for key functions Alarm Status A Navigation left Operator Level access key see page 22 B Up Down keys navigate up down menus and increase decrease displayed values C Navigation key right programmable Soft Key see page 40 Table 3 1 CM10 Front Panel Key Functions Note Whe...

Страница 8: ...ons are shown in Fig 3 2 Fig 3 2 ControlMaster CM30 and CM50 Displays and Icons CM50 1000 0 0 0 479 2 500 0 74 9 AUTO LOCAL PSI PV SP OP ControlMaster CM30 PSI PV SP OP ControlMaster 479 2 500 0 74 9 PV Value Bargraph Setpoint Value Icons Access Level Manual Mode Local Setpoint Remote Setpoint Output Value Auto Mode Operator Level Menu Icons Adjust Indicates which value is adjusted by the keys Pro...

Страница 9: ...C A Navigation left Operator Level access key see page 22 B Local Remote setpoint mode selection key C Up Down keys navigate up down menus and increase decrease displayed values D Auto Manual control mode selection key E Navigation key right programmable Soft Key see page 40 Table 3 2 CM30 CM50 Front Panel Key Functions Note When a Soft Key option is assigned to key E the Advanced Level see page 3...

Страница 10: ...v R 4 Installation 4 1 Siting and Environmental Requirements Fig 4 1 Siting and Environmental Requirements CM30 CM30 CM30 CM30 CM30 At Eye Level Close to the Sensor Avoid Vibration Sensor Temperature Limits 55 C 131 F Max 0 C 32 F Min Humidity Limits 0 to 95 RH IP66 NEMA4X front panel IP20 rear Use Screened Cable ...

Страница 11: ...allation IM CM S EN Rev R 9 4 2 Dimensions Fig 4 2 ControlMaster CM10 and CM30 Dimensions CM10 CM30 Dimensions in mm in Panel Cut out Dimensions 97 3 81 97 3 81 121 4 76 141 5 55 91 8 3 6 20 0 78 92 3 62 0 03 0 0 8 0 92 3 62 14 0 55 14 0 55 30 1 18 0 8 0 0 03 0 50 1 97 45 1 77 0 6 0 0 02 0 ...

Страница 12: ... 8 1 4 and 1 2 DIN 4 Installation 10 IM CM S EN Rev R Dimensions in mm in Fig 4 3 ControlMaster CM50 Dimensions Controllers can be close stacked to DIN 43835 144 5 67 123 4 84 146 5 74 138 5 43 23 0 9 138 5 43 30 1 18 14 0 55 0 04 0 1 0 0 68 0 7 0 2 67 0 03 0 76 3 0 ...

Страница 13: ...e for the controller in the panel see Section 4 2 page 9 for dimensions 2 Insert the controller into the panel cut out Referring to Fig 4 4 3 Position the upper panel clamp A at the top front of the case against the panel 4 Locate the panel clamp anchor B in slot C 5 Tighten the panel clamp anchor screw D until panel clamp A is secured against the panel 6 Repeat steps 3 to 5 to fit the lower panel...

Страница 14: ...n keys 2 Press the bezel release tool A fully in and then down C until the shoulder on the tool engages with the notch behind the controller front plate 3 Pull the bezel release tool A to withdraw the inner assembly from the case D Note If the bezel release tool is mislaid 2 small flat headed screwdrivers 4 mm 0 15 in can be used as alternative tools one inserted into the front panel slot and the ...

Страница 15: ...y move the link to select the relay action required N O or N C Note The factory set default for all jumper links is N O Fig 4 6 Jumper Links for Relay Outputs N C N O N C N O N C N O LK1 LK2 LK3 N O N O N C N C LK1 LK2 N O N O N C N C LK2 LK1 CM10 and CM30 Option Board 1 1a CM50 Option Board 1 CM50 Standard Board 1 LK1 Relay O P 3 LK2 Relay O P 4 LK1 Relay O P 1 LK2 Relay O P 2 LK1 Relay O P 2 LK2...

Страница 16: ...ables separately preferably in earthed grounded metal conduit It is strongly recommended that screened cable is used for signal inputs and relay connections The instrument conforms to Mains Power Input Overvoltage Category 2 Pollution Degree 2 EN601010 1 This equipment is protected through double insulation Insulation Class II Analog digital inputs and outputs transmitter power supply and DC power...

Страница 17: ...100 to 240 V AC 10 W 10 to 36 V DC NC C NO Analog Output 2 Digital Input Output 1 Digital Input Output 2 Digital Input Output Relay Output 2 Relay Output 3 Relay Output 4 Digital Output External C C C Standard Connections See rear panel for MODBUS connections N O factory default or N C contact selection made via internal jumper links see page 12 200 mA Type T fuse mains AC or 2 A Type T fuse 120 V...

Страница 18: ...SU Analog Output 2 Rear View Option Board 1 Option Board 2 Standard Connections Digital Input Output 2 Digital Input Output C C C Relay Output 2 Relay Output 3 Relay Output 4 Digital Output External Digital Input Output 3 Analog Input 1 Analog Input 2 Relay Output 1 Neutral Line 100 to 240 V AC 10 W 10 to 36 V DC NC C NO Analog Digital Output 1 Rear View Refer to rear panel for MODBUS connections ...

Страница 19: ...lay Output 3 Relay Output 4 Analog Output 2 Option Board 1 C C Analog Input 1 Analog Input 2 Comms Standard Connections Neutral Line Digital Output External Digital Input Output 1 Digital Input Output 2 Digital Input Output Analog Digital Output 1 Relay Output 1 Relay Output 2 C C Tx PSU Refer to rear panel for MODBUS connections N O factory default or N C contact selection made via internal jumpe...

Страница 20: ...ng internal transmitter power supply Fit the CJ sensor supplied if Analog Input 1 or 2 are THC inputs Alternatively it is possible to use an external fixed cold reference junction if the controller is programmed for use with millivolt inputs and the appropriate thermocouple linearizer is selected Analog Input 2 can be used only with THC inputs if Analog Input 1 is also used as a THC input For mA i...

Страница 21: ...ontroller is programmed for use with millivolt inputs and the appropriate thermocouple linearizer is selected Analog Input 4 can be used only with THC inputs if Analog Input 3 is also used as a THC input For mA input types to ensure loop continuity when the controller is switched off fit a 2V7 Zener diode as shown Note 3 Leads must have equal resistance not exceeding 20 each Milliamps THC CJ THC 3...

Страница 22: ...te This input is designed primarily for use with flowmeters Fig 4 12 Frequency Pulse Input Note Digital input and open collector digital output connections are shown in Fig 4 13 see page 113 for Digital Input Output type options Terminal 1 Terminal 3 Source Device External Voltage Max 30 V ControlMaster Input 1 ve ve Load Refer to the device documentation for resistor value ...

Страница 23: ...l Input Output CM10 Terminal 22 or 23 CM30 Terminal 44 or 45 36 37 38 or 39 CM50 Terminal 8 or 9 31 32 33 or 34 Digital Input Output CM10 Terminal 24 CM30 Terminal 46 or 40 CM50 Terminal 10 or 35 Terminal Connections on Standard and Option Boards External Voltage Max 30 VDC 24 VDC Input OR Digital Input Output CM10 Terminal 22 or 23 CM30 Terminal 44 or 45 36 37 38 or 39 CM50 Terminal 8 or 9 31 32 ...

Страница 24: ...and to enter Basic and Advanced modes via the Access level To access Operator Level menus 1 From the Operator Page press to view the available menus 2 Use the keys to scroll through the menus and menu options 3 Press to expand menu levels and to select menu options or press to return to the previous menu Menu functions are described in Table 5 1 ControlMaster PV SP 27 589 12 257 0 0 OP deg C Adjus...

Страница 25: ...usted using the keys The icon next to a value indicates the current adjustable selection Setpoint Select Selects the local setpoint to be used displayed only if more than 1 local setpoint is configured Alarm Acknowledge Acknowledges any active but unacknowledged alarms View Select Selects the Operator view to be displayed Enter Advanced Level Displays the Access Level selection views see Section 5...

Страница 26: ...aster CM30 Shown PV 1 Failed ControlMaster PV SP 99 5 175 0 32 5 OP deg C PV 1 Failed Description of diagnostic or alarm tag The highest priority diagnostic or alarm is displayed Other active diagnostic alarm states can be viewed on the Diagnostic View see page 25 Failure Maintenance Out of Spec Check Function NAMUR NE107 Status Icon High Process Alarm Low Process Alarm High Latch Alarm Low Latch ...

Страница 27: ... and Advanced The Service level is password protected at the factory and reserved for factory use only Passwords are set changed or restored to their default settings at the Device Setup Security Setup parameter see page 38 Fig 5 2 ControlMaster Diagnostic View ControlMaster CM30 Shown CM30 ControlMaster High High Temp PV1 Failed High High Temp Alarm Icon Diagnostic Description Alarm Tag Note When...

Страница 28: ...age 30 parameters autotuning configuration and adjustment of alarm trip points Advanced Enables configuration access to all parameters Service Reserved for use by authorized service personnel Table 5 2 Access Levels Fig 5 3 Access Level Note A 5 minute time out period enables a user to return to the Operator page and re access the previous menu displayed at exit without re entering the password Fo...

Страница 29: ...tpoint value required If this value is adjusted in the Operator Level see page 22 its value here is also updated RSP Ratio If the remote external setpoint is selected the control setpoint value is ratio x remote setpoint input bias Note This parameter is available only if the template selected has remote setpoint see page 101 RSP Bias Sets the remote setpoint bias in engineering units Note This pa...

Страница 30: ...e setpoints Ramp Rate Sets the ramp rate required in engineering units hour Note Applicable only if Ramp Mode is On Loop 1 Control On Off Hysteresis Sets the hysteresis value in engineering units Note Applicable only if Control Type is On Off see page 55 0 100 200 PV 300 Displayed local setpoint value Time Actual ramping setpoint value used by PID algorithm Example Ramp Rate 200 Increments hr 1 Ho...

Страница 31: ... and stored in the controller automatically Note To achieve the best results from Autotune switch the controller to Manual control mode see page 5 and adjust the output until the PV is stable close to the normal setpoint before initiating Autotune A B C D SP PV 1 Set the first step value and dynamics required For best results select the largest initial output step size that can be tolerated by the...

Страница 32: ...red automatically and calculates the control settings accordingly Deadtime Sets the proportional and integral terms to give optimum control for the deadtime process higher proportional band lower gain and shorter integration time PI Used for processes where it is known that derivative control is not required Reset If the controller is transferred to another process or duty Autotune must be reset T...

Страница 33: ...ontrol the process it is connected to these values must be tuned accordingly This can be achieved via the AutoTune function or manual adjustment If the controller is tuned manually the table below provides details of some suggested values to start from These values are only suggested starting values and should not be used as an alternative to proper tuning of the Controller Process Type P I Temper...

Страница 34: ...o move by a series of integral action pulses Therefore the controller does not need to know the absolute regulator position and is not affected when the regulator reaches the upper or lower limit as determined by the regulator s limit switches hence the term boundless When a deviation from setpoint is introduced the regulator is driven for a length of time equivalent to the proportional step The r...

Страница 35: ...ted in the following way Minimum ON time of integral action pulses for a fixed control deviation Minimum approximate time between integral action pulses for a fixed control deviation Duration of the proportional step Control Deviation Ratio The required valve position Ratio x PID O P Bias Bias Applicable only for motorized valve with feedback only see page 32 Deadband Deadband eng units x 100 Eng ...

Страница 36: ... when the position feedback is 48 The deadband is between 48 and 52 Travel Time For motorized valve without feedback see page 32 this parameter is used to control the valve movement For motorized valve with feedback see page 32 the time entered is compared with the actual valve movement If the valve is sticking a diagnostic message is generated set Travel Time to 0 s to disable this feature Positi...

Страница 37: ...e Applicable only if Output Type is Time Prop or Split Output and one output is a relay or a digital output see page 36 Cycle Time 1 2 The cycle time to be used with time proportioning outputs For split outputs the Cycle Time 1 setting applies to Output 1 and Cycle Time 2 setting applies to Output 2 Alarm 1 8 Trip The alarm trip level in engineering units See Process Alarm page 64 for parameter de...

Страница 38: ...t the appropriate template before configuring any other parameters When a template is selected the controller assumes the preset form for that template The inputs and function blocks are soft wired automatically to perform the selected function Note See Section 8 page 101 for templates available to controllers with Standard functionality Loop 1 Output Type The appropriate output function block rel...

Страница 39: ...s the controller into Manual control mode When the Advanced level is exited the controller returns to the pre Configuration mode of operation Digital relay and analog outputs are held at their value state when Configuration mode is entered Inactive Puts the controller into Manual control mode When the Advanced level is exited the controller returns to the pre configuration mode of operation Digita...

Страница 40: ...e 36 Reset Passwords Resets all passwords to factory values Custom Config Loop 1 2 PV Sets the source for the process variable Loop 1 2 Split O P Sets the source for output to the split output function block Loop 1 2 Valve Mode Sets the valve operation mode Feedback or Boundless see page 32 Loop 1 2 Valve O P Sets the control input to the valve function block Loop 1 2 Valve FB Sets the source for ...

Страница 41: ...erator Templates Enables up to 4 operator pages to be configured to suit the application requirements Page 1 4 Template The operator template type The functions available in each template type are displayed as abbreviations for example Single PV SP OP Key to abbreviations PV process variable SP setpoint MOP master output Auto Manual see page 40 status and analog backups OP control output Loop 1 2 ...

Страница 42: ...tion Displays the Access Level enabling selection of configuration levels Auto Manual Toggles between Auto and Manual control modes Local Remote Toggles between Local and Remote setpoint modes Scroll View Scrolls through each available Operator view Alarm Ack Acknowledges all active unacknowledged alarms Toggle Signal Provides a source that toggles between 2 states can be assigned to outputs or us...

Страница 43: ...dge alarms from the front panel SP Adjust Enable Turns on off setpoint adjustment in the Operator Level Settings Adjusts display settings to suit ambient conditions Brightness Increases Decreases the display brightness to suit local environmental conditions Contrast Increases Decreases the display contrast to suit local environmental conditions Note Enabled for CM30 and CM50 only Date Time Sets th...

Страница 44: ...r regions other than Europe or USA Note Enables Daylight Start Time and Daylight End Time parameters DS Start Time The start time selected from 1 hour increments Note Displayed only when the DS Region sub parameter is Custom DS Start Occur DS End Occur The day within the month that daylight starts ends for example to set daylight saving to start or end on the second Monday of the selected month se...

Страница 45: ...V Digital Freq Input Pulse Input Additional Input Type comments Digital Volt Free Acts as a digital input Freq Input Sets the maximum frequency and equivalent flow rate in the engineering range 0 to 6 KHz A frequency of 0 01 to 6 KHz can be used to create an analog value Pulse Input This parameter counts pulses and is recommended only for use with electromagnetic flowmeters Analog Inputs 2 to 4 Fr...

Страница 46: ...CM10 CM30 0 2 or 4 µA 0 to 50 mA CM50 Volts 0 to 25 V 0 2 or 1 mV Resistance low 0 to 550 0 2 or 0 1 Resistance high 0 to 10 k 0 1 or 0 5 Elect High Sets the required electrical range Note Applicable only to Millivolts Milliamps Volts and Freq Input Linearizer Selects the linearizer type required to condition the input signal Notes For thermocouple applications using an external fixed cold junctio...

Страница 47: ...ed to deg C deg F Kelvin see Appendix C page 122 for analog input engineering units Eng Dps Engineering decimal places selects the resolution required to be displayed for the input value Eng Low Specifies the engineering low minimum value For example for an electrical input range of 4 0 to 20 0 mA representing a pressure range of 50 to 250 bar set the Eng Low value to 50 0 and the Eng High value t...

Страница 48: ...le if Pulse Units Kl and Pulse Unit 10 00000000 each pulse represents 0 1 Kl 10 pulses 1 Kl Broken Sensor If an input failure occurs the input value can be configured to drive in a set direction None No action taken Automatic If the value of failed input is below Eng Low see page 45 the input value is driven to the minimum downscale value otherwise it is driven to the maximum upscale value Upscale...

Страница 49: ...ut value is displayed Normally Zero Adjustment is used with input values close to Eng Low adjustment is performed by applying an offset to the reading and Span Adjustment is used with values close to Eng High adjustment is performed by applying a multiplier to the reading Analog Outputs The analog outputs can be configured to retransmit any analog value and have a configurable range from 0 to 24 m...

Страница 50: ...5 Auto Eng Range If enabled On the Eng High and Eng Low values for the output are set to the engineering range values of the source automatically Eng Low The minimum engineering range output value Eng High The maximum engineering range output value Polarity Sets the polarity of the output signal If set to Negative the output is energized when the source is inactive If set to Positive the output is...

Страница 51: ...ss input is closed 24 Volt Digital input low 5 V high 11 V maximum input 30 V TTL Digital input low 0 8 V high 2 V Output Source Selects the digital signal to be assigned to the output see Appendix A 1 page 116 for description of sources Polarity Sets the polarity of the output signal Positive For an output the output is high if the source is active For an input the input is active if a high signa...

Страница 52: ... S EN Rev R Input Output Relays Relay 1 4 Source Selects the digital signal to be assigned to the relay see Appendix A 1 page 116 for description of sources Polarity Sets the polarity of the relay Positive The relay is energized If the source is active Negative The relay is energized If the source is inactive ...

Страница 53: ...nd minimum values for the local and or remote setpoints Setpoint limits do not apply in Manual control mode with local setpoint tracking enabled If the setpoint is out of limits when Auto control mode is selected the setpoint value can be adjusted only towards its limits No of Local SP s Selects the number of independent local internal setpoints required Local setpoints can be selected from the Op...

Страница 54: ...l setpoint tracks the remote external setpoint when in Remote Setpoint mode If the controller is put into Manual control mode the setpoint reverts from Remote to Local Note Available only if the template selected has remote setpoint functionality Local and Remote Note Available only if the template selected has remote setpoint functionality RSP Ratio When the remote external setpoint is selected t...

Страница 55: ... setpoint under remote setpoint fault conditions Ramp Mode See Basic Level page 28 Ramp Rate See Basic Level page 28 Select Sources Selection of local setpoints and changing the setpoint mode between local internal and remote external can be controlled by digital signals either from internal digital signals for example alarm states or from external signals via digital inputs or digital communicati...

Страница 56: ...t remote setpoint mode Loc Rem Toggle The level triggered source required to select either local or remote setpoint mode A low signal locks the controller in local setpoint mode and a high signal locks it in remote setpoint mode The edge triggered local and remote selection sources and the front panel keys do not operate when this function is used If the remote setpoint fails while selected using ...

Страница 57: ...ontrol Action If the required controller action is known it can be set using this parameter Otherwise it can be set to Unknown and Autotune see page 29 determines and selects the correct action Direct For applications where an increasing process variable requires an increasing output to control it Reverse For applications where an increasing process variable requires a decreasing output to control...

Страница 58: ... page 30 before the split output range values are calculated Limit Action Selects when the output limits should be applied Off Auto Manual Auto Only Low High Limit Sets minimum maximum controller output in Failure Actions Power Recovery Used to select the default power failure mode required following a power interruption or failure Last Mode The last Power Recovery mode selected Man Last Manual co...

Страница 59: ...ion Determines the controller output when the PV process variable input fails No Action No action is taken if the PV input fails Man Hold O P Puts the controller into Manual control mode and holds the output at its value immediately prior to the PV failure Man Default O P Puts the controller into Manual control mode and sets the output to the default output value Default Output This parameter is u...

Страница 60: ...ection is made on the rising edge of the digital signal Manual 1 2 Select The source required to select Manual control mode Selection is made on rising edge of the digital signal The output value is set according to Manual 1 2 Config O P see below Manual 1 2 Output Determines the Manual output value to be set when the controller is put into Manual control mode see page 5 using Manual 1 2 Select so...

Страница 61: ...al select signals have no effect When the digital signal is low Auto control mode is selected When in the low state either the front panel controls or edge triggered digital signals can be used to put the controller into Manual control mode A M Output Sets the manual output value when the controller is put into Manual mode using A M Toggle source Last Auto O P Holds the output at its value prior t...

Страница 62: ...utput Slew Rate function is enabled and when it applies Off Up and Down The Slew Rate applies to increasing and decreasing output values Up The Slew Rate applies to increasing output values Down The Slew Rate applies to decreasing output values only Rate The maximum rate of change of the control output as s Disable Source The level triggered source required to disable Slew Rate control of the outp...

Страница 63: ...isabled and the normal PID output is provided as the control output Source Signal Source Sets the source of the signal required to be tracked by the output in Auto control mode If set to None output tracking is disabled Mode Selects the type of object tracking In Auto Control output tracking signal when in Auto control mode Auto OP Control output tracking signal change in PID output when in Auto c...

Страница 64: ...e below When operating with Split O P in Manual control mode manual adjustment is made to the input at the split output block x axis By default the Operator page displays both output values OP1 and OP2 Loop 1 Time Prop See Basic level page 27 Applicable only if the output type selected is Split O P see page 36 50 50 100 100 0 50 50 100 100 0 Output 1 OP1 Output 2 OP2 Max Input 2 50 Max Output 2 0 ...

Страница 65: ... Advanced Level IM CM S EN Rev R 63 7 5 Process Alarm Used to configure up to 8 independent process alarms Process Alarm Menu Process Alarm High and Low Process Alarm Action Trip point Process Variable Alarm On Alarm Off Alarm On Alarm Off High Process Low Process Hysteresis Hysteresis ...

Страница 66: ... Tag is displayed as a diagnostic message and appears in the Diagnostic Status Bar see page 24 and the Diagnostic view in the Operator Level 22 Source The analog source see Appendix A 2 page 117 for description of sources Trip Alarm trip level in engineering units High and Low Latch Alarm Action Trip Point Alarm On Alarm Off Hysteresis Process Variable Alarm Latched Alarm Acknowledged by Operator ...

Страница 67: ...t become active until the Time Hysteresis value has expired If the signal goes out of the alarm condition before the Time Hysteresis has expired the hysteresis timer is reset Display Enable Enables an alarm to be used for control purposes without it appearing as an active alarm state in the Operator level or Diagnostic view Acknowledge Source The source required to acknowledge all active alarms Ac...

Страница 68: ...mp and soak segments Can be applied above below or above and below the setpoint Programmable start conditions Program Local Setpoint Current PV Recovery action determines profile operation under power fail PV fail conditions Fast Run mode runs program 8 times normal speed for test commissioning The Ramp Soak Profile facility is a setpoint profile generator which can be used with any type of contro...

Страница 69: ... configured to increment in one of two way for a fixed period of time or for a number of engineering units per hour Fig 7 1 Ramp Types Start value Start value Start value Start value End value End value Start value End value End value Start value End value Ramp rate End value Ramp rate Seg 1 Seg 2 Seg 3 Seg 1 Seg 2 Seg 3 Time Time Time A Time units B Rate of change ...

Страница 70: ...mping segments and Soak applied to soak segments The hysteresis value can be set within the limits 0 to 9999 where a setting of 0 implies that no deviation from the set point value can be tolerated Hysteresis can be applied in one of four ways with individual settings for each segment None hysteresis not applied ramp soak not guaranteed High hysteresis applied above set point Holdback HOLD set if ...

Страница 71: ...g 1 Seg 2 Seg 3 Seg 4 Seg 5 Start Time hours or minutes Holdback active outside hysteresis limits Hysteresis applied Hi Lo above and below the set point Process Hysteresis applied Hi above the set point End of profile revert to local set point or repeat of profile Skip forward Adjustable ramp rates Set point Eng Units Manual pause Adjustable holdback hysteresis 1 for Ramp segments 2 for Soak segme...

Страница 72: ...e process variable value is used as the program start point and the set point steps up to the process variable value This has the effect of changing the overall segment time and maintains a constant ramp rate Fig 7 3 Current PV Process variable Current process variable inserted as program start level Current process variable inserted as program start level Program status Seg 1 Seg 2 Seg 3 Seg 1 Se...

Страница 73: ...dition shall be specified for each control loop that determines the initial start setpoint of the program Program Setpoint The program will start at the setpoint configured by Setpoint Start parameter Local Setpoint The program will start from the current local setpoint value Current PV The program will start from the current process variable value Applies only if the first segment is a ramp ...

Страница 74: ...red to increment in one of two way for a fixed period of time or for a number of engineering units per hour Rate Defined as rate time unit hr min sec Time Defined in hr min sec Ramp Units Selects the ramp rate time units required Units min Units hr Units sec Program Control Run Selects the digital source used to start the program The program is started on the rising edge Hold Selects the digital s...

Страница 75: ...m was held it will remain held at the start point Run Hold Selects the digital source used to start and hold the program The program runs when the input is high and holds when the input is low Stop Selects the digital source used to stop the program The program is stopped on the rising edge Skip Selects the digital source used to skip to the next segment The segment is skipped on the rising edge R...

Страница 76: ...at which failure occurred and is placed in Operator Hold mode Repeat The program resumes from the start of the current segment and is placed in Operator Hold mode Reset The program resumes from the start of the current program and is placed in Operator Hold mode Advance The program resumes at the point in the program that would have been reached if no power failure had occurred in Run mode Note If...

Страница 77: ...This frame enables a mode that allows the profile program to be run 8 times faster than the programmed times In this mode guaranteed Ramp Soak settings are ignored but wait conditions are not overridden Enter Program Name Enter the Program Name up to 16 characters to be used to identify the running program in the Operator Page display Repeat Count Enter the number of times the program is to be rep...

Страница 78: ...d switch to the currently selected Local Setpoint Hold Setpoint The program remains active and in control at the setpoint defined by the last segment It remains active until stopped at which point the Control Setpoint switches to the current Local Setpoint Holdback Hysteresis Hysteresis values are used to hold the program when the process value deviates from the setpoint by more than the hysteresi...

Страница 79: ...ed duration in hh mm ss If the soak segment is the 1st segment in a program the setpoint value will be set as defined by the SPT Start Condition parameter For other segments the setpoint value will be derived from the end setpoint value of the previous segment Ramp Rate Increases or decreases the setpoint at a linear rate until the desired value is reached A Ramp Rate segment requires the user to ...

Страница 80: ...hh mm ss Step Changes the setpoint value from the end value to of the previous segment to a new value A Step segment requires the entry of the Step setpoint value End Ends the program Period Select the soak or ramp period of the segment in hhh mm ss Note Only displayed if Segment Type is configured as Soak or Ramp time Setpoint Select the required end setpoint value for the segment in engineering ...

Страница 81: ...he Guaranteed Ramp Soak feature will be applied to the segment None Guaranteed Ramp Soak is disabled for the segment High Guaranteed Ramp Soak is applied above the setpoint Low Guaranteed Ramp soak applied below the setpoint High Low Guaranteed Ramp Soak is applied above and below the setpoint Note Displayed only if Guaranteed Ramp Soak is enabled in the Segment Options menu see page 75 for detail...

Страница 82: ...of the operand sources are invalid for example an alarm that is not configured the logic equation output state is zero and invalid 2 Logic equations are required to perform an exclusive OR of 3 inputs Menu Functions OR AND NOR NAND EXOR END OR AND NOR NAND EXOR END OR AND NOR NAND EXOR END OR AND NOR NAND EXOR END Operand 1 Operand 2 Operand 3 Operand 4 Operand 5 Operator 1 Operator 2 Operator 3 O...

Страница 83: ...ned to the operand has a state of 1 it is inverted to a state of 0 before being applied to the equation Operator1 7 Selects the Operator type OR AND NOR NAND EXOR END Select END if no more elements are required Math Blocks Up to 8 math blocks can be configured Each block can be configured as one of 6 different types see Block Type below The resulting analog value can be used as a source for other ...

Страница 84: ...erator the equation is processed in a strict left to right order with no operator precedence The result of a math block can be used as the operand in another math block enabling more complex math equations to be constructed The math blocks are processed in ascending order math block 1 is processed first then math block 2 then 3 to 8 Operand 1 Operand 2 Operand 3 Operand 4 Operator 1 Add Subtract M...

Страница 85: ... case of power failure If the duration of the power failure is longer than the Average Duration see page 85 the math block output value is set to zero Max Hold The math block output represents the highest value of the signal since it was reset Min Hold The math block output represents the lowest value of the signal since it was reset Multiplexer Enables 1 of 2 analog signals or constant values to ...

Страница 86: ...Operator 1 3 End Add Subtract Multiply Divide Terminates the equation Standard arithmetic functions Low Select High Select Result is the lower of the 2 operands Result is the higher of the 2 operands Median If Median operators are used the median value calculated is dependent on the number of operands The median value of 2 operands is their mean value The median value of 3 operands is the value of...

Страница 87: ...ernal accumulative value and timer This does not change the immediate output of the math block but restarts the calculation of the next average value see Appendix A 1 page 116 for digital sources Average Duration Sets the time duration the average is calculated over The output value of the math block is updated at this rate Max Hold MinHold Setup Source 1 Selects the source for maximum or minimum ...

Страница 88: ...y if Source 1 is assigned to one of the constants Source 2 Select the source for the second input into the multiplexer Source 2 Constant Sets the constant value to be used Note Applicable only if Source 1 is assigned to one of the constants Mux Selector Select the digital signal to be used to switch between the 2 multiplexer inputs 0 selects first input Mux A Src 1 selects second input Mux B Src S...

Страница 89: ...is set and its output is determined by the Fault Action see below Eng Units The selected units are displayed in the operator pages see Appendix C page 122 for description of engineering units Fault Action The value returned when the math block fails can be configured None Failed calculated value is used as math block output Automatic If the failed calculated output value is below zero the output i...

Страница 90: ... assigned to the custom linearizer output Source 1 2 Selects the input source to be linearized see page Appendix A page 116 for description of sources Lin 1 2 Breakpoints Set X and Y values as a of the engineering range input source Breakpoint Selects the breakpoint to be configured X X is input to the linearizer expressed as a of the electrical range Y Y is output expressed as a of the engineerin...

Страница 91: ...ay timer Trigger occurs on rising edge of the signal see page Appendix A page 116 for description of sources Delay Time The delay in seconds between the trigger received and the output of the delay timer going high On Time The length of time in seconds the delay timer output is held in the high state Real Time Alarms 2 Independent real time alarms can be configured to activate on specific days and...

Страница 92: ...ppears in the Diagnostic Status Bar and the Diagnostic View in the Operator Level see Section 5 page 22 Bank Control Bank control functionality allows a bank of output devices such as pumps heaters or fans to be scheduled On and Off under a duty assist strategy If required one of two different wear levelling schedules can be selected rotate or FIFO First In First Out Up to 6 stages may be configur...

Страница 93: ... First Out FIFO Level P1 P2 P3 Level P1 P2 P3 Seq 1 1 3 m Seq 6 2 2 m Seq 2 2 2 m Seq 7 0 8 m Seq 3 3 6 m Seq 8 1 8 m Seq 4 4 3 m Seq 9 0 8 m Seq 5 2 8 m Seq 10 1 8 m Rotate Pump Cycling Level P1 P2 P3 Level P1 P2 P3 Seq 1 1 3 m Seq 6 2 2 m Seq 2 2 2 m Seq 7 0 8 m Seq 3 3 6 m Seq 8 1 8 m Seq 4 4 3 m Seq 9 0 8 m Seq 5 2 8 m Seq 10 1 8 m On trip at 4 m Off trip at 3 m On trip at 1 5 m Off trip at 1 ...

Страница 94: ...ge 1 6 Off Trip Select the Control Source value PV at which the output pump will be turned off On Trip Select the Control Source value PV at which the output pump will be turned on Output Select the initial output relay or digital output that the output is assigned to by default for example when FIFO or Rotate mode is not in operation Schedule Select the wear levelling schedule required Off the ou...

Страница 95: ...4 and 1 2 DIN 7 Advanced Level IM CM S EN Rev R 93 7 8 Communication Used to setup communication parameters for the MODBUS Ethernet communication protocols see separate User Guide IM CM C EN Note Only 1 communication option can be fitted per controller Menu Communication ...

Страница 96: ... of the diagnostic messages generated by the controller Each diagnostic condition has a classification code conforming to NAMUR NE107 Menu Diagnostics 178 025 S In Configuration n 2 00h 04m 07s tn 01h 03 m 15s Configuration C178 025 C S n tn Internal Code Diagnostic priority Highest value 250 Number of instances of this diagnostic condition Total time spent in this diagnostic condition Time since ...

Страница 97: ...analog signal selected Digital Sources Enables the current state of any digital source to be viewed Digital Source Selects the digital signal to be viewed see Section A 1 page 116 View State Displays the state of the digital signal selected Invalid Sources Select edit to display any invalid analog or digital sources that are used in the configuration Reasons for invalid sources include Hardware no...

Страница 98: ...ective input source or input signal out of permitted range Check wiring Check input source Check if input signal is outside permitted limits 246 002 244 003 RSP 1 2 Failed Problem with Input assigned to Loop 1 2 Remote Setpoint Broken sensor leads defective input source or input signal out of permitted range Check wiring Check input source Check if input signal is outside permitted limits 222 014 ...

Страница 99: ...uration parameters and correct any errors Acknowledge error If problem persists contact local service organization 214 017 NV Error Main Bd Failure of non volatile memory on main board or permanent corruption of its data Check calibration of AIN1 AIN2 and AO1 Recalibrate if necessary Acknowledge error If problem persists contact local service organization 212 018 NV Error Opt Bd 1 Failure of non v...

Страница 100: ...ger present or valid Check invalid sources in Diagnostics menu see Section 7 9 page 94 Check configuration check I O required for configuration is present and correct any illegal use of the invalid signal by changing configuration or fitting additional option cards 054 044 052 045 Tune Lp1 2 Fail Autotune has failed to complete its sequence or has calculated values outside of its permitted range C...

Страница 101: ...s in progress See page 29 for details of each phase Autotune can be aborted if required by selecting Manual control mode 160 030 158 031 156 032 Tuner 2 Phase 1 3 Autotune is in progress See page 29 for details of each phase Autotune can be aborted if required by selecting Manual control mode 162 029 154 033 Tuner 1 2 Pass Autotune has completed successfully and calculated new control parameters A...

Страница 102: ...tput I O configuration No Analog Inputs The number of analog inputs available No Analog Outputs The number of analog outputs available No Relays The number of relays available No Digital I O The number of digital inputs outputs available Functionality The current functional setting of the controller for example Dual Loop Serial No The factory serial number Hardware Revision The controller s hardwa...

Страница 103: ...es basic feedback control using three term PID or On Off control The controller output is calculated from the difference between the process variable and the control setpoint The control setpoint can be a fixed value entered by the user Local setpoint or an input from a remote source remote setpoint Notes Input assignments can be changed in Device Setup Custom Config see page 38 Output assignments...

Страница 104: ... Fig 8 1 Single Loop Single Loop with Remote Setpoint Template A M PV L R SP AIN 1 AIN 2 x Ratio Bias LSPT1 LSPT2 LSPT3 LSPT4 Local Set Point Manual Output Loop 1 PID Control PID O P OP Time Prop Output Motorized Valve Split Output AO1 RLY1 RLY2 RLY1 OP2 OP1 Output Type Analog Output 1 1 Single Loop Remote Setpoint only RSP AIN 3 FB ...

Страница 105: ...ystem which is identified by either a low signal value on the Master Output or via a digital Input signal the ControlMaster selects Manual Mode with either the last valid Master Output value or a pre configured fixed output value Once the Master signal is restored or the digital input state returns to its normal state the ControlMaster switches back to Auto Mode and continues to follow the Master ...

Страница 106: ...itches into Local Control Mode and the process is controlled by the PID output of the ControlMaster The PID algorithm continuously tracks the Master Controller output value to ensure a bumpless transfer from remote to local operation Once the Master Controller output is restored or the digital Input returns to its normal state the ControlMaster switches back to Remote Control Mode and continues to...

Страница 107: ...ignal Parallel operation is achieved by using an external relay that is triggered by a relay on the ControlMaster and selects the output to be routed to the process This setup allows uninterrupted control even in the event of failure of either the master controller or ControlMaster External relay type is triple pole dual throw Fig 8 4 Parallel Connection AIN 2 AO 1 PV Control Output Master Control...

Страница 108: ...tor The Single Indicator template is used to display one variable on the digital display 8 2 4 Dual Indicator The Dual Indicator template is used to display two process variables on the digital display Fig 8 5 Single Indicator Template AO1 Manual Output AIN 1 PV Fig 8 6 Single Indicator Template Manual Output AO1 Manual Output AO2 AIN 1 AIN 2 PV 1 PV 2 ...

Страница 109: ...a the front panel keys the controller can be configured from a PC via the infrared port using the ConfigPilot PC configuration software The controller s infrared port is activated when accessing the following page in the Advanced level Advanced Device Setup IrDA Configuration Connect Fig 9 1 PC Configuration via IrDA Service Port Infrared Port on Controller Infrared USB Adaptor ...

Страница 110: ...ff Motorized valve with feedback Motorized valve without feedback Split output with combinations of relay digital output and current outputs CM10 4 tactile membrane keys CM30 and CM50 6 tactile membrane keys Basic Advanced User assigned password protection not set at factory Base templates Single loop with local setpoint Single loop with remote setpoint Standard templates Auto Manual station low s...

Страница 111: ...s Derivative 0 0 to 999 9 s Manual Reset 0 0 to 100 0 Local CM10 2 selectable via digital inputs or front panel CM30 CM50 4 selectable via digital inputs or front panel Remote selectable via digital input or front panel keys Number 8 Types High Low process and High Low latch Source Fully configurable for example PV analog input math block inbuilt OP control loop deviation Hysteresis Level and time...

Страница 112: ...r Pt100 Only if universal process input is configured as Thermocouple Number 8 Elements 15 Per equation Operators OR AND NOR NAND NOT EXOR Number 2 Elements 20 Breakpoints Number 2 total 9 digit totals Type Analog digital frequency or pulse Statistical calculations Average maximum minimum for analog signals Update rate 125 ms CM10 1 standard CM30 CM50 2 1 standard 1 optional Type Voltage Current R...

Страница 113: ...put drift 0 1 of reading or 10 µV annually Input impedance 10 M millivolts input 10 mA input Inputs Thermocouple Maximum Range C F Accuracy of reading B 18 to 1800 0 to 3270 0 1 or 2 C 3 6 F above 200 C 392 F E 100 to 900 140 to 1650 0 1 or 0 5 C 0 9 F J 100 to 900 140 to 1650 0 1 or 0 5 C 0 9 F K 100 to 1300 140 to 2350 0 1 or 0 5 C 0 9 F L 100 to 900 140 to 1650 0 1 or 1 5 C 2 7 F N 200 to 1300 ...

Страница 114: ... to 25 V 0 to 550 0 to 10 k 0 1 or 20 µV 0 2 or 4 µA 0 2 or 20 mV 0 2 or 0 1 0 5 or 10 Sample Interval 125 ms per sample Digital Inputs Type Volt free or 24 V Minimum pulse duration Analog inputs 1 and 2 Single input configured 250 ms Both inputs configured as analog or digital 500 ms Analog inputs 3 and 4 not CM10 Single inputs configured 250 ms Both inputs configured as analog or digital 500 ms ...

Страница 115: ...optional Type CM10 CM30 Standard with changeover contacts Optional contacts selectable as N O or N C by jumper CM50 Selectable as N O or N C by jumper Contact ratings CM10 CM30 CM50 Relay 1 5 A 240 V Relays 2 3 4 5 A 240 V max ambient 40 C 104 F Relays 2 3 4 2 A 240 V max ambient 55 C 131 F 5 A 240 V Update rate 125 ms CM10 2 optional CM30 CM50 6 2 standard 4 optional Type User programmable as inp...

Страница 116: ... F Operating humidity range 5 to 95 RH non condensing Storage temperature range 20 to 70 C 4 to 158 F Restrictions may apply refer to relay specification Enclosure sealing Vibration Conforms to EN60068 2 6 Safety Approvals and certifications EN61010 1 cULus General safety Pollution category 2 Insulation category 2 Isolation to inputs Key Isolation Baud rate up to 115 kBaud Distance up to 1 m 3 ft ...

Страница 117: ...ical Size Weight Panel cutout Case material Glass filled polycarbonate DS CM10 EN Rev O DS CM30 EN Rev P DS CM50 EN Rev N CM10 50 x 97 x 141 mm 2 0 x 3 8 x 5 5 in CM30 97 x 97 x 141 mm 3 8 x 3 8 x 5 5 in CM50 144 x 76 x 146 mm 5 6 x 3 0 x 5 7 in CM10 0 38 kg 0 84 lb approx unpacked CM30 0 5 kg 1 1 lb approx unpacked CM50 0 58 kg 1 3 lb approx unpacked CM10 45 x 92 mm 1 8 x 3 6 in 121 mm 4 8 in beh...

Страница 118: ...he analog input is outside the fault detect level specified during configuration AO1 2 Loop Break Analog output Delay Timer 1 2 Delay timer state IP 1 4 Digital State Input 1 4 digital state Linearizer 1 2 Fail Custom linearizer failure Logic Equation 1 8 Logic equation result Loop 1 SP Mode Setpoint mode selected 0 Local 1 Remote Loop 1 Auto Mode Automatic control mode Loop 1 Close Relay Motorize...

Страница 119: ...zer run state 1 totalizer running T1 2 Wrap Pulse Totalizer wrap pulse If Wrap Enable is set to On active for 1 second when the predetermined count is reached If set to Off active when the predetermined count has been reached and remains active until the totalizer is reset Source Name Description Comment Source Name Description Anlg IP 1 4 Analog input Constant 1 8 Math block constant Linearizer 1...

Страница 120: ...1 11 Setpoint Selected Ratio Value 1 12 Setpoint Selected Bias Value 1 13 Setpoint Actual Ratio Value 1 14 Setpoint Selected LSPT Value 2 15 Setpoint Control Setpoint Value 2 16 Setpoint Selected Ratio Value 2 17 Setpoint Selected Bias Value 2 18 Setpoint Actual Ratio Value 2 19 Modbus Input Value 1 26 Maths Block Value 1 27 Maths Block Value 2 28 Maths Block Value 3 29 Maths Block Value 4 30 Math...

Страница 121: ...g Input Fail State B1 73 Analog Input Fail State B2 74 Analog Input Fail State C1 75 Analog Input Fail State C2 76 Maths Block Fail State 1 77 Maths Block Fail State 2 78 Maths Block Fail State 3 79 Maths Block Fail State 4 80 Maths Block Fail State 5 81 Maths Block Fail State 6 82 Maths Block Fail State 7 83 Maths Block Fail State 8 84 Custom Linearizer Fail State 1 85 Custom Linearizer Fail Stat...

Страница 122: ...Alarm State 3 146 Alarm Ack State 3 147 Alarm State 4 148 Alarm Ack State 4 149 Alarm State 5 150 Alarm Ack State 5 151 Alarm State 6 152 Alarm Ack State 6 153 Alarm State 7 154 Alarm Ack State 7 155 Alarm State 8 156 Alarm Ack State 8 157 Time Prop State 1 158 Time Prop State 2 159 Time Prop State 3 160 Time Prop State 4 161 Control O P Auto State 1 Error Code Error Description 162 Control O P Ma...

Страница 123: ...gured incorrectly 2 Retort Rampback Invalid Retort Rampback value is a negative number and must be changed 3 Retort Previous Invalid There is no previous segment therefore the program is unable to jump back to the last ramp rate 4 PV Invalid The Process Variable has failed 5 Local Setpoint has Failed The Local setpoint has become invalid This may be that it has travelled outside of its permissible...

Страница 124: ... Celsius Fahrenheit Feet imperial feet ft3 d ft3 h ft3 m ft3 s cubic feet per day hour minute second FTU formazine turbidity units g d g h g l grams per day hour liter gal d UK imperial gallons per day gal d US US gallons per day gal h UK US imperial US gallons per hour gal m s UK US imperial US gallons per minute second Hz hertz Inches imperial inches Kelvin degrees Kelvin kg d kg h kg m kilogram...

Страница 125: ...rs per day hour ml h ml m milliliters per hour minute Ml s megaliters per second mS cm mS m milliSiemens per centimeter meter mV millivolts MV megavolts Unit Description NTU nephelometric turbidity units pb parts per billion pH potential Hydrogen pm parts per million psi pounds per square inch S Siemens SCFM standard cubic feet per minute T d T h T m metric tonnes per day hour minute T s metric to...

Страница 126: ...edback PV SP Open V Close V ALM 1 ALM 2 MValve Boundless PV SP OP 2 Open V Close V ALM 1 ALM 2 Split Output Analog Relay OP 1 PV OP 2 ALM 1 ALM 2 ALM 3 Split Output Analog Digital OP 1 PV OP 2 ALM 1 ALM 2 ALM 3 ALM 4 Split Output Relay Relay PV SP OP 1 OP 2 ALM 1 ALM 2 Split Output Relay Digital PV SP OP 2 OP 1 ALM 1 ALM 2 ALM 3 Split Output Digital Relay PV SP OP 1 OP 2 ALM 1 ALM 2 ALM 3 Split Ou...

Страница 127: ...2 Source Delay Time On Time Real Time Alarms Real Time Alarm 1 2 Bank Control Bank Size Control Source Bank 1 6 Refer to IM CM C EN for details of Communication parameters Diagnostic History Source Analysis Analog Source Digital Source Invalid Sources Instrument Type I O Build No Analog Inputs No Analog Outputs No Relays No Digital I O Functionality Serial No Hardware Revision Software Revision Fu...

Страница 128: ...l storage installation operating and maintenance records relating to the alleged faulty unit Note We reserve the right to make technical changes or modify the contents of this document without prior notice With regard to purchase orders the agreed particulars shall prevail ABB does not accept any responsibility whatsoever for potential errors or possible lack of information in this document We res...

Отзывы: