+33 4 7642 9550
www.aaton.com
User manual for Cantar-X1 & X2 v2.15 2008 March 28
p.13
p.13
Calendar and Sync Times
Time is the essence of a digital audio recorder. Cantar uses
two kinds of time: ‘
Calendar Time
’ organizes folders and
files, ‘
Sync Time
’ links audio and picture.
Calendar Time
System date
and
time
run on a medium precision clock
which automatically creates the workday folders. This clock
is powered for four to six years by a user replaceable 3V
Lithium CR1220 button battery located below the HDD
compartment.
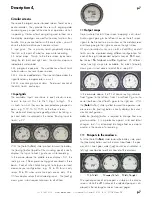
In STOP, the system date and time displayed on the rectan-
gular screen must be checked for a ±5 minute consistency
with the time-zone you are working in; think of it when you
get off of a three-hour flight.
This clock is very important for the file management; go to
TECHSET.21 ‘System Time’ and press [ok], a triangle points
to the modifiable digit. Using [jog], select the desired
value, then press the [>] or [<] to move on to the next col-
umn, and so on, [ok] to exit.
Power ‘Off’ then ‘On’ Cantar
for the CPU to acknowledge the new system time.
The
Workday
is related to the date defined by the calen-
dar clock but not totally a clone of it. The workday is an
interpretation of the ‘human’ day; its duration can be from
6 AM in the morning to 3 AM in the deep night next day.
If you turn ‘OFF’ the batteries after midnight, Cantar thinks
the operator has gone to sleep. But if your ‘workday’ is
continued into the wee hours after a midnight snack, you
would probably not want it to be considered a ‘new’ work-
day. That is why Cantar displays '
New Workday?
', giving
you the opportunity to say ‘NO’. Note that going to TEST
or REC is a way to say ‘YES’.
Thus, if you stop working at 2 AM one day, the audio
files are technically still part of the previous workday.
Conversely if you want to start a new workday right after
midnight, just turn ‘OFF’ Cantar, then turn it back ‘ON’ and
answer ‘YES’ or go to TEST.
Sync Time
At startup you will notice a blinking
int c
or
ext c
icon,
depending upon the master (internal clock) or slave (external
clock) mode selected in AUDIO/TC.12 ‘TC Source’. This
blinking icon reminds you to verify that the same timecode is
running in all of the camera(s) and audio recorder(s).
Four syncing methods can be used:
Method 1
'int c’ internal
Free-Run
master-clock
Set AUDIO/TC.12 ‘TC Source’ to '
Int.Clock
'. The internal
TCXO 1 ppm clock keeps the time accurate to within ±one
frame in nine hours; this time is used to stamp the sound files
with the very same TC as the one stamped on the camera’s
images. This is the AatonCode method. In the video world
they called it the
‘free-run’
mode. Once initialized (four
ways) Cantar behaves as an independent
master-clock
.
• System/Calendar initialization
At startup, Cantar uses the System/Calendar date and
time to immediately initializes its internal high stability,1ppm
TCXO, Sync clock, ‘
Stc
’ (System-TC) is displayed in the
rectangular screen.
To remind you to sync other equipment
around
to the Cantar Sync clock, the ‘
int c
’ icon keeps
blinking until you press [shift] [TC jam]. 'Confirm Sys time'
is displayed.
• Operator initialization
In case you don’t want to use the calendar date and time,
the TCXO clock can be set by the operator, see AUDIO/
TC.17 ‘OperTc Init’. ‘
Otc
’ (Operator-TC) is displayed in
the rectangular screen.
• LTC initialization
(from Camera, VTR, GPS, etc.)
Cantar on TEST press [TC jam] for more than two seconds,
this makes the entered SMPTE LTC jam the Cantar TCXO
clock. ‘
Jtc
’ (Jammed-TC) is displayed in the rectangular
screen. [TC jam] has no effect if there is no valid timecode
on the LTC inputs, ‘
Jam Failed No LTC
’ appears in the rect-
angular screen and the ‘
int c
’ icon continues to blink.
•
ASCII initialization
(from Aaton OriginC)
Cantar on TEST, its TCXO clock is set by an Aaton OriginC
which also initializes cameras and GMT generators. ‘
Atc
’
(ASCII-TC) appears in the rectangular screen.
STOP 3,
Time&Sync

