© CMS Magnetics 2007, 2008
Confidential
8
2. Lay out the individual pole pieces in order of eventual assembly.
3. Insert the generator cables through the tower pieces, and pull the cables out of the main
section of the tower. It is easier to feed the cables through each tower section before
assembly, instead of trying to feed the cables through the entire length of the
assembled tower.
4. Using the nuts, bolts and washers provided, connect each section of tower one by one,
and place the tower on a supporting stand after assembly. This supporting stand keeps
the top of the tower off the ground so that you can more easily mount the generator
later.
5. Connect the cables to the generator. Pull the cable slack through the base of the tower.
6. While one person positions the generator on the top of the tower, the second person
needs to bolt the running flange and tower flange together. Make sure the shaft faces
upward in order to install the blades/hub assembly.
7. Position the stand so that the generator is elevated about 5’-6’ off the ground, so that
the tail can be connected with enough ground clearance.
8. Assemble the tail and fins. Attach the tail to the generator so that the tail is pointing
toward the ground, otherwise the weight of the tail will cause the generator to flip over,
resulting in possible personal injury or property damage.
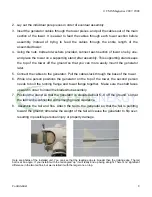
Here are photos of the installed unit. You can see that the leading edge is broader than the trailing edge. The tail
bolt is at an angle. If you install it with the tail angled “up” it will really end up being straight. There is no significant
difference in the two tail fins, but we installed it with the larger one on top.

