background image

F u l l - s i z e   C P U   C a r d  

S B C - 8 6 0


Chapter 1 General Information


1 - 3 

pin-headers, offering 480Mbps high-speed efficiency and value without 
compromising performance. 

 
Moreover, SBC-860 is also equipped with Dual Intel Ethernet 
controllers. One of these provides superior 1Giga Mbps networking 
access ability for high speed networking applications such as gateway, 
VPN, Mini server. 

 
In short, this product is a versatile P4 level compact board with the best 
cost-performance for CTI, networking, and mini-server markets. 

Содержание SBC-860

Страница 1: ... CPU Card S B C 8 6 0 SBC 860 Rev A Socket 478 based Intel Pentium 4 processor Full size CPU Card With Integrated Intel 82845GV chipset DDR 4 USBs Dual Ethernet CompactFlash SBC 860 Rev A Manual 6th Ed Jan 2004 ...

Страница 2: ...this manual is intended to be accurate and reliable However the original manufacturer assumes no responsibility for its use or for any in fringements upon the rights of third parties that may result from its use The material in this document is for product information only and is subject to change without notice While reasonable efforts have been made in the preparation of this document to assure ...

Страница 3: ... l CompactFlash is a trademark of the Compact Flash Association l Intel Pentium 4 and Celeron are trademarks of Intel Corporation l Microsoft Windows is a registered trademark of Microsoft Corp l ITE is a trademark of Integrated Technology Express Inc l IBM PC AT PS 2 and VGA are trademarks of International Business Machines Corporation l SoundBlaster is a trademark of Creative Labs Inc ...

Страница 4: ...ll Size CPU Card 1 Quick Installation Guide 1 CD ROM for manual in PDF format and drivers 1 HDD Cable 1 FDD Cable 1 Audio and COM Port Cable with bracket 1 LPT and COM Port Cable with bracket 1 Y Cable Keyboard and Mouse 1 USB Cable with bracket If any of these items should be missing or damaged please contact your distributor or sales representative immediately ...

Страница 5: ... 2 5 2 4 List of Jumpers 2 7 2 5List of Connectors 2 8 2 6 Setting Jumpers 2 10 2 7 Front Panel JP1 2 11 2 8 COM2 RS 232 422 485 Selection 1 JP2 2 11 2 9 COM2 RI 5V 12V Selection JP3 2 11 2 10 COM2 RS 232 422 485 Selection 2 JP4 2 12 2 11 CPU FSB Setting JP5 2 12 2 12 Clear CMOS JP6 2 12 2 13 Watchdog Timer JP7 2 12 2 14 ATX Power Connector CN1 2 13 2 15 System Fan Connector CN2 2 13 2 16 Floppy D...

Страница 6: ...lay Connector CN14 2 22 2 28 Ethernet 10 100 1000BaseT RJ 45 Phone Jack CN15 2 23 2 29 Ethernet 10 100 BaseT RJ 45 Phone Jack CN17 2 23 2 30 Audio Input Output Connector CN18 2 24 2 31 Mini DIN PS 2 Connector CN19 2 25 2 32 CPU Fan Connector CN20 2 25 2 33 Internal Keyboard Connector CN21 2 25 2 34 Internal Mouse Connector CN22 2 26 2 35 Compact Flash Disk Connector CN23 2 26 2 36 External 5V SB P...

Страница 7: ... 3 2 5 PC Health Setup 3 38 3 2 6 Clk Voltage Setup 3 40 3 2 7 Exit Setup 3 42 Chapter 4 Driver Installation 4 1 Installation 1 4 3 4 2 Installation 2 4 4 4 3 Installation 3 4 5 Appendix A Programming the WatchDog Timer A 1 How to program the watchdog timer A 2 ...

Страница 8: ...Full size CPU Card S B C 8 6 0 Chapter 1 General Information 1 1 General Information Chapter 1 ...

Страница 9: ...ce available SBC 860 also provides high memory capacity up to 2 GB DDR DRAM DDR 200 266 In addition to its powerful computing engine the full functional design of the board includes features such as chipset integrated 2D 3D graphics engine with AGP 4x bandwidth built in USB2 0 and on board CompactFlash Type II socket SBC 860 delivers super graphic performance without additional cost on integrated ...

Страница 10: ...formance Moreover SBC 860 is also equipped with Dual Intel Ethernet controllers One of these provides superior 1Giga Mbps networking access ability for high speed networking applications such as gateway VPN Mini server In short this product is a versatile P4 level compact board with the best cost performance for CTI networking and mini server markets ...

Страница 11: ...ted AC 97 2 3 codec PCI 3D Audio n Supports type II CompactFlash n 4 USB ports onboard n High Drive design to enhance the ISA driving capacity n Supports H W status monitoring n Support 1 IrDA n Onboard 2 IDE connectors Support 4 devices n Supports Ultra DMA 100 n Dual Ethernet 1 Intel 82562 phy 1 82551QM ER or 82540EM for option ...

Страница 12: ...ced IDE Interface Supports Four IDE devices Supports Ultra DMA 100 mode with data transfer rate up to 100MB sec Connector Two 20x2 2 54mm pin header with box l FDD Interface Supports up to two floppy disk drives 5 25 360KB and 1 2MB and or 3 5 720KB 1 44MB and 2 88MB Connector One 17x2 2 54 mm pin header with box l USB Ports 4 USB 2 0 ports Connector Two 5x2 2 00mm pin header l Serial Ports Two RS...

Страница 13: ...T KBD and mouse for IPC applications Supports WakeOn KBD and Mouse l Watchdog Timer Generate a system reset Software selectable time out interval l SSD CompactFlash slot onboard support type 2 CFD l IRDA Port Support SIR and CIR Connector One 6 pin 2 54mm header l DMA 7 DMA channels 8237 equivalent l Interrupt 15 interrupt levels 8259 equivalent l Power Management Supports ATX power supply ACPI 2 ...

Страница 14: ...B with Dynamic Video Memory Technology l Display Type Supports non interlaced CRT l Resolution Up to 1600 x 1200 16 7M colors Ethernet Interface l Chipset Dual 10 100 Ethernet 1 Intel 82562 Phy and one Intel 82551QM ER or one Intel 82540EM 10 100 1000 Gigabit Ethernet 1 Intel 82562 Phy and 1 Kenai 32 l Interface Two RJ45 connector 1x10 100 and 1xGbE LAN LED support Support WOL and optional support...

Страница 15: ... Bus ITE IT8888 PCI to ISA bridge l High Drive Support 64mA high driving capability for ISA bus slot on backplane Mechanical and Environment l Dimension 13 3 L x 4 8 W l Weight 1 2lb 0 5kg l Operating Temperature 0 60 32 140 l Power Supply Voltage 5V 12V 3 3V 5VSB ATX ATX12V Power Supply version 1 2 ...

Страница 16: ...Installation Guide Chapter 2 Part No 2007860015 Printed in Taiwan Jan 2004 Notice The Quick Installation Guide is derived from Chapter 2 of user manual For other chapters and further installation instructions please refer to the user manual CD ROM that came with the product ...

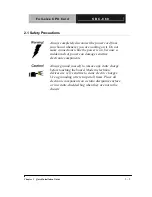
Страница 17: ...while the power is on because a sudden rush of power can damage sensitive electronic components Always ground yourself to remove any static charge before touching the board Modern electronic devices are very sensitive to static electric charges Use a grounding wrist strap at all times Place all electronic components on a static dissipative surface or in a static shielded bag when they are not in t...

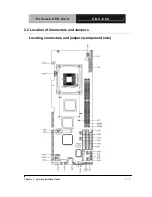
Страница 18: ...Full size CPU Card S B C 8 6 0 Chapter 2 Quick Installation Guide 2 3 2 2 Location of Connectors and Jumpers Locating connectors and jumpers component side ...

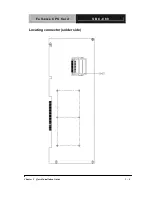
Страница 19: ...Full size CPU Card S B C 8 6 0 Chapter 2 Quick Installation Guide 2 4 Locating connector solder side ...

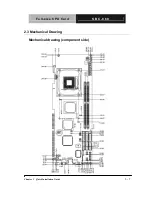
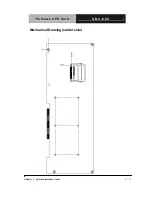
Страница 20: ...Full size CPU Card S B C 8 6 0 Chapter 2 Quick Installation Guide 2 5 2 3 Mechanical Drawing Mechanical drawing component side ...

Страница 21: ...Full size CPU Card S B C 8 6 0 Chapter 2 Quick Installation Guide 2 6 Mechanical Drawing solder side ...

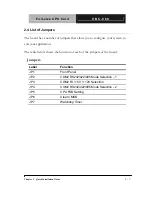
Страница 22: ...llow you to configure your system to suit your application The table below shows the function of each of the jumpers of the board Jumpers Label Function JP1 Front Panel JP2 COM2 RS232 422 485 Mode Selection 1 JP3 COM2 RI 5V 12V Selection JP4 COM2 RS232 422 485 Mode Selection 2 JP5 CPU FSB Setting JP6 Clear CMOS JP7 Watchdog Timer ...

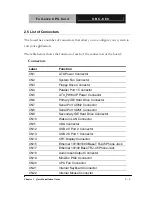
Страница 23: ...N4 Parallel Port 1 Connector CN5 ATX_PWM 4P Power Connector CN6 Primary IDE Hard Drive Connector CN7 Serial Port COM2 Connector CN8 Serial Port COM1 Connector CN9 Secondary IDE Hard Drive Connector CN10 Wake on LAN Connector CN11 IrDA Connector CN12 USB 2 0 Port 2 Connector CN13 USB 2 0 Port 1 Connector CN14 CRT Display Connector CN15 Ethernet 10 100 1000 BaseT RJ 45 Phone Jack CN17 Ethernet 10 10...

Страница 24: ...Full size CPU Card S B C 8 6 0 Chapter 2 Quick Installation Guide 2 9 CN23 Compact Flash Disk Connector CN24 External 5VSB PWRGD Connector ...

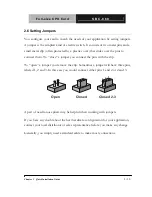
Страница 25: ...t them To close a jumper you connect the pins with the clip To open a jumper you remove the clip Sometimes a jumper will have three pins labeled 1 2 and 3 In this case you would connect either pins 1 and 2 or 2 and 3 1 2 3 Open Closed Closed 2 3 A pair of needle nose pliers may be helpful when working with jumpers If you have any doubt about the best hardware configuration for your application con...

Страница 26: ...al 1 GND 2 Power Button 3 HDD LED 4 VCC 5 External Speaker 6 VCC 7 Power LED 8 GND 9 Reset Button 10 GND 2 8 COM2 RS 232 422 485 Selection 1 JP2 JP2 Function 1 2 4 5 7 8 10 11 RS 232 Default 2 3 5 6 8 9 11 12 RS 422 2 3 8 9 RS 485 2 9 COM2 RI 5V 12V Selection JP3 JP3 Function 5 6 RI Default 3 4 5Volt 1 2 12Volt ...

Страница 27: ...unction 1 2 RS 232 Default 3 4 RS 422 5 6 RS 485 2 11 CPU FSB Setting JP5 JP5 Function 1 2 CPU Auto Detect Default 2 3 400MHz Open 533MHz 2 12 Clear CMOS JP6 JP11 Function 1 2 Normal Default 2 3 Clear CMOS 2 13 Watchdog Timer JP7 JP7 Function 1 2 Select Hardware Reset for WDT Default Open Select Keyboard Reset for WDT ...

Страница 28: ...nnector CN1 Pin Signal Pin Signal 1 3 3 Volt 11 3 3 Volt 2 3 3 Volt 12 12 Volt 3 GND 13 GND 4 5 Volt 14 PS_ON 5 GND 15 GND 6 5 Volt 16 GND 7 GND 17 GND 8 ATXPWRGD 18 5 Volt 9 5 Volt Stand By 19 5 Volt 10 12 Volt 20 5 Volt 2 15 System Fan Connector CN2 Pin Signal 1 GND 2 12 Volt 3 FAN Sense ...

Страница 29: ...ually used for 5 25 drives Wire number 1 on the cable is normally red or blue and the other wires are usually gray Connecting the floppy drive 1 Plug the 34 pin flat cable connector into CN3 Make sure that the red or blue wire corresponds to pin 1 on the connector 2 Attach the appropriate connector on the other end of the cable to the floppy drive s You can use only one connector in the set The se...

Страница 30: ...k Installation Guide 2 15 board indicating pin number 1 Also the connector on the floppy drive connector may have a slot When the slot is up pin number 1 should be on the right Check the documentation that came with the drive for more information ...

Страница 31: ...EX 9 GND 10 MTRA 11 GND 12 DRVB 13 GND 14 DRVA 15 GND 16 MTRB 17 GND 18 DIR 19 GND 20 STEP 21 GND 22 WDATA 23 GND 24 WGATE 25 GND 26 TRK0 27 GND 28 WPT 29 N C 30 RDATA 31 GND 32 HDSEL 33 N C 34 DSKCHG 2 17 Parallel Port 1 Connector CN4 Pin Signal Pin Signal 1 STBX 2 AFD 3 PTD0 4 ERR 5 PTD1 6 PINIT 7 PTD2 8 SLIN 9 PTD3 10 GND 11 PTD4 12 GND 13 PTD5 14 GND ...

Страница 32: ... SLCT 26 N C 2 18 ATX PWM 4P Power Connector CN5 Pin Signal 1 GND 2 GND 3 12 Volt 4 12 Volt 2 19 Primary IDE Hard Drive Connector CN6 Pin Signal Pin Signal 1 PRI_IDERST 2 GND 3 PDD7 4 PDD8 5 PDD6 6 PDD9 7 PDD5 8 PDD10 9 PDD4 10 PDD11 11 PDD3 12 PDD12 13 PDD2 14 PDD13 15 PDD1 16 PDD14 17 PDD0 18 PDD15 19 GND 20 N C 21 PDREQ 22 GND 23 PDIOW 24 GND ...

Страница 33: ... PDCS 3 39 IDEACTP 40 GND 2 20 Serial Port COM2 CN7 COM 2 supports RS 232 422 485 mode which allows you to connect serial devices mouse printer etc COM 2 RS 232 Mode CN7 Pin Signal Pin Signal 1 DCDB 2 RXB 3 TXB 4 DTRB 5 GND 6 DSRB 7 RTSB 8 CTSB 9 RIB 10 N C COM 2 RS 422 Mode CN7 Pin Signal Pin Signal 1 TXD 2 RXD 3 TXD 4 RXD 5 N C 6 N C 7 N C 8 N C 9 GND 10 N C COM 2 RS 485 Mode CN7 ...

Страница 34: ...ial Port COM1 CN8 Pin Signal Pin Signal 1 DCDA 2 RXA 3 TXA 4 DTRA 5 GND 6 DSRA 7 RTSA 8 CTSA 9 RIA 10 N C 2 22 Secondary IDE Hard Drive Connector CN9 Pin Signal Pin Signal 1 SEC_IDERST 2 GND 3 SDD7 4 SDD8 5 SDD6 6 SDD9 7 SDD5 8 SDD10 9 SDD4 10 SDD11 11 SDD3 12 SDD12 13 SDD2 14 SDD13 15 SDD1 16 SDD14 17 SDD0 18 SDD15 19 GND 20 N C 21 SDREQ 22 GND 23 SDIOW 24 GND ...

Страница 35: ...DY 28 GND 29 SDDACK 30 GND 31 IRQ15 32 N C 33 SDA1 34 S66DET 35 SDA0 36 SDA2 37 SDCS 1 38 SDCS 3 39 IDEACTS 40 GND 2 23 Wake on LAN Connector CN10 Pin Signal 1 5VSB 2 GND 3 RI PCI_PME 4 SMBDATA 5 SMBCLK 2 24 IrDA Connector CN11 Pin Signal Pin Signal 1 Vcc 2 CIR_Tx 3 GND 4 IR_RX 5 IR_TX 6 CIR_RX ...

Страница 36: ...ch detach for up to 127 external devices The USB interfaces comply with USB specification Rev 2 0 and can be disabled in the system BIOS setup Pin Signal Pin Signal 1 USBVDD2 3 2 USBGND 3 USBD2 4 USBGND 5 USBD2 6 USBD3 7 USBGND 8 USBD3 9 USBGND 10 USBVDD2 3 2 26 USB 2 0 Port 1 Connector CN13 Pin Signal Pin Signal 1 USBVDD0 1 2 USBGND 3 USBD0 4 USBGND 5 USBD0 6 USBD1 7 USBGND 8 USBD1 9 USBGND 10 US...

Страница 37: ...2 Quick Installation Guide 2 22 2 27 CRT Display Connector CN14 Pin Signal Pin Signal 1 CRT_RED 9 5 Volt 2 DRT_GREEN 10 VGA GND 3 DRT_BLUE 11 N C 4 N C 12 CRT_SDA 5 VGA GND 13 CRT_HSYNC 6 VGA GND 14 CRT_VSYNC 7 VGA GND 15 CRT_VSYNC 8 VGA GND ...

Страница 38: ...The high speed Ethernet connectors provide complete plug and play 10Mb s 100 Mb s and 1000Activity LED of the Giga bit Ethernet are as follows Orange Gigabit Green 100M No light 10M 10 100Base Tx RJ 45 Connector 10 100 1000Base Tx RJ 45 Connector 2 29 Ethernet 10 100 BaseT RJ 45 Phone Jack CN17 CN17 is the RJ 45 connector based on the chipset integrated LAN The figure at the left side shows the pi...

Страница 39: ...LINE_our Right 13 GND 14 GND 5 Channel Audio Output Mode Pin Signal Pin Signal 1 Center Out 2 MIC_Vcc 3 GND 4 CD_GND 5 Rear Left Out 6 CD_in L 7 Rear Right Out 8 CD_GND 9 GND 10 CD_in R 11 Front Left Out 12 Front Right Out 13 GND 14 GND Note If you would like to transfer the mode from 2 Channel to 5 Channel you will set up through the driver The further transferring procedure will be shown in the ...

Страница 40: ...IN PS 2 Connector CN19 Pin Signal Pin Signal 1 Mouse Clock 2 Keyboard Clock 3 Vcc 4 GND 5 Keyboard Data 6 Mouse Data 2 32 CPU Fan Connector CN20 Pin Signal 1 GND 2 12 Volt 3 FAN Sense 2 33 Internal Keyboard Connector CN21 Pin Signal 1 Keyboard clock 2 Keyboard data 3 N C 4 GND 5 Vcc ...

Страница 41: ...2 35 Compact Flash Disk Connector CN23 Pin Signal Pin Signal 1 GND 26 GND 2 SDD3 27 SDD11 3 SDD4 28 SDD12 4 SDD5 29 SDD13 5 SDD6 30 SDD14 6 SDD7 31 SDD15 7 SDCS 1 32 SDCS 3 8 GND 33 GND 9 GND 34 SDIOR 10 GND 35 SDIOW 11 GND 36 Vcc 12 GND 37 IRQ15 13 Vcc 38 Vcc 14 GND 39 CSEL 15 GND 40 N C 16 GND 41 SEC_IDERST 17 GND 42 SIORDY 18 SDA2 43 N C 19 SDA1 44 Vcc ...

Страница 42: ...pter 2 Quick Installation Guide 2 27 20 SDA0 45 DASP 21 SDD0 46 PDIAG 22 SDD1 47 SDD8 23 SDD2 48 SDD9 24 N C 49 SDD10 25 GND 50 GND 2 36 External 5V SB PWRGD Connector CN24 Pin Signal Pin Signal 1 N C 2 GND 3 PWRGD 4 GND 5 PS_ON 6 5VSB ...

Страница 43: ...Full size CPU Card S B C 8 6 0 Chapter 3 Award BIOS Setup 3 1 Award BIOS Setup Chapter 3 ...

Страница 44: ...Write down the message and press the F1 key to continue the boot up sequence When you should encounter fatal errors please contact your distributor or sales representative System configuration verification These routines check the current system configuration the values stored in the CMOS memory of the board If they do not match the program outputs an error message You will then need to run the BI...

Страница 45: ...ard S B C 8 6 0 Chapter3 Award BIOS Setup 3 3 been erased The SBC 860 CMOS memory has an integral lithium battery backup for data retention However you will need to replace the complete unit when it finally runs down ...

Страница 46: ...tect your system The presence or the values of these items vary with the corresponding hardware specification of your system A Entering setup Power on the computer and press Del immediately This will allow you to enter Setup The top menu offers users various functions to configure the system The default page after entering the BIOS setup is Main Standard CMOS setup B Major Setup Features Main Stan...

Страница 47: ...SB Serial port Parallel port keyboard mouse etc l Power Management Setup Use this menu to specify your settings for power management HDD power down power on by events KB wake up etc l PnP PCI Configurations This entry appears if your system supports PnP PCI D Default Load Optimized Defaults Use this menu to load the BIOS default values that are factory settings for optimal performance system opera...

Страница 48: ...up Use this menu to specify your settings for auto detect DIMM PCI clock and spread spectrum F PC Health Setup This menu allows you to set the shutdown temperature for your system Exit Setup G Save and Exit Setup Save CMOS value changes to CMOS and exit setup H Exit Without Saving Abandon all CMOS value changes and exit setup ...

Страница 49: ...s such as date time hard disk drive floppy drive and display Once a field is highlighted on line help information is displayed in the right box of the Menu screen Date and Time Configuration The BIOS determines the day of the week from the other date information This field is for information only Press the left or right arrow key to move to the desired field date month year Press the PgUp or PgDn ...

Страница 50: ...on about other IDE devices such as a CD ROM drive or other hard drive types such as SCSI drives NOTE We recommend that you select type AUTO for all drives The BIOS can automatically detect the specifications and optimal operating mode of almost all IDE hard drives When you select AUTO for a hard drive the BIOS will detect its specifications ü IDE Primary Secondary Master Slave If you do not want t...

Страница 51: ...inch double sided drive 720 kilobyte capacity n 1 44M 3 5 in 3 1 2 inch double sided drive 1 44 mega byte capacity n 2 88M 3 5 in 3 1 2 inch double sided drive 2 88 mega byte capacity ü Video This function setting allows you to select the video type The choices EGA VGA CGA 40 CGA 80 MONO ü Halt On During the power on self test POST the computer will stop if the BIOS detects a hardware error You ca...

Страница 52: ...al memory The DOS operating system and conventional applications use this area ü Extended Memory Above the 1 MB boundary Early IBM personal computers could not use memory above 1 MB but current PCs and their software can use extended memory ü Total Memory The fields show the total installed random access memory RAM ...

Страница 53: ... CPU Card S B C 8 6 0 Chapter3 Award BIOS Setup 3 11 3 2 2 Advanced Features Setup l Advanced BIOS Features By choosing the Advanced BIOS Feature option from the initial setup menu the screen below is displayed ...

Страница 54: ...ge If you plan to run such a program we recommend that you first disable the virus warning Before installing Microsoft Windows please disable this function The choices Enabled Disabled ü Hyper Threading Technology If your Pentium 4 processor supports this function you can select Enabled for Windows XP and Linux 2 4x OS optimized for Hyper Threading Technology Select Disabled for other OS which doe...

Страница 55: ... If your boot device such as SCSI RAID is not included in the following choices Floppy LS120 HDD SCSI CDROM ZIP100 USB FDD USB ZIP USB CDROM USB HDD LAN ISA FDD you may set First Second Third Boot devices to Disabled and enable the BOOT Other Device function The system will automatically boot the other device The choices Enabled Disabled ü Swap Floppy Drive This field is effective only in systems ...

Страница 56: ... Disabled ü Boot Up NumLock Status Toggle between On or Off to control the state of the NumLock key when the system boots When toggled On the numeric keypad generates numbers instead of controlling cursor operations The choices On Off ü Gate A20 Option Gate A20 refers to the way the system addresses memory above 1 MB extended memory When set to Fast the system chipset controls Gate A20 When set to...

Страница 57: ...acter repeats when you hold down a key The choices 6 8 10 12 15 20 24 30 ü Typematic Delay When the typematic rate setting is enabled you can select a typematic delay at which before keystrokes begin to repeat The choices 250 500 750 1000 milliseconds ü Security Option If you have set a password select whether the password is required every time the System boots or only when you enter Setup The ch...

Страница 58: ...ze CPU Card S B C 8 6 0 Chapter3 Award BIOS Setup 3 16 The choices Enabled Disabled ü Silent Post This feature allows you to enable the system to show AAEON s logo when power is on The choices Enabled Disabled ...

Страница 59: ... screen below is displayed ü DRAM Timing Selectable This function stores information about Memory Module setting Therefore it can auto detect the best frequency that the memory module should use The Choices By SPD Manual ü CAS Latency Time When synchronous DRAM is installed the number of clock cycles of CAS latency depends on the DRAM timing Do not reset this field from the default value ...

Страница 60: ...e The choices 5 6 7 ü DRAM RAS to CAS Delay This function controls the number of clocks that are inserted between a row activate command and a read or write command to that row The choices 2 3 ü DRAM RAS Precharge This function controls the number of clocks that are inserted between a row precharge command and an active command to the same row The choices 2 3 ü Memory Frequency For This item allow...

Страница 61: ...ce The choices Enabled Disabled ü Memory Hole At 15M 16M Enable this function to allow ISA ROM to map to 15 16M and support Legacy ISA devices If you don t utilize legacy ISA devices in your system you are recommended to disable this function to enhance graphic performance The choices Enabled Disabled ü AGP Aperture Size MB Aperture size will ensure that all writes posted in the global write buffe...

Страница 62: ...n Chip VGA Setting On Chip VGA This allows users to select to Enable or Disable the onboard VGA function The choices Enabled Disabled On Chip Frame Buffer Size This function is used to select the amount of main memory that is pre allocated to support the internal graphics device The choices 1MB 8MB ...

Страница 63: ... is displayed ü IDE DMA transfer access This function to enable disable IDE DMA transfer in DOS mode The choices Enabled Disabled ü On Chip Primary Secondary PCI IDE The integrated peripheral controller contains an IDE interface with support for two IDE channels Select Enabled to activate each channel separately The choices Disabled Enabled ü IDE Primary or Secondary Master Slave PIO ...

Страница 64: ...es Auto Mode 0 Mode 1 Mode 2 Mode 3 Mode 4 ü IDE Primary or Secondary Master Slave UDMA Ultra DMA100 implementation is possible only if your IDE hard drive supports it and the operating environment includes a DMA driver If both your hard drive and IDE cable support Ultra DMA 100 select Auto to enable BIOS support The choices Auto Disabled ü USB USB 2 0 Controller USB controller This function is us...

Страница 65: ...per setting The choices Disabled Enabled ü Init Display First You can select Onboard AGP or PCI slot to initialize it as the primary display before initializing any other display device on the system The choices Onboard AGP PCI Slot ü IDE HDD Block Mode Block mode is also called block transfer multiple commands or multiple sector read write If your IDE hard drive supports block mode most new drive...

Страница 66: ...that you can power on the system by typing the password ü Hot key power on If you select Hot key as the power on method you have to define the Hot key in this section The choices Ctrl F1 Ctrl F2 Ctrl F12 Onboard FDC Controller Select Enabled if your system has a floppy disk controller FDC installed on the system board and you wish to use it If you install an add in FDC or the system has no floppy ...

Страница 67: ...Q3 3E8 IRQ4 2F8 IRQ3 3F8 IRQ4 ü UART Mode Select If you don t disable Onboard Serial Port 2 you will have to select an operating mode for the second serial port Normal RS 232C serial port IrDA IrDA compliant serial infrared port ASKIR Amplitude shift keyed infrared port SCR Smart Card Reader The choices Normal IrDA ASKIR SCR ü UR2 Duplex Mode Select the value required by the IR device connected to...

Страница 68: ...T port address and corresponding interrupt for the physical parallel port The choices Disabled 378 IRQ7 278 IRQ5 3BC IRQ7 ü Parallel Port Mode Two bi directional parallel ports Supports ECP EPP ECP EPP SPP The choices SPP EPP ECP ECP EPP ü ECP Mode Use DMA Select a DMA channel for the port The choices 1 3 ...

Страница 69: ...SCREEN menu the screen below is displayed This sample screen contains the SBC 860 s default values for the SBC 860 ü ACPI Function This item allows you to enable disable the Advanced Configuration and Power Interface ACPI The choices Enable Disable ü ACPI Suspend Type This configuration responds the suspend mode to operating system S1 POS Power on Suspend ...

Страница 70: ...es Yes No Auto ü Power Management Select Max Saving mode or Min Saving mode or define desired Doze Mode Standby Mode Suspend Mode HDD Power Down functions by User Define This category allows you to select the type or degree of power saving and is directly related to the following modes 1 User Define 2 Min Saving 3 Max Saving Disable Default No power management Disable all four modes Min Power Savi...

Страница 71: ...DD Power Down which ranges from 1 min to 15 min and disable ü Video Off Method This determines the manner in which the monitor is blanked V H SYNC Blank This selection will cause the system to turn off the vertical and horizontal synchronization ports and write blanks to the video buffer DPMS Display power management system Blank Screen This option only writes blanks to the video buffer ü Video Of...

Страница 72: ... lets you select two types of suspend Stop Grant Halts CPU s instruction stream stop clock at ACPI C2 state PwrOn Suspend CPU sleeps at ACPI S1 state The choices Stop Grant PwrOn Suspend ü Modem Use IRQ Name the interrupt request IRQ line assigned to the modem if any on your system Activity of the selected IRQ always awakens the system The choices NA 3 4 5 7 9 10 11 ü Suspend Mode Disable this fun...

Страница 73: ...to push the on off button lasting for 4 seconds to shut down the system In this mode one touch on the on off button won t shut down the system but place it in a very low power usage state with only enough circuitry receiving power to detect power button activity or Resume by Ring activity The choices Instant Off Delay 4 Sec ü Wake Up by PCI Card The Choices Enabled Disabled ü USB KB Wake Up From S...

Страница 74: ...me hh mm ss Alarm ü Reload Global Timer Events When this item is enabled an event occurring on each listed device resets the global timer to prevent the system from entering Suspend mode These devices include Primary Secondary IDE 1 0 FDD COM LPT Port and PCI PIRQ A D ...

Страница 75: ...n from the INITIAL SETUP SCREEN menu the screen below is displayed ü PNP OS Installed Select Yes if the system operating environment is Plug and Play aware for example Windows 9x Windows 2000 and Windows XP Hardware resource will be distributed by OS Select No if you need the BIOS to configure non boot devices The choices No Yes ...

Страница 76: ...boot and Plug and Play devices If you choose Auto you cannot select IRQ DMA and memory base address fields since BIOS automatically assigns them The choices Auto ESCD Manual ü IRQ Resources When resources are controlled manually assign each system interrupt a type depending on the type of device using the interrupt There are two types for choice Legacy ISA and PCI ISA PnP Legacy ISA Devices compli...

Страница 77: ... Devices compliant with the Plug and Play standard whether designed for PCI or ISA bus architecture ü PCI VGA Palette Snoop Enabling this item informs the PCI VGA card to keep silent and to prevent conflict when palette register is updated i e accepts data without responding any communication signals This is useful only when two display cards use the same palette address and plugged in the PCI bus...

Страница 78: ... screen shown below is displayed Pressing Y loads the default values that are factory settings for optimal performance system operations When you press Enter on this item you get a confirmation dialog box with a message similar to Load Optimized Defaults Y N Pressing Y loads the default values that are factory settings for optimal performance system operations ...

Страница 79: ...l l l Set Change password You can set the password to restrict unauthorized access to enter or change the options of the setup menus To abort the process at any time press Esc NOTE To clear the password simply press Enter when asked to enter a password Then the password function is disabled ...

Страница 80: ...n temperature When the temperature of your system reaches the limitation the system will shut down automatically to prevent damage caused by overheat The choices Disabled 60 140 65 149 70 158 l Power on show status Enable this function to show hardware monitor listing after powering on the system The choices Enabled Disabled l CPU fan low speed warning Select the speed figure limits for the CPU sp...

Страница 81: ...Full size CPU Card S B C 8 6 0 Chapter3 Award BIOS Setup 3 39 speed drop down to the limitation the system would send out the warning signal The choices 2000RPM 3000RPM 4000RPM Disabled ...

Страница 82: ... may set the CPU Clock Ratio for your selection However if the CPU you adopts reserves no flexibility for clock ratio modification this item will be hidden or can t work The choices 8X 9X 50X l Auto Detect DIMM PCI CLK This item allows you to enable disable auto detect DIMM PCI clock The choices Enabled Disabled l Spread Spectrum When the system clock generator pulses the extreme values of ...

Страница 83: ...rate excess EMI Enabling pulse spectrum spread modulation changes the extreme pulse spikes to flat curves thus reducing EMI This benefit may in some cases be outweighed by problems with timing critical devices such as a clock sensitive SCSI device The choices 0 25 0 50 Disabled ...

Страница 84: ...tup utilities will be recorded in the chipset s CMOS memory The microprocessor will check this every time you turn your system on and compare this to what it finds as it checks the system This record is required for the system to operate l Exit without saving Selecting this option and pressing Enter lets you exit the Setup program without recording any new values or changing old ones ...

Страница 85: ...Full size CPU Card S B C 8 6 0 Chapter 4 Driver Installation 4 1 Driver Installation Chapter 4 ...

Страница 86: ...ilize Windows NT series OS you are strongly recommended to download the latest version Windows NT Service Pack from Microsoft website and install it before installing any driver Please follow the sequence below to install the drivers Step 1 Install Intel INF Update for Windows 95 XP Step 2 Install Intel 845G Graphic Driver Step 3 Install Intel LAN Driver Step 4 Install Realtek 2CH AC97 codec Drive...

Страница 87: ...installation screen will appear Notice take VGA driver installation under Windows 98 for example choose the corresponding folder depending on your OS 3 A driver installation screen will appear please follow the onscreen instructions to install the driver in sequence and click on the Next button Notice In some cases the system will ask you to insert Windows 98 CD Diskette and key in its path Then c...

Страница 88: ...ect Search for the best driver for your device Recommended and click on the Next button 5 Select Specify a location click on Have Disk button then key in the CD ROM path and specify component drivers and OS folders Then click on the Next button 6 The Wizard shows that Windows driver file search for the device Click on the Next button 7 The system will ask you to insert Windows 98 CD Diskette Click...

Страница 89: ...and click on OK button 6 Click on the Have Disk button 7 Key in CD ROM path and specify component drivers then click on the OK button 8 From the list of displayed devices select your desired device 9 If a message appears stating the driver is already installed on the system and asks if you want to use the current or new drivers be sure to select the New button 10 If prompted for the driver diskett...

Страница 90: ...Full size CPU Card S B C 8 6 0 Appendix A Programming the Watchdog Timer A 1 Programming the Watchdog Timer Appendix A ...

Страница 91: ...MB PnP mode 2 Select logical device 3 Configure the watchdog timer controller registers 4 Exit the MB PnP mode To enter the MB PnP mode is to write value 87h 1h 55h 55h to configuration port 2Eh To exit the MB PnP mode is to set bit 1 of configure control register index 02h to 1 The AAEON initial watchdog timer program is illustrated below This program is applied only to DOS and Win 9x Example Ent...

Страница 92: ...ect logical device mov al 7 index 7 for logical device out 2eh al mov al 7 out 2fh al Configure the watchdog timer controller registers mov al 73h out 2eh al mov al 0ah index 73h for watchdog timer time out value out 2fh al mov al 72h out 2eh al mov al 0c0h time out value use second enable WDT output through KRST out 2fh al ...

Страница 93: ...Full size CPU Card S B C 8 6 0 Appendix A Programming the Watchdog Timer A 4 Exit the MB PnP mode mov al 2 out 2eh al out 2fh al ...

Отзывы: