Saving after power-down
By now you should have a few different new samples recorded into a few different
slots. The WAV files themselves are saved on the microSD card, and the STS has
assigned each file to a bank/slot. You should be familiar how to play each sample
you just recorded by going to the bank and slot number on a play channel.
At this point, the
information telling the STS which sample
file is assigned to which slot in the bank is
not saved to the microSD card. Keep in
mind that the sample files themselves are
saved, but the STS is only temporarily
assigning them to the bank/slot you
recorded them into. To make this
temporary assignment permanent, you
have to save it.
To save the sample bank/slot assignment
information, hold down
Edit Sample
and
the left side
PLAY
for half a second. The
lights will flash a bit while it saves.
Notice the word “SAVE” above the left side
PLAY
button— it’s written in gold just like the
Edit Sample
button to remind you of the alternate feature of this button.
Why doesn’t the STS just save your sample slot assignment information automatically when you
record? The reason is that you might have recorded over a slot that you didn’t mean to, or you might
not like any of your takes and decide not to keep them. If this happens, you can either use the
Edit
+
Revert
+
Bank
feature (see
Edit Mode
section), or re-assign the slot using the
Edit+Next File
feature (see
Assigning
Samples section)… or just do nothing and the next time you power on the STS,
the samples will be back to the way you had them before.
Tutorial 4: Loading Files onto the microSD Card
The STS has an intelligent and intuitive sample file management
system. You can do everything in several different ways,
depending on your preferences: use a computer OS to move
files, or use the STS’s on-board assignment feature, or edit the
index file with a text editor (hackers only).
Unlike many other samplers, you never have to rename your files
for the STS. You can simply drag your sample files into folders
and the STS will load them into banks. This makes loading a
huge sample library a breeze.
Included with your STS is a SD Card adaptor that fits any
computer with a SD Card slot. If your computer lacks this slot,
you need to purchase a microSD to USB adaptor.
First, make sure the
Busy
light is off, and power down the STS.
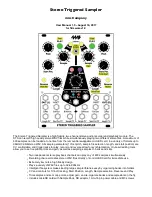
Remove the microSD card and insert it into the adaptor in your
computer. The microSD card should show up as a drive on your
computer, similar to what’s shown on the right:
Each of these folders contains WAV files. Think of each folder as
a bank.
Page of
10
24
PLAY
Save
Save
Edit
Sample
Edit
Sample
Hold both 0.5 sec
+
How it works
:
The STS never deletes or overwrites your files!
When you make a new recording, the STS
assigns the new WAV file to the sample bank/
slot selected by the
REC Bank
and
Sample
controls. If you accidentally record into a
bank/slot that already has a sample you
wanted to keep, don’t worry— the previous
sample file is still saved on the card, but it’s
temporarily
not assigned to any sample slot. If
you don’t hit
Save
, then the old file will be
loaded next time you power on. Read the
Assigning Samples
section for more ways to
re-assign samples to slots.


