background image

5

GB

3M™ PELTOR™ Comtac XPI

3M™ PELTOR™ Comtac XPI is a hearing protector with level-dependent function for 

ambient listening and input for external equipment. Differences in available features may 

appear on specific models. Read these instructions carefully before use and save for 

future reference.

1. COMPONENTS

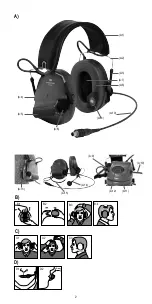
A:1 Foldable headband (stainless steel sheet, leather)

A:2 Cup supporting arm (stainless steel)

A:3 Two-point fasteners (POM)

A:4 Cup

A:5 Battery lid

A:6 Microphone for level-dependent function for ambient listening

A:7 Damping pad (PUR foam)

A:8 Ear cushion (PVC foil, PUR foam)

A:9 Speech microphone input (J22) (only specific models)

A:10 External input cable (PUR) (only specific models)

A:11[-] button

A:12 [+] button

A:13 Bone conduction microphone (only specific models)

A:14 Speech microphone (TPE, PC) (only specific models)

A:15 Neckband (stainless steel, TPO)

2. FITTING AND ADJUSTMENT

Note! Brush aside hair around your ears so the ear cushions (A:8) fit snugly. Spectacle 

frames should be as thin as possible and fit close to the head to minimize acoustic leakage.

2:1 Foldable headband (Fig. B)

(B:1)(B:2) Slide out the cups and tilt the top of the cup out, as the cable must be on the 

outside of the headband.

(B:3) Adjust the height of the cups by sliding them up or down while holding the head-

band in place.

(B:4) The headband should be positioned across the top of your head.

2:2 Neckband (Fig. C)

(C:1) Place the cups in position over the ears.

(C:2) Keep the headset in position and place the head strap on top of your head and 

lock it tight in position.

(C:3) The head strap should be positioned across the top of your head.

2:3 Speech microphone (Fig. D)

For maximum noise cancelling, the speech microphone should be positioned close to 

your mouth (<3 mm).

2:4 Bone conduction microphone

The bone conduction microphone (A:13) should be positioned between your jaw bone and 

chin bone for best performance.

3. USAGE/FUNCTIONS

3:1 Inserting batteries

Remove the battery compartment lids and insert the batteries (2xAAA). The battery polarity 

must correspond to the marking in the battery compartment. The lids must be pressed all 

the way down to ensure good seal. Low battery level is indicated by a ghost voice message 

“low battery”, repeatedly.

3:2 Switching the headset on and off

Press and hold the [+] or [-] button for two seconds to switch the headset on or off. The 

current setting is always saved when the headset is switched off, except when in ear-plug 

mode. The headset is automatically powered off after two hours of inactivity. This is indi-

cated by a ghost voice message during the last minute before the headset switches off.

Содержание PELTOR ComTac XPI Series

Страница 1: ...PELTOR ComTacXPI MT20H682FB MT20H682BB The Sound Solution...

Страница 2: ...2 D C A B 1 B 2 B 3 C 1 D 1 D 2 C 3 B 4 C 2 B A 15 A 12 A 11 A 9 A 10 A 14 A 13 A 4 A 5 A 6 A 1 A 2 A 3 A 8 A 13 A 10 A 7...

Страница 3: ...8 2 3 2 2 2 1 3 2 2 9 3 2 Assumed Protection Value dB 5 14 8 14 5 25 2 30 0 29 9 30 1 32 9 SNR 28 dB H 31 dB M 25 dB L 18 dB 6 308 g G Attenuation Values H 112 dB A M 96 dB A L 92 dB A Input mV 1 SPL...

Страница 4: ...10 14 DE CH AT 15 19 IT CH 20 24 ES 25 29 NL BE 30 34 SE 35 39 DK 40 44 NO 45 49 IS 50 54 FI 55 59 PT 60 64 PL 65 69 HU 70 74 CZ 75 79 SK 80 84 SL 85 89 EE 90 94 LV 95 99 LT 100 104 RO 105 109 RS 110...

Страница 5: ...3 Adjust the height of the cups by sliding them up or down while holding the head band in place B 4 The headband should be positioned across the top of your head 2 2 Neckband Fig C C 1 Place the cups...

Страница 6: ...udes the additional settings described in 3 9 3 14 The advance settings menu steps are added to the normal menu steps when activated It is automatically de activated when returning from the menu 3 9 R...

Страница 7: ...ar muffs will be severely impaired This product may be adversely affected by certain chemical substances Further information should be sought from the manufacturer Ear muffs and in particular ear cush...

Страница 8: ...ries and accumulators must be disposed of according to local law by the use of available return and collection systems 6 TECHNICAL DATA 6 1 Standard and approval 3MSvenskaABherebydeclaresthatComTacXPI...

Страница 9: ...ant attenuation hygiene and comfort 3M PELTOR HY100A Single use protectors Single use protector that is easy to fit to the ear cushions 3M PELTOR HYM1000 Microphone protector Moisture and wind resista...

Страница 10: ...ieur en tournant leur partie sup rieure vers l ext rieur le cordon devant tre l ext rieur du serre t te B 3 R glez la hauteur des coquilles en les faisant glisser vers le haut ou vers le bas tout en m...

Страница 11: ...irmer r initialisation d usine 3 8 Advanced settings param tres avanc s Le menu des param tres avanc s comprend les param tres suppl mentaires d crits sous 3 9 3 14 Les tapes du menu des param tres av...

Страница 12: ...t port es r gl es et entretenues selon les instructions du fabricant Les protections auditives sont toujours port es dans des environnements bruyants L aptitude l usage des protections auditives est r...

Страница 13: ...nf rieure 40 C N utilisez pas la protection auditive dans des endroits o la temp rature peut d passer 55 C ou descendre en dessous de 20 C 5 4 Protection du microphone Pour prot ger le microphone de l...

Страница 14: ...pour les hautes fr quences M niveau de r f rence pour les moyennes fr quences L niveau de r f rence pour les basses fr quences 7 PI CES DE RECHANGE ACCESSOIRES 3M PELTOR HY68 SV Kit d hygi ne Kit d h...

Страница 15: ......

Страница 16: ...0 370 65 65 65 Fax 46 0 370 65 65 99 Email peltorcommunications mmm com Internet www 3M EU CommunicationSolutions FP3752 Rev a 3M Peltor are trademarks of 3M Corporation St Paul MN 55144 1000 USA Plea...

Отзывы: