background image

Troubleshooting

Model C1060

 3M 2001     February

24

5. All headsets will not go into

Standby (silence) when the
vehicle leaves the menu sign.

1. This is normal when a pulse

(air switch) type of vehicle
detector is used.

1. Press the Page switch to

silence the menu microphone.

2. There is a large metal object

near the loop in the driveway
(if a loop is used).

2. Remove the object.

3. The Loop detector is “ locked

up.”

3. Unplug the loop detector from

the AC outlet and plug it back
in to reset the detector.

4. Defective vehicle detector.

4. Call for authorized service.

6. Audio on all headsets cuts out

or is interrupted.

1. The cause could be radio

interference.  These are
symptoms of interference:


The operating range


between the base
station and the headsets
gets very short,
sometimes 25 feet or
less.  Normally you
will hear nothing to
indicate interference.

The Talk or Page light
flickers briefly causing
the system to leave
standby mode, and go
into listen mode with
no vehicle alert heard.

The system may drop
out of Talk Lock by
itself.

When pressing the Channel
Select button on the Base
Station, the channel lights
move sluggishly or not at
all.

1. Change the channel on the base

station to one at least three
channels away.

If using a single base
station, move jumper J3
to the lane 2 position.
This provides 8
additional channels from
which to choose.

Locate and shut off
other 900 MHz devices
in the building, such as
cordless phones, video
and speaker systems,
and video monitors.

2. Loose or frayed wiring.

3. Poor location of Base Station

(behind large metal objects,
too far from work area, etc.).

2. Call for authorized service.

3. Relocate the Base Station, or

add an additional Base Station
to extend the range of the
system.

Содержание HEADSET C1060

Страница 1: ...Headset Intercom System Model C1060 Operating Instructions ...

Страница 2: ......

Страница 3: ...tion System 1 System Components 2 Base Station 2 Headset 2 Programming Station 3 Battery Charger 3 Controls and Indicator 4 Base Station 4 Headset 5 Battery Chargers 7 Headset Preparation 8 Adjusting Headband Size 8 Positioning the Ear Pad and Microphone 8 Operation 9 System Startup 9 Turning On the Base Station 9 Turning On the Headset 9 Operating Modes 9 Standby Mode 9 Talk Listen Mode 9 Single ...

Страница 4: ...ing Batteries 15 Disposing of Batteries 16 Making Sure Batteries are Ready for Use 16 Important Information about C1060 Rechargeable Batteries 16 Special Instructions for System Manager 17 Programming the Headset for Cross Lane Operation 17 Reprogramming 17 Enabling Disabling the Talk Lock Feature 18 Changing Channels if Interference is Encountered 18 Changing the Day Night Switch Setting 21 Adjus...

Страница 5: ...ult in poor performance and or undesired operation FCC Information This device complies with part 15 of the FCC Rules Operation is subject to the following two conditions 1 This device may not cause harmful interference and 2 this device must accept any interference received including interference that may cause undesired operation Changes or modifications not expressly approved by the party respo...

Страница 6: ...Important Information Model C1060 3M 2001 February iv Blank Page ...

Страница 7: ...ed to menu sign 2 The headsets are programmed to work with one system or the other and are labeled accordingly 1 or 2 The dual lane duplex communication system provides duplex communication simultaneous talk and listen for facilities that have two menu signs The system consists of two independent systems one dedicated to menu sign 1 and the other dedicated to menu sign 2 The headsets are programme...

Страница 8: ...terface between the customer at the menu sign and the headset worn by the operator See Figure 1 Figure 1 Base Station The headset is a wireless battery powered two way radio used by the operator to communicate with menu sign customers and with other store personnel who are wearing headsets Headsets feature a light weight design to provide for comfort The headset pads can be easily replaced See Fig...

Страница 9: ...o transfer program data to the C1060 headset and a separate jack is provided for the C960 headset programming cable See Figure 3 Figure 3 Programming Station The battery charger charges headset batteries in approximately 1 5 to 2 hours The charger is available in 3 slot and 6 slot versions See Figure 4 Figure 4 3 Slot and 6 Slot Battery Chargers Battery Charger Programming Station ...

Страница 10: ...GHT position the volume of the menu sign speaker is decreased for nighttime operation Sound travels further and more efficiently at night These indicators light to show which of the 8 channels is selected This indicator blinks when the Noise Reduction Module is switched on This button turns the optional Noise Reduction Module on or off This indicator lights when headset Page communications occur T...

Страница 11: ... volume level There are multiple volume levels from minimum to maximum If the headset volume is at its maximum level a low continuous tone sounds when the volume up control is pressed A low continuous tone also occurs when the volume reaches minimum level and the volume down control is pressed When the headset is turned on headset volume automatically returns to the mid range level Note that even ...

Страница 12: ...low the headset to be programmed to the same channel as the base station The microphone sends the headset operator s voice to the menu sign or other headset operators while eliminating unwanted background noise The earphone is a speaker that broadcasts the voice from the customer at the menu sign or from other headset operators The replaceable earpad covers the earphone and cushions the operator s...

Страница 13: ...s during the recharging cycle The charging status indicators light RED or GREEN to indicate charging status RED indicates the battery is being charged GREEN to indicate the battery is fully charged This jack accepts the plug from the power supply cord The power supply provides power to the battery charger Battery Chargers 1 Charging Slots 2 Charging Status Indicators 4 Power Supply 3 3 ...

Страница 14: ... the other ear Slide the headband out of the headset to make it larger Push the headband into the headset to make it smaller Figure 7 Headband Size Rotate the microphone boom up or down so that its tip is in line with the corner of your mouth Do not bend the rubber microphone boom See Figure 8 Figure 8 Adjusting Headband Size Positioning the Ear Pad and Microphone ...

Страница 15: ...als when the system detects a customer vehicle at the menu sign 2 When you hear the alert tone press and hold T1 or T2 to talk to the customer at the menu sign Release T1 or T2 to listen Dual Lane Standard or Duplex Communication Systems In dual lane systems some headsets are programmed to communicate with Lane 1 and others are programmed to communicate with Lane 2 The headsets are labeled accordi...

Страница 16: ...ler t tone press and hold T2 to talk to the customer at the menu sign 2 Release T2 to listen Use this mode to operate hands free The talk lock mode is only available with duplex system configurations In this mode the headset automatically switches from standby to talk listen when a customer is detected at the menu sign The headset automatically switches back to standby when the customer leaves the...

Страница 17: ...prevent communication between the menu sign operator and the customer Use this mode to listen for pages from other operators without hearing the communication to and from the menu sign This feature is convenient for managers and supervisors who only want to hear page communication This mode is available with all system configurations To use the page monitor mode 1 Turn the headset OFF See Figure 9...

Страница 18: ...e page mode keep the following things in mind Communication between the menu sign operator and the customer may be heard by several people Only one headset operator can talk or page at a time In the talk listen mode communication to and from the headset is heard by menu sign customers and all operators who are wearing headsets except those in page monitor mode In the page mode communication from a...

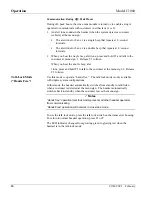
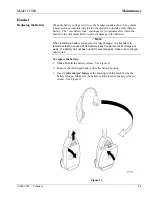
Страница 19: ... a battery make sure it is fully charged It is important to remember that an unused C1060 battery loses five percent of its charge per week If a battery has not been used for several weeks make sure to charge prior to use To replace the battery 1 Slide and hold the battery release See Figure 11 2 Remove the discharged battery from the battery housing 3 Insert a fully charged battery in the housing...

Страница 20: ... cup and replace it with a new pad See Figure 12 Figure 12 To replace the headband pad remove the worn damaged pad by peeling it from the back of the battery housing Remove protective backing from new pad and press it into place on the back of the battery housing See Figure 12 Replacing the Ear and Headband Pads ...

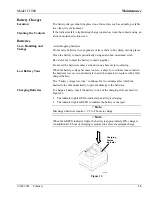
Страница 21: ...ne sounds in the headset at seven second intervals to alert the operator to replace with a fully charged battery The battery voltage low tone continues for two minutes after which the headset turns off automatically to prevent damage to the batteries To charge a battery insert the battery in one of the charging slots as shown in Figure 13 The indicator lights RED to indicate the battery is chargin...

Страница 22: ...ing Talk and Page operation Avoid unnecessary communications Keep the following information in mind as you operate the system and as you establish operating procedures Each 3M battery contains an internal protective device to prevent unsafe discharge rates But as with any battery avoid shorting across the battery contacts with metal items Never carry a battery in a pocket or place it in a drawer w...

Страница 23: ...le pressing and holding both the T1 and T2 switches on the headset turn the headset ON Hold all three switches for at least 5 seconds See Figure 14 Audible tones will be heard in the headset earpiece indicating that the headset is programmed for cross lane operation Press and hold both T1 and T2 then press ON OFF switch Hold all 3 switches for 5 seconds 1 2 3 Figure 14 To remove this function and ...

Страница 24: ...feature enabled Symptoms of Radio Frequency Interference The operating range between the base station and the headsets gets very short sometimes 25 feet or less Normally you will hear nothing to indicate interference Occasionally you might hear a whistle or a chirp in the background but seldom if ever will you hear talking The Talk or Page LED on the base station flickers briefly causing one of th...

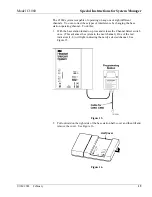
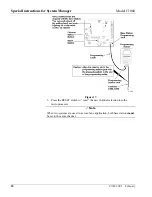
Страница 25: ...the base station operating channel To do this 1 With the base station turned on press and release the Channel Select switch once This advances the system to the next channel One of the red indicators 1 8 will light indicating the newly selected channel See Figure 15 Figure 15 2 Pull outward on the right side of the base station half cover and then lift and remove the cover See Figure 16 Half Cover...

Страница 26: ...er Model C1060 3M 2001 February 20 Figure 17 3 Press the RESET switch to read the new channel selection into the microprocessor ü Note When two systems are used in a cross lane application both base stations must be set to the same channel ...

Страница 27: ...channel changes the original channel will again be encountered If none of the 8 channels are interference free try 8 additional channels on lane 2 by following the steps below Note These steps may be used for single lane systems only 1 On the base station move jumper J3 to LANE 2 2 Press the RESET button or turn the base station OFF then back ON 3 Program all headsets at the programming station by...

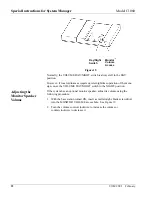
Страница 28: ...ghttime operation of the menu sign move the VOLUME DAY NIGHT switch to the NIGHT position If the system has an optional monitor speaker adjust its volume using the following procedure 1 With the base station turned ON insert a small straight blade screwdriver into the MONITOR VOLUME access hole See Figure 19 2 Turn the volume control clockwise to increase the volume or counterclockwise to decrease...

Страница 29: ...the programming cable 3 The Base Station is defective 3 Call for authorized service 2 A single headset hears static 1 Headset is not programmed to same channel as base station 1 Reprogram the headset with the programming station 2 Defective programming station 2 Try to program other headsets If they won t program replace the programming station 3 Defective headset 3 If the other headsets program O...

Страница 30: ...short sometimes 25 feet or less Normally you will hear nothing to indicate interference The Talk or Page light flickers briefly causing the system to leave standby mode and go into listen mode with no vehicle alert heard The system may drop out of Talk Lock by itself When pressing the Channel Select button on the Base Station the channel lights move sluggishly or not at all 1 Change the channel on...

Страница 31: ... for authorized service 2 Call for authorized service 9 Low Talk volume on a single headset 1 The holes in front of the microphone are plugged with dirt or grease 2 Operator is not positioning the microphone correctly 1 Call for authorized service 2 Refer to Operating Guide 3 Defective headset 3 Call for authorized service 10 Louder Talk volume or feedback from a single headset 1 The holes in back...

Страница 32: ...ohol moistened swab 2 No power to charger 2 Make sure power transformer is plugged into charger and a live outlet 3 Defective battery 3 Try a known good battery 4 Defective charger 4 Call for authorized service 2 Short battery life 1 Worn out batteries 1 Replace battery 2 Wrong type of power transformer used for charger 2 Make sure power transformer is marked Secondary Voltage 14 VAC 3 The green l...

Страница 33: ... not all C1060 system service needs can be fulfilled by your local 3M dealer If special service assistance is needed however or for information on how to properly dispose of your non functional C1060 rechargeable batteries please call 1 800 328 0033 Service ...

Страница 34: ...3 Food Services Trade Department 3M Center St Paul MN 55144 1000 Printed on 50 recycled waste paper including 10 post consumer waste paper Printed in U S A 3M 2001 February 70 0710 3648 0 Rev A ...

Отзывы: