


CREATE AND CONFIGURE A NEW PRESET
In order to demonstrate the features of bitbox, we will walk through the process of
creating a new preset and configuring several different pads.
Create and Name a Preset
First, you will create a new preset that will be used to store the configuration parameters
you select. Follow these steps to create and name your preset:
1.
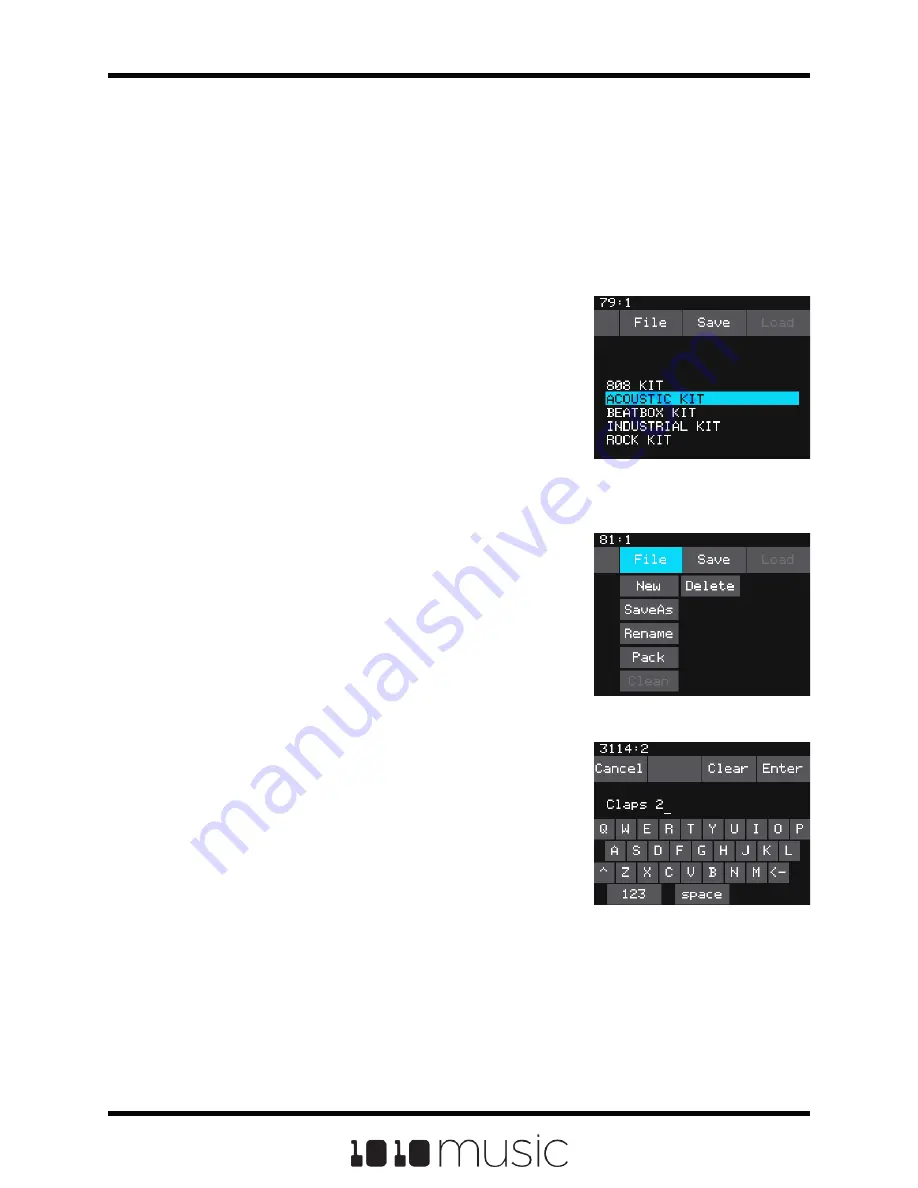
Press the HOME button until you see the Menu
screen. Touch the Presets option to display the
Preset Management screen. The Preset
Management screen shows a list of the presets
stored on the microSD card with a menu
across the top. The currently selected preset is
highlighted in blue.
2.
Touch File then New in the top menu. A new
preset is added to the list with the name New
Preset xx, where xx is the next available
number. You can use the on-screen keyboard
to change the name.
3.
Touch the back arrow <- to backspace through
the preset name to clear it. Then use the on-
screen keyboard to type in a new name. Turn
the knob to change where you are typing. Use
the carat button ^ to toggle between upper- and
lower-case letters. Touch the 123 button to
display the numeric keyboard if needed.
4.
When the name is complete, touch Enter to
save the name and go to the Presets screen
with the new preset selected. The new preset
is loaded. Push HOME to go back to the Main
screen.
Select WAV Files and Control Playback
Options
Now you will choose some WAV files to assign to pads
and assign a mode to each pad. The main screen has a
4x4 grid of 16 light gray pads. A WAV file can be
assigned to each of these pads, and each pad is
assigned a pad mode. The available pad modes are
sample, clip, slicer, granular and new recording. The
table below will help you choose which pad type to use:
Preset Management
Screen
Preset File Menu
Keyboard Screen
Copyright 1010music LLC 2020
Page 18 of 72
Bitbox 3.0.1 User Manual


