Summary of Contents for DR-07
Page 95: ......
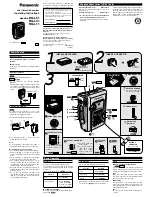
The Tascam DR-07 is a portable audio recorder perfect for capturing high-quality sound on the go. Ensure you are getting the most out of your device by downloading the Owner's Manual for free from manualshive.com. This manual provides all the information you need to maximize your recording experience.
Page 95: ......