background image

ACCU-TURN 1400

Digital Wheel Balancer

 - ZEEWB604A

OPERATOR’S MANUAL

Machine à équilibrer

MANUEL DE L’OPÉRATEUR

Equilibradora

MANUAL PARA EL OPERADOR

Summary of Contents for 1400

Page 1: ...ACCU TURN 1400 Digital Wheel Balancer ZEEWB604A OPERATOR S MANUAL Machine quilibrer MANUEL DE L OP RATEUR Equilibradora MANUAL PARA EL OPERADOR...

Page 2: ...cautions de s curit Toutes les informations figurant dans le pr sent manuel ont t fournies par le fabricant de l quipement VENCIMIENTO DE LA GARANT A Y LIMITACIONES DE RESPONSABILIDAD A pesar de que...

Page 3: ...NTY SET FORTH HEREIN IS IN LIEU OF ALL OTHER WARRANTIES EXPRESS OR IMPLIED INCLUDING BUT NOT LIMITED TO ANY WARRANTIES OF MERCHANTABILITY OR FITNESS FOR A PARTICULAR PURPOSE AND ALL SUCH WARRANTIES AR...

Page 4: ...e Hanover Virginie GARANT A LIMITADA Accu Industries Inc Vendedor prev una garant a limitada de un a o en lo que ata e a piezas y mano de obra suministradas incluyendo este producto La nica y exclusiv...

Page 5: ...e 36 5 3 2 3Motorcycle Dynamic Balancing Mode 38 5 3 2 4Static 1 balancing mode 38 5 3 2 5Static 2 balancing mode 38 5 3 2 6Motorcycle Static Balancing Mode 38 5 3 2 7PAX wheel balancing mode 40 5 3 2...

Page 6: ...C 67 8 Vente De La Machine 67 9 Annexes 67 Annexe Instructions pour l Installation 69 Figures Pieces de Rechange 79 ndice 1 Seguridad 9 1 1 Tipograf a 9 2 Especificaciones 11 2 1 Condiciones 11 3 Int...

Page 7: ...ic warnings and cautions when possible dangerous situations may be encountered during the procedures described 1 1 Format of this Manual This manual contains text styles which make you pay extra atten...

Page 8: ...TE RISQUE DE CAUSER DES BLESSURES SERIEUSES A L OPERATEUR OU AUTRES Liste puces Indique que l op rateur doit effectuer une action avant de pouvoir passer l tape suivante de la s quence 1 Seguridad En...

Page 9: ...Specifications Power Power Motor power Electrical consumption Fuses Protection class Measurements Cycle time wheel D 14 Speed of rotation range Offset Increments inches 10 mm Wheel dimensions Max widt...

Page 10: ...0 mm Dimensions de roue Largeur max Diam tre max Poids max Largeur de la jante Diam tre de la jante NORMAL ALU STATIQUE Arbre et c nes Diam tre de bout d arbre C ne petit C ne moyen C ne grand Dimensi...

Page 11: ...g surface of the wheel be clean and free of debris prior to mounting to the bal ancer Application The off the vehicle wheel balancer is designed for dy namic and static balancing of passenger car and...

Page 12: ...lis par le personnel de maintenance seu lement Instructions pour l installation Les instructions pour l Installation se trouvent au Ch 9 Annexes 3 Introducci n Esta equilibradora de ruedas combina una...

Page 13: ...t accessories are Quick Release Hub Nut 10201462 Spacer ring 10017671 Universal drum 10017672 Universal drum cushion 10018618 Large cone 10025539 Medium cone 10025518 Small cone 10025517 Stub shaft 10...

Page 14: ...025518 Petit c ne 10025517 Arbre 10025516 Embout de vissage arbre 14025821 Masse de calibrage utilisateur 50025415 Pince masses 525011 Calibre largeur jantes 14007580 3 1 Accesorios Consultar lao Figu...

Page 15: ...nit 1 Display Refer to Chapter 4 1 2 Control panel Refer to Chapter 4 2 3 Gauge arm The gauge arm is a tool for measuring the rim 4 Flange 5 Stub shaft 6 Brake pedal 7 Weight compartments 8 Storage ar...

Page 16: ...9 Capot de s curit protection roue mobile 10 Zone de stockage pour Calibre largeur jantes Se reporter la Figure 4 2 1 Interrupteur secteur MARCHE ARRET 4 Disposici n Consultar Figura 4 1 Descripci n f...

Page 17: ...ights error codes etc 3 7 Weight position indicator Fit a clip on weight at the rim position indicated when the relative WAP indicator lights up 4 5 6 Weight position indicator Fit a stick on weight a...

Page 18: ...ore lorsqu une erreur est d tect e et affiche g n ralement un message Pour tous les autres signaux sonores reportez vous au Chapitre 7 car ces signaux indiquent des erreurs 4 1 La Pantalla Ver Figura...

Page 19: ...ough the values 6 Rim Diameter and mm inch Key Press to reduce the rim diameter value shown on the display Hold down to rapidly scroll through the values In combination with the F key toggles between...

Page 20: ...re 10 Touche START d marrage Presser pour lancer la rotation de la roue apr s avoir abaiss le capot de s curit 11 Touche STOP Presser pour arr ter la rotation de la roue 4 2 El panel de entrada Consul...

Page 21: ...may undergo design revisions Always check for compatibility be tween the devices and the balancer Refer to the sup plied technical information The method used to mount a wheel depends on the way the w...

Page 22: ...Retenir la roue et faites tourner la manivelle de ser rage AVERTISSEMENT ASSUREZ VOUS QUE LA ROUE REPOSE BIEN CONTRE LE PLATEAU D INSTAL LATION ET QUE LES FILETS DE LA MANIVELLE S ENGAGENT D AU MOINS...

Page 23: ...leu of the drum C Front Cone Mounting The cone centers the wheel from outside D Front Cone Mounting with an optional exten sion adapter 4026401 in order to elminate the wheel or tire from touching the...

Page 24: ...e fa on s re Remarque L installation double c ne peut tre utilis e avec certaines roues sp cia les Le c ne arri re se centre sur l paullement de la roue et le c ne avant sur le trou central si n para...

Page 25: ...he 3 stud bolts in the holes stamped with the number 3 For 4 holes fit the 4 stud bolts in the holes stamped with the number 4 For 5 holes fit the 4 stud bolts in the holes stamped with the number 5 A...

Page 26: ...it pour roues de fourgon 4026401 Il permet le centrage de roues de fourgon avec al sage central de 120 174 mm de diam tre Ver Figura 5 1 3 En la misma se indica de arriba a abajo A Adaptador Rueda Uni...

Page 27: ...r shaft reference point If the wheel is rotated 180 degrees from the initial po sition on the stud and re tightened a different imbal ance reading may result This is caused by mechanical tolerance on...

Page 28: ...rreur ne peut pas tre corrig e contactez SAV L erreur de d s quilibre est en fait la moiti de l erreur de rotation 5 1 1 Errores en el Montaje de la Rue da Ver Figura 5 1 1 1 Independientemente de la...

Page 29: ...is shown refer to Chap ter 7 The unit will beep and perform a self test All indicators and displays will be on for several seconds so the operator may check if all displays and indicators are functio...

Page 30: ...teur Corriger l entr e et continuer Il n y a pas de proc dure sp ciale suivre Est ce une action impr vue de la machine Relire les chapitres appropri s La machine doit tre relanc e teindre la machine 5...

Page 31: ...y Check the thread of the quick release wing nut Clean all threads and surfaces with a dry soft cloth Store the cones and the quick release wing nut in the correct place Unplug the power cord from the...

Page 32: ...ndique un mode diff rent de celui d sir se reporter au Chapitre 5 3 2 Les param tres par d faut de la machine sont les grammes et les pouces espere 20 segundos vuelva a encender la unidad Repita cuida...

Page 33: ...meters To change the units refer to Chapters 5 4 2 and 5 4 3 Obtaining rim data diameter Note For manual entry the nominal rim diam eter should be derived from the rim or tire rim width Measure manual...

Page 34: ...la jante ou le plan relatif de mesure du d port d pendent du mode d quili brage s lectionn se reporter au Chapitre 5 3 2 Utiliser la jauge pour mesurer et entrer manuelle 5 3 Procedimiento de equilib...

Page 35: ...ted the display will appear as Figure 5 3 2 0 1 Enter the dimensions Chapter 5 3 1 and spin the wheel Apply the clip on weights at the distance in positions indicated by the illuminated weight applica...

Page 36: ...LU4 Se reporter la Figure 5 3 2 2 4 ALU5 Se reporter la Figure 5 3 2 2 5 de la barra del brazo luego introducir el valor en el display utilizando las teclas adecuadas Nota El brazo de medida tiene una...

Page 37: ...planes indicated by the fully illuminated weight application lights in the 12 o clock position Perform a check spin when done 5 3 2 4 Static 1 balancing mode Only static imbalances are measured and c...

Page 38: ...ois s lectionn l afficheur appara t comme sur la Fi gure 5 3 2 6 1 Entrer les dimensions Ch 5 3 1 et faire tourner la roue Placer les masses agraf es adh sives sur les rayons la position MIDI Effectue...

Page 39: ...completed acoustic signal then manually accompany the arm to its original position to obtain effective data entry Rotate the wheel to the WAP position of the right plane and apply the weight At this...

Page 40: ...lan de droite Appuyez la touche F L afficheur de droite montre S 1 5 3 2 7 Modo Equilibrado ruedas PAX Con esta funci n ver Figura 5 3 2 7 1 es posible equili brar las ruedas tipo PAX SYSTEM Al selecc...

Page 41: ...on until you find the radial where the above mentioned index appears Note The field where S 2 appears on the dis play is wider than radial width therefore make sure the radial is positioned exactly at...

Page 42: ...plan R p tez les op rations d application comme indiqu ci dessus pour le premier poids Faites un tour de contr le la fin 5 3 3 Girar la rueda El tipo y las dimensiones de la rueda deber an haber sido...

Page 43: ...lit Figure 5 3 4 2 Press the foot brake to lock the balancers shaft The weight to be applied in that plane is shown on the display Attaching a clip on weight Refer to Figure 5 3 4 3 Clip on weights mu...

Page 44: ...ds en deux valeurs identiques et po ser sym triquement par rapport au plan milieu 5 3 4 Colocaci n del peso Los siguientes tipos de peso y colocaci n est n dis ponibles pesos de sujeci n Colocar siemp...

Page 45: ...n NORMAL ALU and STATIC no additional steps required To have a recalculation done Select the required wheel type Check and or edit rim or plane data when necessary Rotate the wheel to the left plane W...

Page 46: ...e secteur U ajouter une masse correspondant au poids indiqu sur l afficheur ou remplacer la masse par une masse plus lourde R p ter la m me op ration pour le plan interne 5 3 5 Comprobar giro Es una b...

Page 47: ...ith the next step During minimization the left display shows the steps in the following sequence Step 1 Figure 5 4 2 2 Rotate the valve to the 12 o clock position Select the F key Step 2 Figure 5 4 2...

Page 48: ...DI Appuyer sur la touche F Etape 5 Figure 5 4 2 3 Lancer la roue La machine v rifie si une minimisation suppl men taire est n cessaire 5 4 Modos especiales Al seleccionar la tecla F permite que el ope...

Page 49: ...4 2 2 Rotate the valve to the 12 o clock position Select the F key Step 8 Figure 5 4 2 3 Spin the wheel Step 9 Figure 5 4 2 9 The unit will display the result Minimization successfully completed EEE M...

Page 50: ...e la touche F et presser la tou che mm inch R p ter la proc dure pour revenir la visualisation en pouce inch Paso 6 Minimizaci n completada Figura 5 4 2 7 Salir Modo de Minimizaci n Continuar Minimiz...

Page 51: ...at the mo ment you accessed the function Operation Press the F FINE keys simultaneously The dis play shows SEL ECt Hold down until BAL Sht appears accompanied by an acoustic signal Press the or key to...

Page 52: ...es LEDs d applica tion des contrepoids signalent le mode Equilibrage normal poids clip interne externe 5 4 4 Contadores de Control En este cap tulo se describe c mo usar los conta dores que sirven par...

Page 53: ...her with a letter relating to the first op erator index A b After a short time the Offset and diameter data previously set appears again You can now perform two operations 1 Save the current data 2 Re...

Page 54: ...l du set est signal par le mes sage OPE et par le code de l op rateur accom pagn s de deux signaux sonores Pour quitter la fonction multi op rateur presser F 5 4 5 Selecci n Multi Operador En este cap...

Page 55: ...When the balancer will be put into use again clean all oiled parts 6 2 Changing the Main Fuse Refer to Figure 6 2 1 Switch off the balancer Unplug the power lead from the power outlet Remove the powe...

Page 56: ...la machine Allumer la machine en maintenant la touche CAL enfonc e jusqu ce que l afficheur montre CAL 6 2 Cambiar el fusible de la red el ctrica Consultar la Figura 6 2 1 Apagar la unidad Desenchufa...

Page 57: ...keys F FINE the display shows SEL ECt Hold down the keys until BAL Sht appears and an acoustic signal is activated Press F BAL 0 appears on the display Press one of the three keys to display BAL 1 Lo...

Page 58: ...ibrage est correct Sinon un message d erreur appara t Les messages d erreur sont expliqu s au chapitre 7 1 6 3 2 Compensaci n Desequilibrio Adaptadores Este cap tulo indica c mo compensar los desequil...

Page 59: ...to the power outlet 2 No mains current Check the current supply and the power system fuses 3 Unit fuse s blown Replace the unit fuse s If the fuse s has have recently been substituted call Accu Servic...

Page 60: ...20 secondes allumer la machine Continuer Si cela se produit fr quemment faites v rifier vo tre syst me lectrique Si votre syst me est sans pro bl me lectrique appeler SAV 7 Resoluci n de proble mas S...

Page 61: ...oceed with step 4 3 A calibration is required Have the gauge arm calibrated Balancing results are inconsistent 1 The balancer may not be installed properly Make sure the unit rests on its 3 feet only...

Page 62: ...s est produite teindre la machine Attendre 20 secondes allumer la machine Appeler SAV t cnico La rueda no gira autom ticamente 1 El interruptor de la estructura Inclinada no funcio na bien porque no h...

Page 63: ...No acceleration Shaft acceleration was not detected Call Accu Service E27 Slip detected The wheel slips on the shaft Mount wheel properly insuring that sufficent torque is applied to wing nut E28 Spe...

Page 64: ...code v rifier le code sur la liste Si le code n est pas d crit appeler le service apr s vente suivre les m thodes d crites Ce chapitre se divise en Code Description M thode s suivre 7 1 1 C digos E Cu...

Page 65: ...side to factory calibra tion Attach the User Calibration Weight correctly on the left side of the flange Redo Calibration Call Accu Service 8 Disposal When you decide to dispose of the unit contact yo...

Page 66: ...obl me concernant la configuration exacte de la machine veuillez noter que la configura tion exacte peut diff rer dans votre pays Se reporter au bon de commande pour de plus amples renseigne ments 7 1...

Page 67: ...68...

Page 68: ...69 Appendix Installation Instructions Annexe Instructions pour l Installation Anexo Instrucciones Instalaci n...

Page 69: ...be horizontal within 2 level within 2 mm able to bear the weight of the balancer as stated in Chapter 2 of the Operator s Manual The floor on which the balancer will be installed should not relay vib...

Page 70: ...RISE SECTEUR CONFORME EST DIS PONIBLE AVERTISSEMENT NE JAMAIS POSER DE CABLE SECTEUR SUR LE SOL SANS UNE GAINE DE PROTECTION CONFORME En este anexo se describen los requisitos y procedi mientos de ins...

Page 71: ...d supplied parts Check the contents of the shipment Contents The shipment contains a wheel balancer a Declaration of Conformity CE the accessories as mentioned in Chapter 3 of the Operator s Manual 4...

Page 72: ...te Pour manipuler l unit utilisez de pr f rence les crochets de stockage mont s con form ment au Chapitre iii et ou l arbre du couvre roue si pr sent ii Manipulaci n desempaque y contenido Manipulaci...

Page 73: ...ded accessory supports and disks Refer to Figure iii 1 Mount the 4 threaded supports and disks Stub shaft Clean the stub shaft and the main shaft Refer to Figure iii 2 Position the stub shaft on the m...

Page 74: ...Placez les c nes sur les crochets de stockage Appareils de serrage Placez les appareils de serrage sur les crochets de stockage iii Procedimiento de Instalaci n Unidad Consulte el gr fico correcto se...

Page 75: ...ong screw 4 Fig iii 4 and tighten it normally on the cubicle Control panel Connect the multi track cable to the connector be hind the panel Connect the earth cable to the front panel Apply the Control...

Page 76: ...un arr t d urgence Expliquer la fa on de s lectionner un mode d en trer les donn es et de placer les masses Plano Porta Pesos Apoye el plano porta pesos en la m quina y antes de la fijaci n pasar haci...

Page 77: ...78 ACCU 1400 114 0 July 02...

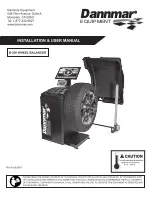
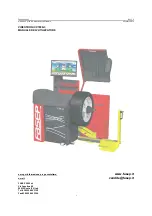
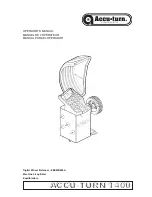
Page 78: ...ACCU TURN 1400 SPARE PARTS EXPLODED VIEWS Digital Wheel Balancer...

Page 79: ...80 ACCU 1400 114 0 July 02 THIS PART IS FOR EXCLUSIVE USE OF QUALIFIED PERSONNEL FOR MAINTENANCE AND SERVICE PURPOSES On order specify type of machine and serial number item code and quantity...

Page 80: ...81 ACCU 1400 114 0 July 02...

Page 81: ......

Page 82: ......

Page 83: ...84 ACCU 1400 114 0 July 02...

Page 84: ...85 ACCU 1400 114 0 July 02...

Page 85: ...86 ACCU 1400 114 0 July 02...

Page 86: ...87 ACCU 1400 114 0 July 02...

Page 87: ...ACCU TURN 1400 Rev A 2 14 05 WDC...

Reviews: