background image

Dimension ES-2008 Ethernet Switch 

2-4  


     Hardware Description and Installation 


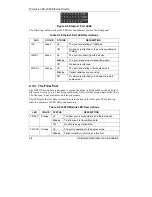
Figure 2-4 Ethernet Port LEDs 

The following table describes the LEDs for the Ethernet ports on the front panel. 

Table 2-3 Ethernet Port LED Descriptions 

LED COLOR 

STATUS 

DESCRIPTION 

On 

The port is operating at 100Mbps. 

100 Green 

Off 

No device is attached or the port is operating at 
10Mbps. 

On 

The port is connecting with a device. 

Blinking 

The port is receiving or transmitting data. 

LK/ACT Green 

Off 

No device is attached. 

On 

The port is operating in full-duplex mode. 

Blinking 

Packet collisions are occurring 

FD/COL Orange 

Off 

No device is attached or the device is in half-
duplex mode. 

2.3.3  The Fiber Port 

The 100FX fiber module is designed to extend the distance between the switch and other 
Ethernet devices by up to 2 km using multi-mode fiber or 30 km using single-mode fibers.  
The fiber port is not available on all switch models.  
The LEDs provide real-time system status information of the fiber port. The following 
table is a summary of LED status and meaning. 

Table 2-4 100FX Module LED Descriptions 

LED COLOR 

STATUS 

DESCRIPTION 

On 

The fiber port is connected to an Ethernet device. 

Blinking 

This fiber port is transmitting data. 

LK/ACT Orange 

Off 

No data is being transmitted. 

On 

The port is operating in full-duplex mode. 

FD/COL Orange 

Blinking 

Packet collision is occurring on this port. 

Summary of Contents for Dimension ES-2008

Page 1: ...Dimension ES 2008 Ethernet Switch User s Guide Version 1 02 March 2003 ...

Page 2: ...on of ZyXEL Communications Corporation Published by ZyXEL Communications Corporation All rights reserved Disclaimer ZyXEL does not assume any liability arising out of the application or use of any products or software described herein Neither does it convey any license under its patent rights nor the patents rights of others ZyXEL further reserves the right to make changes in any products describe...

Page 3: ...rking conditions NOTE Repair or replacement as provided under this warranty is the exclusive remedy of the purchaser This warranty is in lieu of all other warranties express or implied including any implied warranty of merchantability or fitness for a particular use or purpose ZyXEL shall in no event be held liable for indirect or consequential damages of any kind of character to the purchaser To ...

Page 4: ...hat compliance with the above conditions may not prevent degradation of service in some situations Repairs to certified equipment should be made by an authorized Canadian maintenance facility designated by the supplier Any repairs or alterations made by the user to this equipment or equipment malfunctions may give the telecommunications company cause to request the user to disconnect the equipment...

Page 5: ... These limits are designed to provide reasonable protection against harmful interference in a commercial environment This equipment generates uses and can radiate radio frequency energy and if not installed and used in accordance with the instruction manual may cause harmful interference to radio communications Operation of this equipment in a residential area is likely to cause harmful interferen...

Page 6: ...m www europe zyxel com WORLDWIDE sales zyxel com tw 886 3 578 2439 ftp europe zyxel com ZyXEL Communications Corp 6 Innovation Road II Science Based Industrial Park Hsinchu 300 Taiwan support zyxel com 1 714 632 0882 800 255 4101 www zyxel com NORTH AMERICA sales zyxel com 1 714 632 0858 ftp zyxel com ZyXEL Communications Inc 1650 Miraloma Avenue Placentia CA 92870 U S A support zyxel dk 45 3955 0...

Page 7: ......

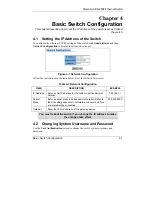
Page 8: ... 2 5 Turning On the Switch 2 6 Chapter 3 Introducing the Web Configurator 3 1 3 1 Accessing the Web Configurator 3 1 3 2 Commonly Used Buttons 3 3 3 3 General Switch Information 3 4 3 4 Switch Console Port Settings 3 4 Chapter 4 Basic Switch Configuration 4 1 4 1 Setting the IP Address of the Switch 4 1 4 2 Changing System Username and Password 4 1 4 3 Resetting the Switch 4 2 4 4 Rebooting the Sw...

Page 9: ...P Port Status 10 5 Chapter 11 Port Mirroring 11 1 11 1 Introduction 11 1 11 2 Configuring Port Mirroring 11 1 Chapter 12 SNMP 12 1 12 1 About SNMP 12 1 12 2 Configuring SNMP 12 2 Chapter 13 Introducing the SMT 13 1 13 1 Introduction 13 1 13 2 Accessing the SMT Using Telnet 13 1 13 3 Accessing the SMT Using the Console Port 13 1 13 4 Initial SMT Screen 13 2 13 5 The SMT Overview 13 3 13 6 Navigatin...

Page 10: ...Configuration File Maintenance 18 1 18 1 Filename Convention 18 1 18 2 Firmware Upgrade 18 1 18 3 Configuration File Maintenance 18 4 Chapter 19 Troubleshooting 19 1 19 1 Using LEDs to Diagnose Problems 19 1 19 2 Console Port 19 2 19 3 Telnet 19 3 19 4 Web Configurator 19 3 19 5 Login Username and Password 19 4 19 6 Improper Network Cabling and Topology 19 4 Appendix A Setting up Your Computer s I...

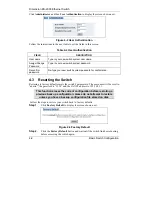
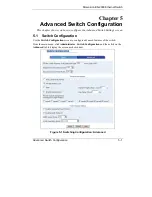
Page 11: ...User Authentication 4 2 Figure 4 3 Factory Default 4 2 Figure 4 4 System Reboot 4 3 Figure 5 1 Switching Configuration Advanced 5 1 Figure 6 1 Port Configuration 6 1 Figure 6 2 Port Statistics 6 3 Figure 7 1 Trunking Aggregator Setting 7 2 Figure 7 2 Trunking Aggregator Information 7 3 Figure 7 3 Trunk State Activity 7 4 Figure 8 1 Configuring IGMP 8 6 Figure 8 2 IGMP Example 1 8 7 Figure 8 3 IGMP...

Page 12: ...ion 14 5 Figure 14 6 SMT Password Configuration 14 5 Figure 15 1 SMT Port Trunk Configuration 15 1 Figure 15 2 SMT Port Monitoring Configuration 15 3 Figure 15 3 SMT VLAN Configuration 15 4 Figure 15 4 SMT VLAN Support Configuration Setting VLAN Mode 15 5 Figure 15 5 SMT VLAN Support Configuration 802 1Q 15 5 Figure 15 6 SMT Add a VLAN Group 15 6 Figure 15 7 SMT Edit Delete a VLAN Group 15 8 Figur...

Page 13: ...ure 16 15 SMT LACP Group Status 16 10 Figure 17 1 SMT Status and Counters 17 1 Figure 17 2 SMT Port Status 17 2 Figure 17 3 SMT Port Counters 17 2 Figure 17 4 SMT Switch Information 17 3 Figure 18 1 SMT Startup Message 18 2 Figure 18 2 1K Xmodem Firmware Upload Example 18 2 Figure 18 3 SMT Firmware Upload Process 18 3 Figure 18 4 Web Configurator Firmware Upgrade 18 3 Figure 18 5 Web Configurator ...

Page 14: ...ooping 8 10 Table 9 1 VLAN Operation Mode 9 2 Table 9 2 VLAN Setup Port based Configuration 9 4 Table 9 3 VLAN Setup 802 1Q VLAN Port Tagging 9 6 Table 9 4 Tag Based VLAN Port VLAN ID 9 6 Table 10 1 Recommended Path Cost 10 1 Table 10 2 Configure STP Parameter 10 2 Table 10 3 View STP Root Bridge Information 10 3 Table 10 4 STP Port Status 10 5 Table 11 1 Port Mirroring 11 2 Table 12 1 SNMP Manage...

Page 15: ...Troubleshooting Power LED 19 1 Table 19 2 Troubleshooting LK ACT LED 19 1 Table 19 3 Troubleshooting 100 LED 19 2 Table 19 4 Troubleshooting FD COL LED 19 2 Table 19 5 Troubleshooting Console Port 19 2 Table 19 6 Troubleshooting Telnet 19 3 Table 19 7 Troubleshooting Web Configurator 19 3 Table 19 8 Troubleshooting Internet Browser Display 19 4 Table 19 9 Troubleshooting Login Username and Passwor...

Page 16: ...l ES models are discussed together in this guide Unless specified images of the ES 2008 SC are used throughout this document Images that directly relate to the other two models are used when referring to the key differences between the models General Syntax Conventions Enter means for you to type one or more characters and press the carriage return Select or Choose means for you to use one from th...

Page 17: ...Getting Started I P Pa ar rt t I I Getting Started Part I covers Getting to Know Your Switch Hardware Installation and Introducing the Web Configurator ...

Page 18: ......

Page 19: ... and monitoring In addition the ES 2008 can be managed via Telnet the console port or SNMP 1 1 Features Conforms to IEEE 802 3 802 3u and 802 3x Ethernet Standards IEEE802 3ab Gigabit copper for ES models with a gigabit port 8 auto negotiating 100M Full half duplex or 10M Full half duplex mode Ethernet RJ 45 ports Auto MDI MDIX auto sensing Ethernet ports One fixed 100Mbps Fiber SC SC single mode ...

Page 20: ...he console port requires a direct connection between the computer and the switch using an RS 232 console cable You can also telnet into the switch from any computer on your network provided you know the IP address of the switch 1 3 2 Web Configurator The switch comes with an embedded HTML web configurator It offers advanced management features and allows you to manage the switch from anywhere on t...

Page 21: ...one Workgroup Example 1 4 2 Bridging Application For enterprise networks where large data broadcasts are constantly processed this switch is an ideal solution for department users to connect to the corporate backbone In the next illustration two Ethernet switches with attached computers print server and local server are all connected to the switch All devices in this network can communicate with e...

Page 22: ...from stations that are not in the same group s the traffic must first go through a router As well as security VLANs also increase network performance by limiting broadcasts to a smaller and more manageable logical broadcast domain In traditional switched environments all broadcast packets go to each and every individual port With VLAN broadcasts are confined to the members of the VLAN Note that VL...

Page 23: ...Dimension ES 2008 Ethernet Switch Getting to Know Your ES 2008 1 5 Figure 1 3 VLAN Application Example ...

Page 24: ......

Page 25: ...smooth and sturdy flat space strong enough to support the weight of the switch and the connected cables Make sure there is a power outlet nearby Step 4 Make sure there is enough clearance around the switch to allow air circulation and the attachment of cables and the power cord Do not block the ventilation holes Leave space between switches when stacking 2 2 Hardware Connections 2 2 1 Front Panel ...

Page 26: ... the type straight crossover of the attached cable This feature effectively removes all wiring troubles caused by a cable type mismatch Although a crossover cable is usually required to cascade a switch to another switch auto MDI MDI X lets you use a normal straight cable to do the task Auto Negotiating 10 100Base TX RJ 45 Ports The auto negotiation feature allows the switch to detect the speed of...

Page 27: ... 2 pair UTP STP Category 5 1000BASE T 100Ω 4 pair UTP STP Category 5 100BASE FX multi mode 50 62 5 125 micron multi mode fiber optics 100BASE FX single mode 8 10 125 micron single mode fiber optics 2 3 Front Panel LEDs All the LEDs are found on the front panel of the switch to indicate real time status of the ports and the switch 2 3 1 The PWR LED The PWR LED on the front panel indicates whether t...

Page 28: ... FD COL Orange Off No device is attached or the device is in half duplex mode 2 3 3 The Fiber Port The 100FX fiber module is designed to extend the distance between the switch and other Ethernet devices by up to 2 km using multi mode fiber or 30 km using single mode fibers The fiber port is not available on all switch models The LEDs provide real time system status information of the fiber port Th...

Page 29: ...EDs Table 2 5 Gigabit Module LED Descriptions LED COLOR STATUS DESCRIPTION On The port is connected at 1000 Mbps 1000 Green Off The port is not connected at 1000 Mbps On The fiber port is connected to an Ethernet device Blinking This fiber port is transmitting data LK ACT Orange Off No data is being transmitted On The port is operating in full duplex mode Blinking Packet collision is occurring on ...

Page 30: ...ct connection between the switch and a computer via an RS 232 console cable Refer to chapters on SMT configurations 2 5 Turning On the Switch Connect one end of the power cord to the power receptacle on the rear panel of the switch and the other end to the power outlet Refer to the product specifications for the right power source The PWR LED on the front panel turns on ...

Page 31: ...connected refer to instructions in Chapter 2 Step 2 Prepare your computer to connect to the switch Set your computer to use a static IP address in the same subnet as the IP address of the switch refer to the Setting Your Computer s IP Address appendix Step 3 Launch your Internet Explorer You must use Internet Explorer 5 0 or later versions Step 4 Type 192 168 1 1 as the URL Step 5 Type admin defau...

Page 32: ...or Figure 3 2 Welcome Screen 3 1 1 The Navigation Panel The navigation panel on the left of all web pages provides a consistent way to access all program functions Click Administrator to expanded the menu and configure the switch Figure 3 3 Menu Figure 3 4 Expanded Menu ...

Page 33: ...k on the ports to open a read only status window as shown next Figure 3 6 Port Status Refer to the Port Statistics section for field descriptions 3 2 Commonly Used Buttons The following table describes the buttons found in most screens Table 3 1 Commonly Used Button BUTTON DESCRIPTION Apply Click Apply to save the changes Default Click Default to set the screen settings back to factory defaults De...

Page 34: ...ch Information FIELD DESCRIPTION Description This field displays a short description of the switch MAC Address This field displays the MAC address of the switch without the separator Firmware Version This field displays the version of the firmware the switch is using Hardware Version This field displays the hardware version of the switch Kernel Version This field displays the version of the kernel...

Page 35: ...on ES 2008 Ethernet Switch Introducing the Web Configurator 3 5 Use the information in this screen to set the communication parameters of a terminal emulation program to access the switch via the console port ...

Page 36: ......

Page 37: ...n the table below to set the fields in this screen Table 4 1 Network Configuration FIELD DESCRIPTION EXAMPLE IP Address Enter a LAN IP address for the switch in dotted decimal notation 192 168 1 1 Subnet Mask Enter a subnet mask in dotted decimal notation Refer to the Subnetting appendix to calculate a subnet mask if you are implementing subnetting 255 255 255 0 Gateway Enter the LAN IP address of...

Page 38: ...assword for confirmation 4 3 Resetting the Switch Restoring to factory defaults resets the switch s parameters The user name will be reset to admin the password to 1234 and the LAN IP address to 192 168 1 1 This function erases the current configuration before restoring a previous back up configuration please do not attempt to restore unless you have a backup configuration file stored on disk Foll...

Page 39: ... reboot the switch after you make changes to the switch s IP address and uploads a firmware or configuration file Step 1 Click System Reboot to display the screen as shown next Figure 4 4 System Reboot Step 2 Click Reboot and wait until the switch finishes rebooting before accessing the switch again ...

Page 40: ...Advanced Settings II P Pa ar rt t I II I Advanced Settings Part II covers advanced port settings such as trunking port security and filtering ...

Page 41: ......

Page 42: ...how to configure the Advanced Switch Settings screen 5 1 Switch Configuration Use the Switch Configuration screen to configure advanced features of the switch From the main menu click Administrator Switch Configuration and then click on the Advanced tab to display the screen as shown next Figure 5 1 Switching Configuration Advanced ...

Page 43: ...s above the threshold broadcast storm control becomes active Select a percentage number from the drop down list box to set the threshold of the ports Select OFF to disable this feature This is the default setting Priority Queue Service Select a priority queuing type First Come First Served Select this option to send packets in the order of arrival All High Before Low Select this option to send all...

Page 44: ...n Enable IGMP Protocol Select this option to activate Internet Group Multicast Protocol IGMP Refer to Section 8 1 for more information IGMP Query Mode Select Auto to allow the network to automatically find the IGMP server The multicast device with the lowest numerical IP address to be the IGMP server This is the default setting Select Enable to force this switch to be the IGMP server even when the...

Page 45: ......

Page 46: ... individual Ethernet ports on the switch and view the status of all the ports Click Administrator and then Port Configuration to display the screen as shown next Figure 6 1 Port Configuration Follow the instructions in the next table to configure the Ethernet ports Table 6 1 Port Configuration FIELD DESCRIPTION Port Configuration Port Select a port to configure from the selection list State Select...

Page 47: ...l or Half from the drop down list box to set the duplex mode of the port All ports are set to Full duplex mode by default Flow Control Select Enable from the drop down list box to activate flow control on this port 6 2 View Port Status The bottom half of the Port Configuration screen displays status of all ports on the switch You may also view the port status information in the Port Status screen ...

Page 48: ...d indicates whether the port has a successful connection Up or no connection Down TxGoodPKT This field displays the number of packets transmitted successfully TxBadPKT This field displays the number of packet transmission failures RxGoodPKT This field displays the number of packets received successfully RxBadPKT This field displays the number of bad packets received TxAbort This field displays the...

Page 49: ......

Page 50: ...gregate Control Protocol LACP which is a protocol that allows a switch to dynamically create and manage trunk groups When you enable LACP trunking on a port the port can automatically negotiate with the ports at the remote end of a link to establish trunk groups Besides dynamic trunking LACP provides port redundancy When an operational port fails one of the standby ports becomes operational withou...

Page 51: ...the table next to change the settings Table 7 1 Trunking Aggregator Setting FIELD DESCRIPTION System Priority Enter a number to identify and set the priority of an active Link Aggregate Control Protocol LACP The smaller the number the higher the priority level Group ID Select a trunk group ID from the drop down list menu and click Select to display the configured settings LACP Select Enable from t...

Page 52: ...s displayed Add Select a port number on the right selection box and click Add to add the port to the trunk group on the left Any ports that remain on the right are ports not assigned to any trunk groups Remove Select a port number on the left selection box and click Remove to remove the port from the trunk group 7 3 Viewing Static Trunk Group Information The Aggregator Information screen displays ...

Page 53: ...the port only responds to LACP packets but cannot negotiate a trunk link configuration with another trunk port on the other end of the link Use the State Activity screen to set the state of the port s in a dynamic trunk group Figure 7 3 Trunk State Activity The following table describes the fields in this screen Table 7 3 Trunk State Activity FIELD DESCRIPTION Port This field displays the port num...

Page 54: ...hout IGMP snooping multicast traffic is treated in the same manner as broadcast traffic that is it is forwarded to all ports With IGMP snooping group multicast traffic is only forwarded to ports that are members of that group IGMP Snooping generates no additional network traffic allowing you to significantly reduce multicast traffic passing through your switch For each attached network an IGMP ser...

Page 55: ... the IGMP server The multicast device with the lowest numerical IP address to be the IGMP server This is the default setting Select Enable to force this switch to be the IGMP server even when there is already an IGMP server on the network Selecting this option may affect network performance Select Disable to forcibly disallow this switch from being an IGMP server 8 1 2 IGMP Examples This section p...

Page 56: ...t Enable in the IGMP Query Mode field However if another multicast device is set to Auto and it has a numerically lower IP address it will act as the IGMP server also This results in duplicated IGMP messages that might decrease your network performance Unless you can disable IGMP on the other multicast devices on your network it is not recommended you select the Enable option ...

Page 57: ...Security Setup Figure 8 3 IGMP Example 2 Example 3 Disable IGMP on the Switch When you want to set a multicast router on your network to be the IGMP server but the router does not have the lowest IP address disable IGMP on all other multicast devices ...

Page 58: ...rity Setup 8 5 Figure 8 4 IGMP Example 2 8 1 3 Viewing IGMP Snooping Information Click Filter Setup and then IGMP Snooping to display IGMP snooping information Figure 8 5 IGMP Snooping The following table describes the read only fields in this screen ...

Page 59: ...ress You can add a MAC address to the MAC address table on the switch A static MAC address will remain in the MAC address table permanently even if the Ethernet device is not connected to the switch With static MAC addresses the switch avoids re learning the MAC addresses of the Ethernet devices every time the switch reboots or disconnects from the network 8 2 1 Adding Static MAC Address Follow th...

Page 60: ... port with security mode turned on is prevented from re learning a new MAC address of an Ethernet device To secure a port disable the port from learning new MAC addresses and then define a list of MAC addresses that are allowed to use the secured port Thus only incoming packets with the defined MAC addresses will be forwarded Follow the steps below to secure the ports on the switch Step 1 Click Ad...

Page 61: ...esses on the ports to allow only the computers with the static MAC addresses to send packets through the ports If you do not configure static MAC address es on the port with port security feature the port will drop all packets 8 4 MAC Address Filtering You can set up the switch to drop packets from a computer based on the computer s MAC address Follow the steps set up MAC address filtering Step 1 ...

Page 62: ...Filtering Step 2 Enter the MAC address without the separator of an Ethernet device in the MAC Address field Step 3 If VLAN is enabled enter the VLAN ID of a VLAN group the port belongs to in the VLAN ID field This field is N A if VLAN is not enabled Step 4 Click Apply to save the settings ...

Page 63: ...Advanced Applications III P Pa ar rt t I II II I Advanced Applications Part III covers VLAN Port Mirroring STP SNMP and firmware and configuration maintenance ...

Page 64: ......

Page 65: ...f VLANs your switch supports 9 2 1 Port Based VLAN Port based VLAN is the most common and simplest form of VLAN In a port based VLAN some ports are assigned to a VLAN group A port can only belong to one VLAN group By default all the ports on the switch belong to a VLAN group VID 1 You cannot delete the default VLAN 9 2 2 Tag Based VLANs IEEE 802 1Q VLAN Tag based VLAN on the switch is based on the...

Page 66: ...he VLANs on each device In addition if the VLAN configuration on a device changes GVRP automatically changes the VLAN configurations of the affected devices 9 3 Selecting VLANSupport Select the type of VLANs to support in the Switch Configuration screen Click Administrator Switch Configuration and then the Advanced tab to set the VLAN Operation Mode field Figure 9 1 Switch Configuration Enable Pro...

Page 67: ... VLAN Operation Mode drop down list box Then click Apply Step 2 Click VLAN Configuration in the navigation menu to display the setup screen as shown next Figure 9 2 VLAN Setup Port based VLAN Information Step 3 Click Add to configure a new port based VLAN The following screen displays Figure 9 3 VLAN Setup Port based Configuration Follow the instructions in the table next to configure this screen ...

Page 68: ...rt number from the right selection list and click Remove to remove the port from the VLAN Ports in the same VLAN must be in the same trunk group 9 5 Tag Based VLAN Configuration Follow the steps below to configure VLANs on the switch Step 1 In the Switch Configuration screen select either 802 1Q with GVRP or 802 1Q without GVRP from the VLAN Operation Mode drop down list box Then click Apply Step ...

Page 69: ... Based VLAN 802 1 Q VLAN Basic Setup Follow the instructions in Table 9 2 to set the fields in this screen All ports in the same VLAN must be in the same trunk group Step 4 Click Next to continue Figure 9 6 VLAN Setup 802 1Q VLAN Port Tagging Follow the instructions in the next table to set the fields in this screen ...

Page 70: ... frames on this port Otherwise select Untag 9 5 1 Configure Port Settings Click Administration VLAN Configuration and then Port VLAN ID to display the screen as shown next Figure 9 7 Tag Based VLAN Port VLAN ID The following table describes the fields in this screen Table 9 4 Tag Based VLAN Port VLAN ID FIELD DESCRIPTION Port This read only field displays the port number on the switch VLAN ID Ente...

Page 71: ...pport tagging Only one untagged VLAN is allowed per port Ingress Filtering Select Enable from the drop down list box to forward a frame whose VID is the same as the VID of the port Select Disable to forward all frames regardless of the port s VID Acceptable Frame Type Select All from the drop down list box to accept all untagged or tagged frames Select Tag Only to drop all untagged frames ...

Page 72: ......

Page 73: ...nly one path exists between any two stations on the network The root bridge is the base of the spanning tree it is the bridge with the lowest identifier value MAC address Path cost is the cost of transmitting a frame onto a LAN through that port It is assigned according to the speed of the link to which a port is attached The slower the media the higher the cost Refer to the following table for th...

Page 74: ...lick Apply to save the changes 10 3 Configuring Spanning Tree Parameters To configure STP on the switch click Administrator and then Spanning Tree Figure 10 2 Configure Spanning Tree Parameters The following table describes the related fields to configure on a global basis for the entire switch Table 10 2 Configure STP Parameter FIELD DESCRIPTION EXAMPLE Priority To set the priority of this switch...

Page 75: ... from its STP learning listening state to forwarding state Specify a number between 4 and 30 15 10 4 Viewing Root Bridge Information View the STP root bridge information in the Spanning Tree screen These fields display the spanning tree parameter settings for the switch currently acting as the root Figure 10 3 View STP Root Bridge Information Refer to the following table for the field descriptions...

Page 76: ...conds root bridge waits between STP configuration message transmissions Forward Delay Time The number of seconds the root bridge waits before changing from its STP learning listening state to forwarding state 10 5 Configuring Spanning Tree Port Parameters Configure the port parameters in the Set Spanning Tree screen Figure 10 4 Configuring STP Port Parameters Follow the steps below to configure th...

Page 77: ... screen Table 10 4 STP Port Status FIELD DESCRIPTION Port This field displays the port number on the switch Path Cost This field displays the cost of using this port to reach the root bridge The bigger the number the higher the path cost Priority This field displays the priority level of the port The higher the number the lower the priority level Port State This field displays the state of the por...

Page 78: ......

Page 79: ...tor input traffic output traffic or both A port that mirrors the traffic of other ports is the analysis port or the sniffer port A port whose traffic is analyzed is the monitor port or the source port You can configure up to nine monitor ports but only one mirror port 11 2 Configuring Port Mirroring Click Administrator and then Port Mirroring to display the screen shown next Figure 11 1 Port Mirro...

Page 80: ...he default setting Analysis Port You must select a port from the drop down list box to act as the sniffer port when you select ENABLE in the Port Mirroring State field This field is NONE if the Port Mirroring State field is DISABLE Monitor Ports This read only field displays the port number of the switch Monitor Rx Select this check box to monitor incoming traffic of the port Monitor Tx Select thi...

Page 81: ...he TCP IP protocol suite Your switch supports SNMP version one SNMPv1 The next figure illustrates an SNMP management operation Figure 12 1 SNMP Management Model An SNMP managed network consists of two main components agents and a manager An agent is a management software module that resides in a managed device An agent translates the local management information from the managed device into a form...

Page 82: ...The manager issues a request and the agent returns responses using the following protocol operations Get Allows the manager to retrieve an object variable from the agent GetNext Allows the manager to retrieve the next object variable from a table or list within an agent In SNMPv1 when a manager wants to retrieve all elements of a table from an agent it initiates a Get operation followed by a serie...

Page 83: ...witch for identification purposes Location Enter the location of the switch Contact Enter the name of the contact person for the switch Community Strings Current Strings This list box displays the current configured community strings of the switch To remove a string select the string in the list and click Remove New Community Strings Fill in the field below to add a new community string or passwor...

Page 84: ...formation and set MIB objects on the switch Trap Managers Current Manager This field displays the current configured management station the trap manager on the switch To remove a trap manager select the trap manager in the list and click Remove New Manager Fill in the fields below to add a new trap manager and click Add IP Address Enter the IP address of the management station Community Enter the ...

Page 85: ...Using the SMT and System Maintenance IV P Pa ar rt t I IV V Using the SMT and System Maintenance Part IV introduces configuration using the SMT screens and firmware configuration maintenance ...

Page 86: ......

Page 87: ...u out 13 2 Accessing the SMT Using Telnet Follow the steps below to access the SMT screens using a Telnet program Step 1 Launch a Telnet program In Windows click Start and then Run Step 2 Type telnet followed by a space and the IP address of the switch 192 168 1 1 is the default and then click OK to display the password screen Refer to Figure 13 3 Figure 13 1 Starting a Telnet Session 13 3 Accessi...

Page 88: ...e its communication parameters as follows 9600 bits per second Parity none 8 data bits 1 stop bit flow control none Figure 13 2 HyperTerminal Communication Parameter Settings Example 13 4 Initial SMT Screen Press ENTER to display the login screen For your first login enter the default user name admin and default password 1234 and then press ENTER The user name and password are case sensitive Figur...

Page 89: ...es you an overview of the various SMT menu screens of your switch Figure 13 4 SMT Overview 13 6 Navigating the SMT Interface Familiarize yourself with the SMT operations before you attempt to modify the configuration 13 6 1 SMT Screen Navigation The following figure shows the breakdown of most SMT screens ...

Page 90: ...hrough fields in the actions menu ENTER To select an item in the menu SPACE BAR To cycle through the available choices in a field ESC Press ESC to go back to the previous screen Press ESC to move from the configuration menu to the actions menu Intelligent Switch Device Information Device Name ES 2008SC Intelligent Switch Device Content Earth Device Location 8TP 1FX Ports Device Description ES 2008...

Page 91: ... information Switch Static Configuration Use this menu to perform switch configuration such as port and VLAN settings and change login information Protocol Related Configuration Use this menu to configure STP SNMP GVRP and LACP settings System Reset Configuration Select this option to reset the switch Logout Select this option to log out of the SMT menus Main Menu Status and Counters Switch Static...

Page 92: ......

Page 93: ...following table describes each submenu in this screen Table 14 1 Switch Configuration Menu Choice SUBMENU DESCRIPTION Administration Configuration Use this menu to set the system name IP address and password Port Trunk Configuration Use this menu to configure and display port settings and set up trunk groups Dimension Switch ES 2008 Switch Configuration Administration Configuration Port Trunk Conf...

Page 94: ...ation Configuration The menus in Administration Configuration allow you to change administrative settings of the switch In the main menu select Switch Configuration and then Administration Configuration to display the screen as shown in the figure below Figure 14 2 SMT Device Configuration 14 2 1 General Setup The Device Information menu contains system related information In the Administration Co...

Page 95: ...s 2F RM105 Device Description Enter a short description of the switch for administrative purposes Ethernet Switch Press ESC to move the cursor back to the actions menu Press TAB to select Save and press ENTER to save the settings back to the switch 14 2 2 Ethernet IP Configuration Use the IP Configuration screen to change the TCP IP settings of the switch Step 1 In the Administration Configuration...

Page 96: ...y IP address in dotted decimal notation 192 168 1 10 Press ESC to move the cursor back to the actions menu Press TAB to select Save and press ENTER to save the settings back to the switch 14 2 3 Changing the System User Name Follow the steps to change the default system user name Step 1 In the Administration Configuration screen press TAB to select User Name Configuration and press ENTER Step 2 To...

Page 97: ...press ENTER Step 2 Type in your existing system password in the Old Password field and press ENTER Step 3 Type in your new system password in the new Password field and press ENTER Step 4 Re type your new system password in the enter again field and press ENTER Figure 14 6 SMT Password Configuration Dimension Switch ES 2008 Password Configuration Old Password new password enter again password chan...

Page 98: ......

Page 99: ...n the next table to set the fields in this screen Table 15 1 SMT Port Trunk Configuration FIELD DESCRIPTION Port This read only field displays the port number from 1 to 9 including the fiber gigabit port on the switch Dimension Switch ES 2008 Port Trunk Configuration Port Type Enabled Auto Speed Duplex Flow Group Negotiate Config Control 1 10 100TX Yes Enabled 100 Full On None 2 10 100TX Yes Enabl...

Page 100: ...set the speed and duplex mode of the port Flow Control Press SPACE BAR and ENTER to select On to activate the flow control feature on the port Group Press SPACE BAR and ENTER to select a trunk group this port belongs to Trunk group choices are Trunk1 Trunk2 Trunk3 and Trunk4 Press ESC to move the cursor back to the actions menu Press TAB to select Save and press ENTER to save the settings back to ...

Page 101: ...a port number as the mirror port Port This read only field displays the trunk group number or port numbers for ports not in a trunk group Note This field is 0 to indicate that a port is in a trunk group Type This read only field displays either 10 100 TX for Ethernet ports or 100FX for the fiber port on the switch Dimension Switch ES 2008 Port Mirroring Configuration Port Mirroring State Enable An...

Page 102: ... the settings back to the switch 15 3 VLAN Use the VLAN Configuration screen to configure VLANs In the main menu press TAB to select Switch Configuration VLAN Configuration and press ENTER to display the screen as shown in the figure below Figure 15 3 SMT VLAN Configuration Refer to the VLAN chapter for more information 15 3 1 Setting VLAN Mode In the VLAN Configuration screen select Configure VLA...

Page 103: ...ON VLAN Mode Press SPACE BAR and ENTER to select either 802 1Q or 802 1QwithGVRP The following fields display on the screen Dimension Switch ES 2008 Configure VLAN Type VLAN Mode 802 1Q Ingress Acceptable Port VLAN ID Filter Frame Type 1 1 Disable All 2 1 Disable All 3 1 Disable All Trk1 1 Disable All Trk2 1 Disable All 0 1 Disable All 0 1 Disable All 0 1 Disable All 9 1 Disable All actions Quit E...

Page 104: ...wed per port Ingress Filtering Select Enable from the drop down list box to forward frames belonging to a specific VLAN if the port belongs to that VLAN Select Disable to forward all frames regardless of the port s VLAN setting Acceptable Frame Type Select All from the drop down list box to accept all untagged frames Select Tag Only to drop all untagged frames Press ESC to move the cursor back to ...

Page 105: ...ames on this port Select No to prevent a port from joining a VLAN group Press ESC to move the cursor back to the actions menu Press TAB to select Save and press ENTER to save the settings back to the switch 15 3 3 Port Based VLAN Configuration Step 1 In the Configure VLAN Type screen and select Port Based in the VLAN Mode field Step 2 Press any key to display the screen as shown in Figure 15 6 Fol...

Page 106: ...ess ENTER Step 3 Select an entry and press ENTER to delete the VLAN group Step 4 Press ESC and select Save in the actions menu to save the settings back to the switch 15 4 Priority Configuration Priority is a value between 0 and 7 assigned to each frame with 7 being the highest priority Frames assigned a higher priority are transmitted before frames with a lower priority Each priority number is ma...

Page 107: ...ESC to move the cursor back to the actions menu Press TAB to select Save and press ENTER to save the settings back to the switch 15 5 MAC Address Configuration Use the menus in the MAC Address Configuration screen to set static MAC addresses and configure MAC address filter In the Switch Configuration screen select MAC Address Configuration to display the screen as shown Dimension Switch ES 2008 P...

Page 108: ...0 SMT Static MAC Address Step 2 Press TAB to select Add and press ENTER to display screen as shown next Dimension Switch ES 2008 Static MAC Address MAC Address Port MAC Address Port actions Add Edit Delete Save Quit Add Edit Delete static MAC addresses Tab Next Item BackSpace Previous Item Quit Previous menu Enter Select Item Dimension Switch ES 2008 MAC Address Configuration Static MAC Address Fi...

Page 109: ...w MAC address or change the port number and save the changes Deleting a Static MAC Address To remove a static MAC address entry from the table press TAB to select Delete and press ENTER Select the entry you want to remove and press ENTER and save the changes 15 5 2 MAC Address Filtering Follow the steps below to set up MAC address filtering Step 1 In the MAC Address Configuration screen select Fil...

Page 110: ...VLAN is enabled enter the number of the VLAN group to which this port belongs in the VLAN ID field Press ESC to move the cursor back to the actions menu Press TAB to select Save and press ENTER to save the settings back to the switch Dimension Switch ES 2008 Filtering MAC Address MAC Address VLAN ID MAC Address VLAN ID actions Add Edit Delete Save Quit Add Edit Delete filter MAC addresses Tab Next...

Page 111: ... Delete and press ENTER Select the entry you want to remove and press ENTER and save the changes 15 6 Miscellaneous Configuration This section shows you configuration menus in Misc Configuration menu Figure 15 14 SMT Misc Configuration 15 6 1 Port Security Refer to the section on Port Security for background information Dimension Switch ES 2008 Misc Configuration Port Security Aging Time Setting B...

Page 112: ...es Press ESC to move the cursor back to the actions menu Press TAB to select Save and press ENTER to save the settings back to the switch 15 6 2 MAC Address Time Out To specify the time out period for inactive MAC addresses select Aging Time Setting to display the screen as shown next Enter a time interval between 300 and 765 in seconds in the MAC Age Interval sec field If you enter 0 the MAC addr...

Page 113: ...igure 15 17 SMT Broadcast Storm Filter Mode Dimension Switch ES 2008 Aging Time Setting MAC Age Interval sec 300 300 0 300 765 actions Edit Save Quit Select the action menu Tab Next Item BackSpace Previous Item Quit Previous menu Enter Select Item Dimension Switch ES 2008 Broadcast Storm Filtering Broadcast Storm Filter Mode NO actions Edit Save Quit Select the action menu Tab Next Item BackSpace ...

Page 114: ...his feature Default is 1 sec Enable Delay Bound Press SPACE BAR and ENTER to select Enable and specify a time in the MAC Delay Time ms in milliseconds to limit the time a low priority packet is allowed to queue in the switch Max Delay Time Specify a time interval a low priority packet is allowed to queue in the switch Press ESC to move the cursor back to the actions menu Press TAB to select Save a...

Page 115: ...ollowing screen displays Figure 16 1 SMT Protocol Related Configuration 16 2 STP Configuration To access the STP menus select STP Configuration in the Protocol Related Configuration screen Refer to the STP chapter for more background information Dimension Switch ES 2008 Protocol Related Configuration STP Configuration SNMP Configuration GVRP Configuration LACP Configuration Previous Menu Configure...

Page 116: ...System Parameters Use the STP Parameters Setup screen to configure the system parameters for STP Refer to the Configuring Spanning Tree Parameters section for field descriptions Dimension Switch ES 2008 STP Configuration Enable Disable STP Function STP Parameters Setup STP Per Port Setting Previous Menu Enable or disable the Spanning Tree Protocol Tab Next Item BackSpace Previous Item Enter Select...

Page 117: ...ity 1 65535 32768 Mac Address 00001C01016C Root Path Cost 0 Max Age 6 40 20 Root Port Root Max Age 20 Hello Time 1 10 2 Hello Time 2 Forward Delay 15 Forward Delay Time 4 30 15 actions Edit Save Quit Select the action menu Tab Next Item BackSpace Previous Item Quit Previous menu Enter Select Item Dimension Switch ES 2008 STP Per Port Setting Port State Path Cost Priority 1 Disabled 10 128 2 Forwar...

Page 118: ...nd 255 in the Priority field The smaller the number the higher the priority Press ESC to move the cursor back to the actions menu Press TAB to select Save and press ENTER to save the settings back to the switch 16 3 SNMP Configuration Refer to the SNMP chapter for more information on SNMP To configure SNMP use the menus in the SNMP Configuration screen as shown next Figure 16 6 SMT SNMP Configurat...

Page 119: ...gement stations Step 1 Select Trap Managers in the SNMP Configuration screen and press ENTER to display the screen as shown next Intelligent Switch System Options System Name System Contact System Location actions Edit Save Quit Select the action menu Tab Next Item BackSpace Previous Item Quit Previous menu Enter Select Item Intelligent Switch Community Strings Community Name Write Access public R...

Page 120: ...ity string or password in the Community Name field of the trap management station Step 5 Save the changes 16 4 GVRP Configuration Refer to the VLAN chapter for more information on GVRP Intelligent Switch Trap Managers IP Community Name actions Add Edit Delete Save Quit Add Edit Delete trap managers Tab Next Item BackSpace Previous Item Quit Previous menu Enter Select Item Intelligent Switch Add SN...

Page 121: ...12 SMT LACP Configuration 16 5 1 LACP Group Setting Select LACP Group Setting in the LACP Configuration screen and press ENTER to display the screen shown next Intelligent Switch GVRP Configuration GVRP Enabled actions Edit Save Quit Select the action menu Tab Next Item BackSpace Previous Item Space Toggle Esc Action menu Dimension Switch ES 2008 LACP Configuration LACP Group Setting Port State Ac...

Page 122: ...trunk group Work Port No Enter the number of ports in the trunk group If dynamic trunking is not activated on the trunk group then the number must be the same as the number of ports in the trunk group If dynamic trunking is activated you may enter a number bigger than the number of ports in a trunk group Press ESC to move the cursor back to the actions menu Press TAB to select Save and press ENTER...

Page 123: ...o have the port automatically send LACP packets to another trunk port on the other side of the link to negotiate a trunk link configuration Select Passive to have the port respond to LACP packets but cannot negotiate a trunk link configuration with another trunk port on the other end of the link This is the default setting for all ports Press ESC to move the cursor back to the actions menu Press T...

Page 124: ...e static trunk group number Port This read only field displays the port number in the static trunk group Press ESC to move the cursor back to the actions menu Press TAB to select Save and press ENTER to save the settings back to the switch Intelligent Switch LACP Group Status Static Trunking Group Group Key 2 Port_No 5 6 actions Quit Previous Page Next Page Select the action menu Tab Next Item Bac...

Page 125: ... select Status and Counters and press ENTER A screen displays as shown Figure 17 1 SMT Status and Counters 17 1 1 Port Status In the Status and Counters screen select Port Status and press ENTER to display the Port Status screen Dimension Switch ES 2008 Status and Counters Port Status Port Counters System Information Main Menu Displays current status of all the switch ports Tab Next Item BackSpace...

Page 126: ...On 4 10 100TX No Down 100 Full On 5 10 100TX No Down 100 Full On 6 10 100TX No Down 100 Full On 7 10 100TX No Down 100 Full On 8 10 100TX No Down 100 Full On 9 100FX No Down 100 Full On actions Quit Select the action menu Tab Next Item BackSpace Previous Item Quit Previous menu Enter Select Item Dimension Switch ES 2008 Port Counters Port TxGoodPkt TxBadPkt RxGoodPkt RxBadPkt TxAbort Collision 1 0...

Page 127: ...h Information and press ENTER to display the Switch Information screen Figure 17 4 SMT Switch Information Refer to the General Switch Information section for field descriptions Dimension Switch ES 2008 System Information System Description Dimension Switch ES 2008 MAC Address 00001C01016C Firmware Version v1 02 Hardware Version A3 00 Kernel Version v1 06 Display the switch system Esc Previous menu...

Page 128: ......

Page 129: ...m for the configuration file to manage the files The filename must be less than 15 ASCII characters if you use the web configurator Visit www zyxel com to download the latest version of firmware for your switch 18 2 Firmware Upgrade This section shows you how to perform firmware upgrades Download the correct firmware for your switch model from www zyxel com Upgrading wrong firmware version will re...

Page 130: ...he switch The following screen displays Figure 18 1 SMT Startup Message Step 3 At the Press X key to start Xmodem receiver message press x Step 4 You must change your terminal emulation program console port baud rate setting to 57600bps Step 5 Click Transfer then Send File to display the following screen Figure 18 2 1K Xmodem Firmware Upload Example Switch LOADER Checksum O K Press X key to start ...

Page 131: ...P server program on the computer and specify the location of the firmware file and the communication mode Step 3 Click TFTP Update Firmware to display the screen as shown next Figure 18 4 Web Configurator Firmware Upgrade Step 4 Enter the IP address of the TFTP server where the new firmware file resides in the TFTP Server IP Address field Step 5 Specify the name of the firmware file in the Firmwar...

Page 132: ... firmware version 18 3 Configuration File Maintenance You can only use the web configurator to perform configuration file backup and restore WARNING DO NOT INTERRUPT THE FILE TRANSFER PROCESS AS THIS MAY PERMANENTLY DAMAGE YOUR SWITCH 18 3 1 Backup Configuration Backup is highly recommended once your switch is functioning properly Step 1 Run a TFTP server program on a computer and specify the loca...

Page 133: ...TLY DAMAGE YOUR SWITCH This function erases the current configuration before restoring a previous back up configuration please do not attempt to restore unless you have a backup configuration file stored on disk Step 1 Run a TFTP server program on the computer and specify the location of a previously saved configuration file and set the communication mode Step 2 Click Configuration Backup and then...

Page 134: ...he switch Make sure you enter the correct IP address to access the web configurator The following message displays when the configuration file is retrieved successfully from the TFTP server Figure 18 9 Web Configurator Successful Configuration File Retrieval Step 7 Click reboot to restart the switch ...

Page 135: ...Additional Information V P Pa ar rt t V V Additional Information Part V consists of troubleshooting product specifications appendices and an index ...

Page 136: ......

Page 137: ...ower source is turned on and that the switch is receiving sufficient power 3 If these steps fail to correct the problem contact your local distributor for assistance 19 1 2 The LK ACT LED The LK ACT LED does not light up when a device is connected Table 19 2 Troubleshooting LK ACT LED STEPS CORRECTIVE ACTION 1 Verify that the attached device s is turned on and properly connected to the switch 2 Ma...

Page 138: ...llow 2 The Ethernet device is connected at half duplex mode when the FD COL LED is off 3 Make sure you have the correct speed and flow control enabled for each port Refer to the Port Control chapter 3 This LED blinks if packet collisions are occurring Collisions are normal but if the FD COL LED blinks very frequently you may need to segment your network 19 2 Console Port I cannot access the switch...

Page 139: ... in the same subnet 3 Make sure you entered the correct username and password The default username is admin and the default password is 1234 If you have forgot your username or password refer to Section 19 5 4 If these steps fail to correct the problem contact the distributor 19 4 Web Configurator I cannot access the web configurator Table 19 7 Troubleshooting Web Configurator STEPS CORRECTIVE ACT...

Page 140: ...l erase all custom configurations 1 Use a terminal emulation program to connect your computer to the console port on the switch Refer to the Accessing the SMT Using the Console Port section 2 At the login screen type superuser in the User Name field and zyxel in the Password field When you see a INET prompt you are logged in with safe mode on 4 At the INET prompt type flashdf and press ENTER A Wri...

Page 141: ...ce refer to Chapter 2 Cabling Length If you use longer cables than are needed transmission quality may be affected The network cables should not be longer than the limit of 100 meters Too many hubs between the computers in the network Too many hubs or repeaters between the connected computers in the network may increase the number of network collision or other network problems Remove unnecessary h...

Page 142: ......

Page 143: ... installed on computers using Windows NT 2000 XP Macintosh OS 7 and later operating systems After the appropriate TCP IP components are installed configure the TCP IP settings in order to communicate with your network If you manually assign IP information instead of using dynamic assignment make sure that your computers have IP addresses that place them in the same subnet as the Prestige s LAN por...

Page 144: ...en click OK If you need Client for Microsoft Networks a Click Add b Select Client and then click Add c Select Microsoft from the list of manufacturers d Select Client for Microsoft Networks from the list of network clients and then click OK e Restart your computer so the changes you made take effect Configuring In the Network window Configuration tab select your network adapter s TCP IP entry and ...

Page 145: ...IP address remove previously installed gateways If you have a gateway IP address type it in the New gateway field and click Add 4 Click OK to save and close the TCP IP Properties window 5 Click OK to close the Network window Insert the Windows CD if prompted 6 Turn on your Prestige and restart your computer when prompted Verifying Settings 1 Click Start and then Run 2 In the Run window type winipc...

Page 146: ...indows 2000 NT XP 1 For Windows XP click start Control Panel In Windows 2000 NT click Start Settings Control Panel 2 For Windows XP click Network Connections For Windows 2000 NT click Network and Dial up Connections 3 Right click Local Area Connection and then click Properties ...

Page 147: ...Win XP and click Properties 5 The Internet Protocol TCP IP Properties window opens the General tab in Windows XP If you have a dynamic IP address click Obtain an IP address automatically If you have a static IP address click Use the following IP Address and fill in the IP address Subnet mask and Default gateway fields Click Advanced ...

Page 148: ...P address in IP address and a subnet mask in Subnet mask and then click Add Repeat the above two steps for each IP address you want to add Configure additional default gateways in the IP Settings tab by clicking Add in Default gateways In TCP IP Gateway Address type the IP address of the default gateway in Gateway To manually configure a default metric the number of transmission hops clear the Aut...

Page 149: ...nd Alternate DNS server fields If you have previously configured DNS servers click Advanced and then the DNS tab to order them 8 Click OK to close the Internet Protocol TCP IP Properties window 9 Click OK to close the Local Area Connection Properties window 10 Turn on your Prestige and restart your computer if prompted Verifying Settings 1 Click Start All Programs Accessories and then Command Prom...

Page 150: ...le menu Control Panel and double click TCP IP to open the TCP IP Control Panel 2 Select Ethernet built in from the Connect via list 3 For dynamically assigned settings select Using DHCP Server from the Configure list 4 For statically assigned settings do the following From the Configure box select Manually ...

Page 151: ...hanges to your configuration 7 Turn on your Prestige and restart your computer if prompted Verifying Settings Check your TCP IP properties in the TCP IP Control Panel window Macintosh OS X 1 Click the Apple menu and click System Preferences to open the System Preferences window 2 Click Network in the icon bar Select Automatic from the Location list Select Built in Ethernet from the Show list Click...

Page 152: ...re box select Manually Type your IP address in the IP Address box Type your subnet mask in the Subnet mask box Type the IP address of your Prestige in the Router address box 5 Click Apply Now and close the window 6 Turn on your Prestige and restart your computer if prompted Verifying Settings Check your TCP IP properties in the Network window ...

Page 153: ......

Page 154: ... remaining octets make up the host ID Class C addresses begin starting from the left with 1 1 0 In a class C address the first three octets make up the network number and the last octet is the host ID Class D addresses begin with 1 1 1 0 Class D addresses are used for multicasting There is also a class E address It is reserved for future use Chart 1 Classes of IP Addresses IP ADDRESS OCTET 1 OCTET...

Page 155: ...f a bit in the subnet mask is 0 then the corresponding bit in the IP address is part of the host ID Subnet masks are expressed in dotted decimal notation just as IP addresses are The natural masks for class A B and C IP addresses are as follows Chart 3 Natural Masks CLASS NATURAL MASK A 255 0 0 0 B 255 255 0 0 C 255 255 255 0 Subnetting With subnetting the class arrangement of an IP address is ign...

Page 156: ...ample you have a class C address 192 168 1 0 with subnet mask of 255 255 255 0 NETWORK NUMBER HOST ID IP Address 192 168 1 0 IP Address Binary 11000000 10101000 00000001 00000000 Subnet Mask 255 255 255 0 Subnet Mask Binary 11111111 11111111 11111111 00000000 The first three octets of the address make up the network number class C You want to have two separate networks Divide the network 192 168 1...

Page 157: ... 168 1 254 The remaining 7 bits determine the number of hosts each subnet can have Host IDs of all zeros represent the subnet itself and host IDs of all ones are the broadcast address for that subnet so the actual number of hosts available on each subnet in the example above is 27 2 or 126 hosts for each subnet 192 168 1 0 with mask 255 255 255 128 is the subnet itself and 192 168 1 127 with mask ...

Page 158: ...west Host ID 192 168 1 1 Broadcast Address 192 168 1 63 Highest Host ID 192 168 1 62 Chart 8 Subnet 2 NETWORK NUMBER LAST OCTET BIT VALUE IP Address 192 168 1 64 IP Address Binary 11000000 10101000 00000001 01000000 Subnet Mask Binary 11111111 11111111 11111111 11000000 Subnet Address 192 168 1 64 Lowest Host ID 192 168 1 65 Broadcast Address 192 168 1 127 Highest Host ID 192 168 1 126 Chart 9 Sub...

Page 159: ...e a 27 bit mask to create 8 subnets 001 010 011 100 101 110 The following table shows class C IP address last octet values for each subnet Chart 11 Eight Subnets SUBNET SUBNET ADDRESS FIRST ADDRESS LAST ADDRESS BROADCAST ADDRESS 1 0 1 30 31 2 32 33 62 63 3 64 65 94 95 4 96 97 126 127 5 128 129 158 159 6 160 161 190 191 7 192 193 222 223 8 224 223 254 255 The following table is a summary for class ...

Page 160: ...ess has two host ID octets available for subnetting and a class A address has three host ID octets see Chart 1 available for subnetting The following table is a summary for class B subnet planning Chart 13 Class B Subnet Planning NO BORROWED HOST BITS SUBNET MASK NO SUBNETS NO HOSTS PER SUBNET 1 255 255 128 0 17 2 32766 2 255 255 192 0 18 4 16382 3 255 255 224 0 19 8 8190 4 255 255 240 0 20 16 409...

Page 161: ...ension ES 2008 Ethernet Switch IP Subnetting S Chart 13 Class B Subnet Planning NO BORROWED HOST BITS SUBNET MASK NO SUBNETS NO HOSTS PER SUBNET 14 255 255 255 252 30 16384 2 15 255 255 255 254 31 32768 1 ...

Page 162: ...08 GTP One console port Data Transfer Rate Ethernet 10Mbps half duplex 20Mbps full duplex Fast Ethernet 100Mbps half duplex 200Mbps full duplex Cabling 10BASE T UTP Cat 3 4 5 100 m 100BASE TX UTP Cat 5 100 m max 1000Base T UTP Cat 5 100m Max ES 2008 GTP 100BASE FX ES 2008 SC ES 2008 SC30 50 62 5 125 micron multi mode fiber optics ES 2008 SC 8 10 125 micron single mode fiber optics ES 2008 SC30 Ful...

Page 163: ...4 groups up to 8 ports for each group Port Security Static MAC address filtering Multicasting Support IGMP snooping Broadcast Storm Support broadcast storm control Port Mirroring All ports support port mirroring Management Local console Telnet Web Based management SNMP Management Security Username Password needed for Console Telnet and Web management authentication MIBs RFC 1213 MIB II RFC 1493 Br...

Page 164: ... Fiber ES 2008 SC and ES 2008 SC30 LK ACT FD COL 1000Base T ES 2008 GTP 1000M LK ACT FD COL Dimensions 250 W x 132 D x 37 H mm Power Supply 100 240VAC 50 60Hz internal universal power supply Power Consumption 17W max Operating Temperature 0ºC 45ºC 32ºF to 113ºF Operational Humidity 10 to 90 Non condensing EMI FCC Class A CE Safety UL cUL ...

Page 165: ...ackup 18 4 Console Port Communication Settings 19 2 Console Port Settings 13 2 D Data path loop 19 5 Device Information 14 3 Dynamic Port Trunking 7 1 Advantages 7 1 Requirements 7 1 Dynamic VLAN 9 2 E Enable Delay Bound 5 2 F Faulty cables 19 5 FIFO See First Come First Served Filename Convention Firmware and Configuration Files 18 1 Note for web configurator 18 1 Firmware Upgrade 18 1 Requiremen...

Page 166: ... State Activity 16 9 Status 7 4 LACP Group Setting SMT 16 7 LACP State Activity 7 4 LACP Status SMT 16 9 LACP Work Ports 7 3 Link Aggregate Control Protocol 7 1 Link Aggregation See Port Trunking M MAC Address Filter 15 9 MAC Address Filtering 8 12 15 11 MAC Address Time Out 15 14 MAC Table Address Entry Age out time 5 2 Management Information Base MIB 12 2 Mirror port 11 1 Miscellaneous Configura...

Page 167: ... 13 3 Sniffer port See Mirror Port SNMP See Simple Network Management Protocol Agent 12 1 Community strings 12 3 Configuring 12 2 Get 12 2 Manager 12 1 Trap 12 2 Trap Manager 12 2 Trap Managers 12 4 Version 12 1 SNMP Agent 12 1 SNMP Configuration SMT 16 4 SNMP Manager 12 1 SNMP System Options 16 4 SNMP Trap Manager 16 5 Source port See Monitor Port Spanning Tree Protocol See STP Speed 19 1 Static ...

Page 168: ...rd 19 4 Power LED 19 1 Telnet 19 3 Web Configurator 19 3 Trunk groups 7 1 Trunk State 7 4 Trunking 7 1 State Activity 7 4 U Using LEDs To Diagnose Problems19 1 V VID See VLAN Identifier Virtual LAN See VLAN VLAN Create New Group 15 7 Dynamic 9 2 Tag Based 9 4 VLAN 9 1 Change Group Settings 15 7 Delete Group 15 8 Port Based 9 3 SMT Configuration 15 4 Types 9 1 VLAN 15 4 VLAN Identifier 9 1 VLAN Mod...

Reviews: