background image

Main Document Only.


Manual of 03/05/2021 Rev. 1.1 “User Manual EV CHARGER 3PH 22kW” 

31/62 

6.


Commissioning 

6.1.


Preliminary safety inspection 


Make sure that the AC voltage falls within the range 
permitted by the device.


Attention 

 
Check the following points before starting up the charging station: 

1)


Positioning:  Check  that  the  position  is  stable  and  solid  and  that  the  charging  station  does  not 
move unintentionally. 

2)


Front closure: make sure that the front of the device is properly closed by the side locks. Also 
check that the emergency button is not pressed; if necessary, turn it slightly to release it. 

3)


Protection: set appropriate values for the protection switch of the AC input current leakage. 

4)


Other components: make sure no components or other objects remain on top of the charger. 
 

6.2.


Starting the charging station 

After  checking  all  the  points  in  the  previous  section,  proceed  with  the  actual  start-up  of  the 
charging station. The charger must be switched on and the indicating lights (LEDs) on the display 
should be in standby mode. 


Status 

Description 

LED lights 

Standby 

On, but charger not plugged in 

Green

 light flashing

, 2s on and 2s 

off 

Ready to charge 

Battery charger plugged in, but 

hasn't started charging 

Yellow

 light flashing

, 2s on and 2s 

off 

Charging 

Battery charger plugged in, and has 

started charging 

Green 

light flashing slowly

gradually on/off 

Charging 

interrupted 

Charging interrupted, but battery 

charger still plugged in 

Green

 light steady 

Error 

Various types of errors 

Red

 light steady 

Table 5 - Operating states 

Summary of Contents for AZZURRO ZCS

Page 1: ...EV CHARGER 3PH 22KW ...

Page 2: ...Main Document Only Manual of 03 05 2021 Rev 1 1 User Manual EV CHARGER 3PH 22kW 1 62 EV CHARGER 3PH 22kW User Manual ...

Page 3: ...tement Copyright of this manual belongs to Zucchetti Centro Sistemi S p A No part of this manual may be copied including the software reproduced or distributed in any form or by any means without the permission of Zucchetti Centro Sistemi S p A All rights reserved ZCS reserves the right to final interpretation This manual is subject to change based on feedback from users installers or customers Pl...

Page 4: ...6 3 1 1 Installation tools 18 3 2 Installation process 20 3 2 1 Installation position 20 3 2 2 Movement of the charger 20 3 3 Materials and cables 21 4 Electrical connections 22 4 1 Connecting PGND cables grounding 22 4 2 Connecting the AC power cables 24 4 3 External protection devices 26 4 4 Communication systems 26 5 Mounting 28 5 1 Wall mounting 28 5 2 Mounting on metal support 29 5 3 Locking ...

Page 5: ...ct overview 42 9 3 Features 43 9 3 1 OCCP 1 6 Protocol 43 9 3 2 Management of charger unit 43 9 3 3 LED indications 45 9 4 Installation 46 9 4 1 Installation tips 46 9 4 2 Installation materials 46 9 4 3 ZVM GATEWAY positioning 46 9 4 4 Internet connection 47 9 5 Commissioning 47 9 6 Wi Fi Configuration 48 9 7 Back end configuration 52 9 8 ZVM GATEWAY update 55 10 Operation 56 10 1 Connecting the ...

Page 6: ...Main Document Only Manual of 03 05 2021 Rev 1 1 User Manual EV CHARGER 3PH 22kW 5 62 12 2 Maintenance 60 13 Dismantling and disposal 61 14 Warranty 62 ...

Page 7: ...ians electricians technical support personnel or anyone who is qualified and certified to work on an electrical system responsible for installing starting up and operating the charging station Symbols used This manual provides information for safe operation and uses certain symbols to ensure the safety of personnel and materials and for efficient use of the equipment during normal operation It is ...

Page 8: ...hich if not resolved or avoided could result in minor or moderate personal injury Caution Attention indicates a potentially hazardous situation which if not resolved or avoided could result in damage to the system or other property Attention Note provides important tips on the correct and optimal operation of the product Note ...

Page 9: ...n injury or damage Qualified personnel Ensure that the operator has the necessary skills and training to operate the equipment Personnel responsible for use and maintenance of the equipment must be qualified and capable of performing the activities described and must also have appropriate knowledge on how to correctly interpret the contents of this manual For safety reasons this charging station c...

Page 10: ...immediately notify the transport company If necessary request assistance from an installer or from Zucchetti Centro Sistemi S p A Transport of the equipment especially by road must be carried out with vehicles suitable to protect the components in particular electronic components against violent knocks humidity vibrations etc Electrical connections Please follow all the electrical regulations on a...

Page 11: ...ve the information label or tamper with the charging station Otherwise ZCS will not provide any warranty or assistance Note Operation Do not use the product if it has any defects cracks scratches or leaks but contact your dealer or ZCS technical service Contact with the electrical grid or the terminal of the equipment may cause electrocution or fire Do not touch the terminal or the conductor conne...

Page 12: ...onnection to the transmission gate After switching off the DC switch wait 5 minutes before carrying out any repairs or maintenance on the charging station Danger The charging station should start working again after any faults have been fixed For repairs contact your local authorised service centre Do not disassemble the internal components of the charging station without permission this will void...

Page 13: ...nt according to the IEC 70 1 standard EN 60529 June 1997 IP54 means that it is resistant against water and rust therefore also suitable for outdoor operation and maintenance Table 1 Symbols present on the charger 1 3 Labels Figure 2 Labels present on the charging station DO NOT remove the labels DO NOT cover with sheets supports cabinets etc Always keep them clean and legible ...

Page 14: ...eeded from the photovoltaic system if present or from the grid depending on availability The figure below shows a typical installation the photovoltaic system inside the barred box Figure 3 Example of a charging station connected to a PV system optional and grid The charging stations can only be connected to grids with voltage and frequency values within the range specified in the technical datash...

Page 15: ...agram of the charging station The charging station connects to an electric vehicle via a Type2 connector the cable is optional According to the standards the charging station is identified with Type3 wall box in which the station is responsible for any power limitations protections of various types and start stop charging No energy conversion takes place inside the charging station ...

Page 16: ...h an external communication gate also allows remote control of the station invoicing of the energy and other functions It is compatible with all types of cables and power sockets in order to ensure safe charging It is designed according to the EN 61851 1 2011 and EN 61851 22 2002 international standards which makes it compatible with industry standards It can be connected to internet via WiFi Ethe...

Page 17: ... 3 1 Checks before installation Checking the outer packaging Packaging materials and components may be damaged during transport Therefore it is recommended to check the materials of the outer packaging before installing the charging station Check the surface of the box for external damage such as holes or tears If any type of damage is detected do not open the box containing the charging station a...

Page 18: ...ion from its packaging check that the product is intact and complete If any damage is found or components are missing contact the supplier and transport company Contents of the packaging No Part Qty 1 Charging station 1 2 Screw with built in washer 4 3 Front opening keys 2 4 RFID activation card 2 5 Expansion plug 4 6 Self tapping screw 4 ...

Page 19: ...ferrules 4 8 Wall support 1 9 Declaration of Conformity 1 10 User Manual 1 11 Warranty 1 Table 2 Package contents 3 1 1 Installation tools The following tools are required for the installation of the charging station and electrical connections therefore they must be prepared before installation ...

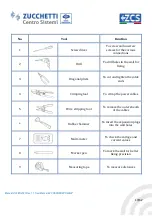
Page 20: ... in the wall for fixing 3 Diagonal pliers To cut and tighten the cable ends 4 Crimping tool To crimp the power cables 5 Wire stripping tool To remove the outer sheath of the cables 6 Rubber hammer To insert the expansion plugs into the wall holes 7 Multi meter To check the voltage and current values 8 Marker pen To mark the wall for better fixing precision 9 Measuring tape To measure distances ...

Page 21: ...d allow easy access to the charging station for normal operation and maintenance For safety reasons ZCS and or its authorised partners may not perform repairs maintenance or move the chargers from and to the ground if they are installed at a height of more than 180 cm Stations installed at higher heights must be moved to the ground before they can be repaired or serviced 3 2 2 Movement of the char...

Page 22: ... three phase Second requirement Mains cable STP CAT5E 8 cores Second requirement Connector for mains cable RJ45 Second requirement Insulating tape 0 15 mm 18mm 0 600V 0 C 80 C Second requirement Cable tie 4 200mm Second requirement Table 4 Electrical equipment It is important that all cables used are suitable for outdoor use NOTE For safety reasons make sure to use suitably sized cables otherwise ...

Page 23: ... with the skills and knowledge to build install and operate electrical systems and who has been trained on how to identify and prevent potential risks Attention The charging station must be installed and serviced by professional technicians or electricians Attention The charging station must be installed and serviced by professional technicians or electricians Attention 4 1 Connecting PGND cables ...

Page 24: ...rt L4 is the distance between the crimped part and the conductor wires protruding from the crimped part Note 2 The cavity formed after the conductor has been crimped must completely wrap the conductor wires The core of the wire must be in close contact with the terminal Figure 10 Preparing the ground cable 2 2 Install the crimped OT terminal and flat washer by inserting the M5 screw into the hole ...

Page 25: ...e AC power cables used for the charging station must be three pole outdoor cables For easier installation use flexible cables The specific section recommended for connections is at least 6mm2 For safety reasons make sure to use suitably sized cables otherwise the current may cause overheating or overloading which could result in a fire Note Cable connection procedure 1 Remove a suitable length of ...

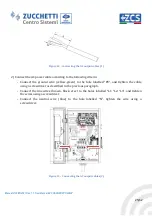
Page 26: ...ria Connect the ground wire yellow green to the hole labelled PE and tighten the cable using a screwdriver as described in the previous paragraph Connect the line wires brown black grey to the holes labelled L1 L2 L3 and tighten the wires using a screwdriver Connect the neutral wire blue to the hole labelled N tighten the wire using a screwdriver Figure 13 Connecting the AC output cables 2 ...

Page 27: ...xternal communication gates e g ENGATE or ZCS Connext The cable connection does not depend on the type of mounting wall or floor The power cables pass through the inlet at the bottom of the charger and connect to the corresponding PE L1 L2 L3 and N inputs on the switch terminals inside the charger A network cable is required to connect the charger to the communication gate which has internet acces...

Page 28: ...s an access gate for up to 12 chargers The gate is connected to charger 1 and the other chargers are connected one by one via network cables between the various CAN ports relative Figure The length of the network cable between the gate and charger 1 should be 10m while the total length of the network cables between the gate and the farthest charger should be 100m Figure 15 Connecting the charging ...

Page 29: ... will be inserted in the top rear of the charging station You can use the hole jig found in the package 2 Insert the plugs horizontally into the holes made paying attention to the force and depth with which they are inserted make sure the plug completely enters the hole 3 Position the station s support on the wall 4 Secure the station on the support as shown in relative Figure Figure 16 Wall fixin...

Page 30: ...ground support in the centre of the parking area 2 Bury the connection cables with at least 150 cm of the cables protruding above the surface 3 The communication and power cables run inside the support 4 Secure the station from below using the screws contained in the mounting kit Figure 17 Positioning of charger on support post ...

Page 31: ...es not depend on the type of mounting Turn on the switch inside and close the front cover of the charger with the wrench supplied The locks are located on the right side Figure 18 Lock position Pressing lightly on the front cover will make it easier to close and open the charger Note Figure 19 Final positioning of charging station LOCK ...

Page 32: ...f the AC input current leakage 4 Other components make sure no components or other objects remain on top of the charger 6 2 Starting the charging station After checking all the points in the previous section proceed with the actual start up of the charging station The charger must be switched on and the indicating lights LEDs on the display should be in standby mode Status Description LED lights S...

Page 33: ...gure 20 Control keypad 2 Press the Confirm Enter key for at least 10 seconds 3 The page in relative Figure appears use the Next Back and Confirm Enter keys to write the password Password 123456 Figure 21 Password selection screen 4 If the password is entered correctly the page shown in relative Figure opens which contains all the device configurations The menu items can be selected using the Next ...

Page 34: ...re select point 1 Settings and press the Confirm Enter key Wait for the page shown in relative Figure to appear Figure 23 Password mode of use and power configuration screen 2 To change the password NOT RECOMMENDED select Set PWD to set the new password as shown in the screen below Figure 24 Password setting screen Set PWD Set Mode Set Current 1 Setting 2 Maintenance 3 Management Set 6 digit PWD 1...

Page 35: ... shown in relative Figure to appear Figure 25 Screen for setting working mode 6 Select the desired working mode Please note that the charging station can be used in the following ways Online requires an ENGATE connection Offline launches the charge only with authorised cards Plug Play simply connect the car to start charging automatically Wait for the device to restart automatically 7 To set the m...

Page 36: ...6A corresponds to the limit of 3 5kW for single phase and 11kW for three phase 10A corresponds to the limit of 2 3 kW for single phase and 6 6kW for three phase Wait for the device to restart automatically 7 3 Menu for repairs or maintenance 1 From the screen shown in relative Figure select item 2 Maintenance and press Confirm Enter Wait for the screen shown in relative Figure to appear Figure 27 ...

Page 37: ...ect 3 Firmware from the screen shown in relative Figure to view the software version of the device 7 4 Configuration of RFID card to enable charging in online and offline mode 1 From the screen shown in relative Figure select item 3 Management and press Confirm Enter Wait for the screen shown in relative Figure to appear Figure 30 RFID card control screen 1 Add Card 2 Remove Card 2 yes Select yes ...

Page 38: ...is recognisable by the symbol shown in relative Figure present on the front of the device Figure 32 RFID Card Reader Symbol 3 To remove a charging card select 2 Remove card from the screen shown in relative Figure and wait for the screen shown in relative Figure to appear Figure 33 Card removal screen 4 Select the card to be removed with the Next and Back keys and confirm the removal with the Conf...

Page 39: ...onfiguration by connecting to the ENGATE in order to use the portal that has already been developed Up to 10 chargers can be connected to the same ENGATE via the CAN port the ENGATE is powered through the CAN port if the connection distance to the first battery charger is less than 10 meters otherwise an additional power supply is required external 12V power supply unit see the chapter on ENGATE f...

Page 40: ...cted to the portal Table 6 Icons for connection to ENGATE 8 2 Offline This working mode allows the charger to operate without any connection to the portal the charging is authorised through RFID cards which can be configured locally via the display Each pack includes two RFID cards which can be configured to activate the charging No billing system is implemented in this configuration The ZCS Conne...

Page 41: ...ations charge limits blocks monitoring needs or specific configurations the simplest configuration is in Plug Play mode recharging is initiated by the car s BMS simply through the physical connection of the magazine gun to the car and stopped through disconnection In this working mode there is no possibility of invoicing There is the possibility of using the connext ZCS connection and this will on...

Page 42: ...Main Document Only Manual of 03 05 2021 Rev 1 1 User Manual EV CHARGER 3PH 22kW 41 62 Figure 36 Plug Play mode ...

Page 43: ...this document carefully to understand how the device works Keep this manual handy at all times 9 2 Product overview The ZVM GATEWAY device is an energy gateway that controls the communication between the chargers and backend The chargers can be connected in a daisy chain and managed by a single gateway this then has the function of managing the entire unit allowing a maximum of 12 chargers to be c...

Page 44: ...as reservations and charging start and stop As the OCPP 1 6 position is open the ZVM GATEWAY can also easily be coupled with other backends that support OCPP1 6 communication protocols For more information please contact ZCS Azzurro support 9 3 2 Management of charger unit In charger units in a car park for example a single ZVM GATEWAY can act as a communication gateway for a maximum of 12 charger...

Page 45: ...AY and the last charger in the chain should be less than 100 meters The balancing of the loads prevents overloading of one charger at the expense of the others the ZVM GATEWAY actively manages and distributes the available power among all the chargers In applications with multiple chargers the ZVM GATEWAY has shown to be a Smart energy management system especially in a system where limited power i...

Page 46: ...GATEWAY in operation Green light steady off ZVM GATEWAY not in operation Back end connection centre Green light steady ZVM GATEWAY and Back end connected Flashes once back end is communicating Off connection between ZVM GATEWAY and back end failed Connection to charger right Green light steady Connection established Flashes once charger is communicating Off connection between ZVM GATEWAY and back ...

Page 47: ...em needs to be installed outdoors additional weather protection is required as the device has a protection class of IP21 9 4 2 Installation materials Number Specifications Quantity Network cable Shielded network cable Cat 5 As required Network cable connector RJ45 As required Cable ties 4 x 200 mm As required 9 4 3 ZVM GATEWAY positioning In accordance with the project route the power and communic...

Page 48: ...e connected to Charger no 1 must be connected to the CAN port Once the connections have been made make sure the connection is active and running If the LED of the internal connection is not on check that the network cables are connected to the correct ports and that the cables are crimped 9 5 Commissioning Before commissioning the device check that the cables are connected properly 1 Switch on the...

Page 49: ... contact the dealer 9 6 Wi Fi Configuration In order to communicate correctly the ZVM GATEWAY device must be connected to a local Wi Fi network so that it is able to send data The device must be powered and switched on 1 Use a mobile phone to search for the Wi Fi hotspot of the ZVM GATEWAY Search for a network that looks like ENGATE_XXXXXX where the last 6 digits correspond to the serial number of...

Page 50: ...Main Document Only Manual of 03 05 2021 Rev 1 1 User Manual EV CHARGER 3PH 22kW 49 62 Password admin ...

Page 51: ...1 1 User Manual EV CHARGER 3PH 22kW 50 62 6 Click on Search Wi Fi select the available Wi Fi network and enter the network password Click Confirm To connect to the device you need to have a stable signal and know the password of the Wi Fi network ...

Page 52: ...V CHARGER 3PH 22kW 51 62 7 If the connection is successful the gateway will restart automatically 8 Wait until the 3 LEDs on the device are all lit up steady or flashing LEDs which means that the configuration is successful and the device is ready to communicate ...

Page 53: ... 62 9 7 Back end configuration The ZVM GATEWAY communicates by default with the manufacturer s back end If communication with another back end is necessary the settings need to be changed For further information contact the dealer 1 From the same initial status page click Set ENGATE ...

Page 54: ...reen opens the manufacturer s credentials are present by default They must be deleted Server IP eu en plus con Server Port 33033 3 Enter the credentials of Azzurro ZCS as follows Server IP evchargers zcsazzurro com Server Port 33033 Click Confirm 4 If the settings are correct the gateway will restart ...

Page 55: ...Main Document Only Manual of 03 05 2021 Rev 1 1 User Manual EV CHARGER 3PH 22kW 54 62 5 Check that the Wi Fi and Back end settings have been saved in the ENGATE INFO screen ...

Page 56: ... 9 8 ZVM GATEWAY update If the device needs to be updated after consulting with technical support request the necessary files and save them on a USB memory stick 1 The USB stick must ONLY contain one folder named OCPP_UPLOADER 2 Power up the gateway and wait until the LEDs light up 3 Insert the USB stick 4 The LED on the left side of the gateway will start to flash quickly for about 20 seconds 5 W...

Page 57: ...nel in order to start the charging operation When charging starts the connector will be secured to the socket until otherwise instructed the charger will display real time information on the charging status such as electricity supplied charging time voltage current and power 10 3 End of charging When the electric vehicle is fully charged the charging will stop and the charging LED will turn solid ...

Page 58: ...Main Document Only Manual of 03 05 2021 Rev 1 1 User Manual EV CHARGER 3PH 22kW 57 62 11 Technical datasheet ...

Page 59: ...ions in good condition Are the configuration settings correct for the type of installation Information on the event list Problems Possible causes Solutions 1 Input overvoltage The input voltage on the AC side may be too high 1 Check the input voltage from the back end 2 If the voltage is higher than 264Vac for a limited period of time wait for the grid to re establish an adequate voltage value 2 I...

Page 60: ...uit breaker for the leakage current of the power distribution 2 Check for damaged AC output cables or low resistance ground connection 8 Abnormal current leakage sensor The value measured by the leakage current sensor is abnormal 1 Immediately switch off the circuit breaker for the leakage current of the power distribution 2 Check for damaged AC output cables or low resistance ground connection 9 ...

Page 61: ... dealer 12 2 Maintenance Charging stations generally do not require daily or periodic maintenance Cleaning the charging station Use an air compressor a soft dry cloth or soft bristled brush to clean the charging station Do not use water corrosive chemical substances or aggressive detergents Disconnect the AC power of the device before cleaning ...

Page 62: ...nscrew the fixing screws and remove from the metal part or support 2 Packaging If possible pack the charging station in its original packaging 3 Storage Store the charging station in a dry place where the ambient temperature is between 25 C and 60 C 4 Disposal At the end of its life dispose of the charging station and packaging materials in places that can manage and recycle electrical equipment s...

Page 63: ...ice is defective or faulty during the warranty period contact your installer or supplier If the fault falls within the responsibility of the manufacturer Zucchetti Centro Sistemi S p A will provide service and maintenance free of charge Warranty exclusions Use of the charging station for any other use other than the intended one Defective or faulty design or installation of the system Improper use...

Page 64: ......

Reviews: