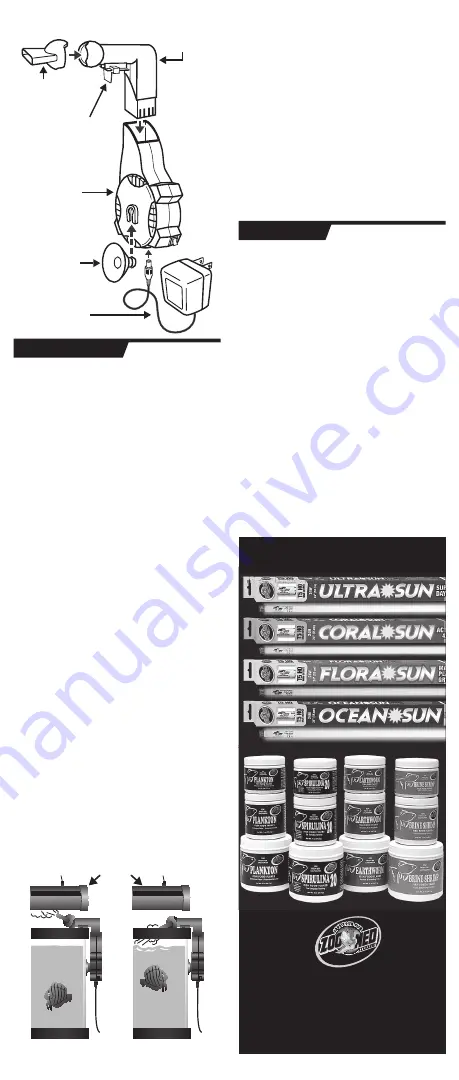
Lighting Fixture
Nozzle Up
Nozzle Down
INSTALLATION:
WARRANTY:
CAUTION:
Do not plug the fan until after
completing the following steps.
1. Remove all of the components from the
package and inspect for missing parts or
damage. If any parts are missing or dam-
aged, contact customer service at the
information listed on these instructions.
2. Insert the suction cup into the recess on
the fan housing.
3. Insert the elbow duct onto the fan housing
as shown. Be careful to avoid inserting
the elbow backwards on the housing. If
inserted correctly, the elbow will extend
over the top edge of the aquarium when
the suction cup is attached to the outside
of the tank.
4. Mount the fan assembly to the aquarium
by attaching the suction cup on the fan
housing to the back of the aquarium at a
location that will allow the elbow duct to
extend over the top edge of the tank. The
sliding bracket on the elbow duct should
be on the inside of the top edge of the
aquarium. Slide the bracket to remove the
slack and prevent the elbow duct from
vibrating during operation.
5. Attach the fan nozzle to the ball of the
elbow duct:
- To cool by directing at Aquarium Lamps:
Direct the nozzle upwards toward the
aquarium lamp fi xture to dissipate some
of the radiant heat generated by your
aquarium lamps.
- To cool by directing at the surface of the
water: Direct the nozzle so that air fl ows
over the surface of the water. This will
reduce the water temperature through
increased evaporative cooling.
6. Plug the transformer into a grounded
GFCI (Ground Fault Interrupted Circuit)
receptacle with a “drip loop” (see fi gure
1). After plugging in the transformer,
insert the transformer jack into the
electrical connection on the bottom of the
fan housing.
7. Your new AQUACOOL Aquarium Cooling
Fan is complete and ready for use! Turn
the fan on using the red switch on the fan
housing. Further adjust the fan nozzle as
desired.
Zoo Med Laboratories, Inc. (Zoo Med) warrants
each AQUACOOL Aquarium Cooling Fan to be
free of defects in material and workmanship
under normal use and service for one year
from the date of purchase. The obligation
under this warranty is limited to the repair or
replacement, at Zoo Med’s discretion, of the
product or any part thereof, when the product
is returned to Zoo Med, freight prepaid. No
claim shall be allowed under this warranty
if, in the opinion of Zoo Med, the AQUACOOL
Aquarium Cooling Fan has been subject to
accident or improper usage, including but not
limited to: water damage, improper storage,
accidental dropping, etc. This warranty is in
lieu of all other warranties and representations
expressed or implied. Please include your
receipt, full name, address, phone number,
and email address along with a note explain-
ing failure when sending any product back to
Zoo Med. Please allow 4 to 6 weeks for repair
or replacement.
LOOK FOR THESE OTHER FINE
ZOO MED PRODUCTS
ZOO MED EUROPA
Klein Hagelkruis 13
B-2180 Ekeren Belgium
Europe: Tel: +32 475 763 663
Europe E-mail: [email protected]
www.zoomed.eu
Lighting Fixture
Power Supply
Suction Cup
Fan Housing
Fan Nozzle
Elbow Duct
Sliding
Bracket
Nozzle Up
Nozzle Down


