21
FR
EN
PL
NL
ES
PT
TROUBLESHOOTING GUIDE
1. Dog Does Not Respond to Stimulation
- Adjust the collar fit.
- Trim the dog’s hair or use longer contact points to make better skin contact.
- Recharge the battery in the receiver/collar.
- Adjust the stimulation intensity level.
2. System Test Procedures
Whenever you experience a malfunction, you will need to do a test loop to determine which
component - collar, wall transmitter or yard wire - is not working. Follow these steps to perform the
test loop procedure.
1. Make a test anti runaway fence using at least 10 ft. to 20 ft. of fencing wire (or use the ground wire).
2. Remove the existing boundary wire from your wall transmitter.
3. Insert the two ends of the test anti runaway fence wire into the wall transmitter.
4. Turn the field width adjustment knob to the 9 o’clock position or a low setting.
5. Place the test light on the receiver/collar. With the receiver/ collar, approach the test loop and
note the distance between you and the wire when the collar activates the test lamp.
6. Turn the field width adjustment knob to the 12 o’clock position or a medium setting.
7. Back away from the wire and approach it again. Determine the distance between you and the
wire when the collar activates. The distance should be greater on the medium range setting.
If more than one collar receiver is used, repeat the above test on each collar. If there is no red light
on the wire indicator light of the wall transmitter with the test loop wire in place, the wall transmitter
is malfunctioning. If the red light is solid on the wall transmitter, but the collar does not activate on
the test loop wire, the receiver/collar is not working. Recharge the battery in the receiver/collar and
repeat the test. If the collars are activating normally, there may be a wire break in the fence wire.
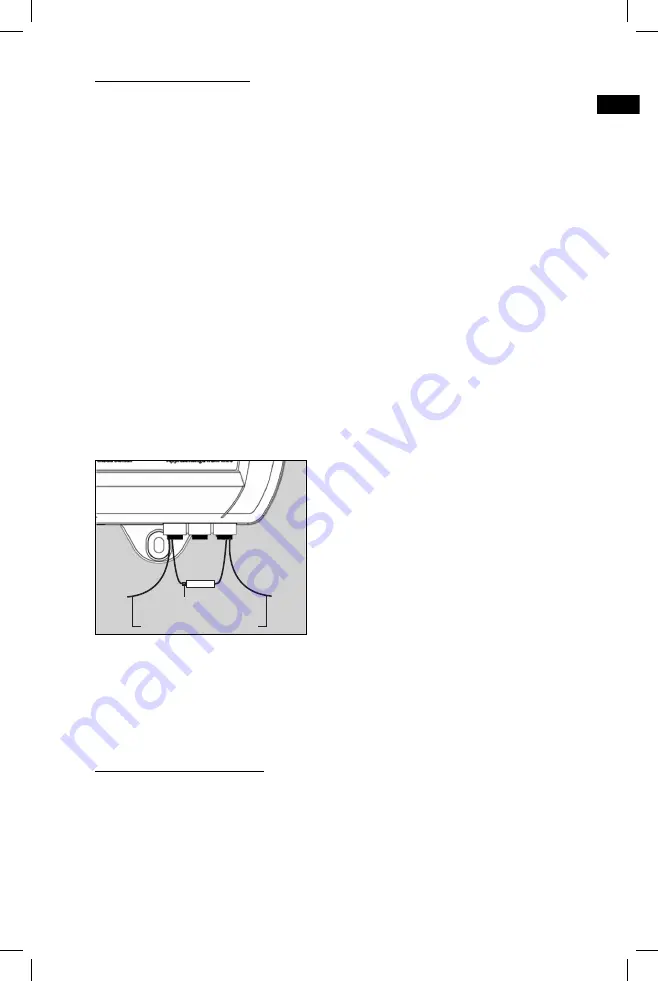
Finding a Wire Break Using an RF Choke
You will need a 100 μH RF Choke and an AM radio
tuned to AM530. Go to the wall mount transmitter
and disconnect the two boundary wire leads from the
RED connector tabs. In place of each boundary wire
lead, connect RF Choke one end of the RF Choke. Next,
take the two boundary wire leads anti runaway fence
boundary wire connector tab. Turn up the transmitter
signal strength to full (RED on the field width
adjustment knob). Take the radio (tuned to approx.
AM530 on the dial) with the volume turned up. Walk
slowly along the path of the boundary wire while
holding the radio directly over the boundary wire close
to the ground as possible. You should hear a whirling/static noise where the boundary wire is intact
and no whirling noise where the break is located.
Fixing the Break
Once you have found the break, cut out the damaged area and use a weatherproof gel style wire
splicer to reconnect the wires. If the break is large, or if you cannot identify the break location, you
may need to splice in some extra wire to bypass the area that is damaged.
GENERAL MAINTENANCE TIPS
Your system requires very little maintenance. The receiver/collar for the anti runaway fence system
is fully waterproof. To remove dirt, simply wipe with soap and water. The wall transmitter is not
waterproof and must be protected from the elements in a shed, garage or carport. Do not attempt
to dismantle or repair the wall mount transmitter or receiver/collar: this will void the manufacturer’s
warranty. These components contain computerized circuitry that should be serviced only by an
authorized expert.
Caution
Any changes or modifications of this device which are not specifically approved by the party
responsible for compliance could void the user’s authority to operate the equipment.
e-fence boundary wire
RF choke


