background image


Page viii


User Guide

[This page left intentionally blank.]

Summary of Contents for AutoPulse 100

Page 1: ...P N 12555 001 Rev 9 Resuscitation System Model 100 User Guide...

Page 2: ...his publication may be reproduced stored in a retrieval system or transmitted in any form or by any means mechanical electronic photocopying recording or otherwise without prior written permission of...

Page 3: ...4 2 3 Menu Mode Switch Button 1 6 1 4 2 4 Move Up Move Down Button 1 6 1 4 2 5 Select Choice Button 1 7 1 4 2 6 Tone Mute Button 1 7 1 4 2 7 Increase Decrease Contrast Button 1 8 1 4 2 8 Power Green L...

Page 4: ...3 4 4 Maintenance 4 3 4 5 Disposal and Recycling 4 5 4 5 1 Platform 4 5 4 5 2 Battery Charger 4 5 4 5 3 Batteries 4 5 4 5 4 LifeBand 4 5 5 Troubleshooting Procedures 5 1 5 1 Troubleshooting Batteries...

Page 5: ...ure 2 14 Compression Mode Menu 2 12 Figure 2 15 Mute Duration Menu 2 13 Figure 2 16 Ventilation Pause Tone Volume Menu 2 14 Figure 2 17 Continuous Mode Ventilation Tone Menu 2 15 Figure 3 1 On Off But...

Page 6: ...en 3 22 Figure 4 1 Battery Charger with Charging Bay 4 1 Figure 4 2 Battery Charger Control Panel 4 2 Figure 5 1 Low Battery Warning 5 1 Figure 5 2 Replace Battery Screen 5 2 Figure 5 3 A User Advisor...

Page 7: ...l Specifications B 2 Table B 4 Li Ion Battery Specifications B 2 Table B 5 Battery Charger Specifications B 4 Table B 6 Guidance and Manufacturer s Declaration Electromagnetic Emissions B 6 Table B 7...

Page 8: ...Page viii User Guide This page left intentionally blank...

Page 9: ...uscitation CPR General Warnings and Precautions 0 Warning The AutoPulse System is intended for use on adults 18 years of age or older The AutoPulse System is not intended for patients with traumatic i...

Page 10: ...ce should be reported to the manufacturer and the competent authority of the Member State in which the user and or patient is established Warning If a user advisory or fault cannot be cleared or a sys...

Page 11: ...ons for use Date of Manufacture Manufacturer Authorized Representative Serial Number Defibrillation Protected Type BF Patient Connection Degree of Protection Provided by Enclosure Per IEC 60529 Do Not...

Page 12: ...Page xii User Guide Do Not Incinerate Fuse DC Voltage Caution Charging Ready Fail Test Cycle Power Caution Catalog number Prescription use only Importer Medical device REF Rx ONLY MD...

Page 13: ...ntended to reduce the impact of rescuer fatigue and will enable the rescuer to address additional patient needs The AutoPulse System has the following operating parameters Chest displacement equal to...

Page 14: ...anism control system and electronics necessary to generate and control the force required to perform mechanical chest compressions User controls and indicators are contained in the User Control Panel...

Page 15: ...contact with the patient 1 3 3 AutoPulse Power System The AutoPulse Power System consists of a battery and battery charger Battery the AutoPulse Li Ion Battery a Lithium Ion battery Battery charger t...

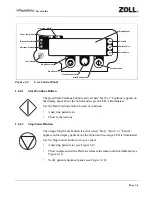
Page 16: ...e On Off button is located adjacent to the Battery on the Platform see Figure 1 3 Figure 1 3 On Off Button Location 1 4 1 1 On Off Button 1 4 2 User Controls All user controls and indicators except th...

Page 17: ...ge Stop Cancel button is active when Stop Quit or Cancel appears on the display panel above the button and its orange LED is illuminated Use the Stop Cancel button to stop or cancel Analyzing patient...

Page 18: ...his button may function as the Mode Switch button The Mode Switching feature is only active when the 30 2 or Continuous or 15 2 or Continuous option has been set in Mode section of the Administration...

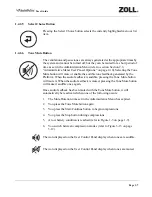
Page 19: ...ble pressing the Tone Mute button will mute it When the audio feedback is muted pressing the Tone Mute button will make it audible once again Once audio feedback has been muted with the Tone Mute butt...

Page 20: ...charge status icon only appears when the Platform is powered up Pressing the Increase Contrast button plus sign increases the contrast of the display panel screen Each key press increases the contras...

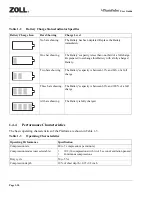
Page 21: ...by two beeps every 30 seconds until the battery is replaced or depleted It is recommended that if available a fully charged Battery be exchanged for the Battery with the low charge To exchange Batter...

Page 22: ...harge Be prepared to exchange this Battery with a fully charged Battery Two bars showing The Battery s capacity is between 33 and 66 of a full charge Three bars showing The Battery s capacity is betwe...

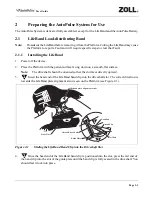
Page 23: ...n a smooth flat surface Note The driveshaft should be oriented so that the slot faces directly upward 3 Insert the head end of the LifeBand band clip into the driveshaft slot The correct direction is...

Page 24: ...nd Band Clip Properly into the Driveshaft Slot 6 Ensure that both free ends of the LifeBand are oriented flat not twisted and away from the AutoPulse Platform Inspect the LifeBand for any cuts or tear...

Page 25: ...nto Place 9 Flip down and snap into place the hinged belt guards of the LifeBand cover plate to engage the LifeBand chest bands to the rollers see Figure 2 4 Figure 2 4 Flip Down the Hinged Belt Guard...

Page 26: ...fore removing it from the Platform Cutting the LifeBand may cause the Platform to report a Fault and will require specific steps to clear that Fault 1 Place the Platform with the patient surface facin...

Page 27: ...ide 3 Using both hands pinch together the locking tabs of the LifeBand cover plate and firmly pull the plate straight up and away from the Platform see Figure 2 6 Figure 2 6 Pinching the Locking Tabs...

Page 28: ...after patient use Treat the LifeBand as contaminated medical waste and dispose of it accordingly There are no user serviceable parts Warning Removing the band clip when the driveshaft is not at its ho...

Page 29: ...d is installed a shaft lock mechanism secures the driveshaft in the Home Position do not attempt to defeat the shaft lock mechanism Figure 2 8 LifeBand NOT in the Home Position Do Not Remove Removing...

Page 30: ...on either side of the driveshaft and pull both bands outward Figure 2 10 LifeBand in the Home Position Ready for Removal 2 The chest bands should now be fully extended The seam securing the band clip...

Page 31: ...can slide into the Battery compartment see Figure 2 11 Then slide the Li Ion Battery into the Battery compartment in the Platform The Li Ion Battery should snap into place and mount flush with the Pl...

Page 32: ...Ion Battery to be pulled straight out until it fully clears the Battery compartment Caution Only use ZOLL Batteries specifically designed for use with the Platform The use of other batteries may caus...

Page 33: ...e the Administrative Menu is active use the Move Up and Down arrow buttons to highlight the desired menu item and the Select Choice Button to select it Figure 2 13 Administrative Menu scrolled down AD...

Page 34: ...between 30 2 and continuous compressions or 15 2 and continuous compressions respectively while the system is actively doing compressions Selecting 30 2 Only or 15 2 Only will restrict the system ope...

Page 35: ...wo minutes Highlight the desired setting using the Move Up and Down arrow buttons press the Select Choice Button to select it a check will appear beside the selected item and then press the gray Menu...

Page 36: ...rator that the system has been deliberately stopped paused while actively doing compressions Choices are High and Low Highlight the desired setting using the Move Up and Down arrow buttons press the S...

Page 37: ...ate the patient Selecting 3 Beeps will allow for three ventilation tones to sound as a countdown to cue the rescuer to ventilate the patient after the third ventilation tone Highlight the desired sett...

Page 38: ...Page 2 16 User Guide This page left intentionally blank...

Page 39: ...racing is suggested for roles and positions of the staff involved in performing defibrillation and using the AutoPulse System Your local ZOLL representative can provide you with appropriate detailed...

Page 40: ...Self Test Display Panel Screen 3 The Platform indicates that it is ready for use see Figure 3 3 Figure 3 3 Patient Readiness Display Panel Screen 30 2 I n i t i a l i z i n g 30 2 m e n u CONTINUE A l...

Page 41: ...he local protocol calls for anterior posterior placement Use of standard pads in both the a p or anterior anterior apex sternum placement is acceptable and will not affect the operation of the Platfor...

Page 42: ...thing by the sleeves and pull down toward the ankles to remove all of the clothing from both the front and back of the torso see Figure 3 5 The anterior pad s may be placed at this time Figure 3 5 Rem...

Page 43: ...platform as shown in Figure 3 6 Figure 3 6 Correct Patient Alignment Warning Do not place or position the patient on the Platform in either a facedown orientation or on the patient s side Also ensure...

Page 44: ...slot of band 2 over the alignment tab 1 see Figure 3 7 c Press the bands together to engage and secure the Velcro fastener see Figure 3 8 d Lift up the LifeBand to its fullest extension ensuring that...

Page 45: ...here are no obstructions such as clothing straps or equipment with the bands Warning Failure to properly position the LifeBand at the patient s armpit line may cause injury to the patient Failure to p...

Page 46: ...en up any slack in the bands see Figure 3 10 If the patient is not properly aligned press the Stop Cancel button realign the patient and begin compressions again with step 1 on page 3 7 Warning Do not...

Page 47: ...immediately initiate compressions ahead of that time Warning Do not lean on the patient after pressing the Start Continue button If you must move or realign the patient you must press the Stop Cancel...

Page 48: ...Mode setting within the Administrative Menu then the Platform will perform in the mode either 15 2 or Continuous that was used last until powered down on power up 15 2 will be the initial selection I...

Page 49: ...creen Note Positive pressure ventilation can be performed synchronously with any decompression and or during the ventilation pause Warning Check the patient s chest rise during ventilation during acti...

Page 50: ...firm that the mode change has been accepted 7 To access the patient or to pause the Platform for any reason press the Stop Cancel button The Platform releases the tension on the LifeBand allowing the...

Page 51: ...ntinue Compressions Display Panel Screen 8 To restart compressions press the CONTINUE button as described in the procedure starting at step 1 on page 3 7 see Figure 3 15 30 2 S t o p p i n g 30 2 Q U...

Page 52: ...Refer to Section 4 2 Cleaning the Platform for more information 4 Replace the LifeBand before returning the Platform to service Refer to Section 2 1 1 Installing the LifeBand for more information 5 R...

Page 53: ...ing the patient lift by supporting the patient and the Platform onto the transportation device for example a gurney backboard AutoPulse Quick Case or AutoPulse Soft Stretcher and place the Platform an...

Page 54: ...ended Method of Patient Extrication This extrication method includes the AutoPulse Shoulder Restraint Head Immobilizer and Soft Carry Stretcher Figure 3 16 Securing the Patient for Transport ON OFF He...

Page 55: ...g moving around tight corners and stairwells The Platform may also be secured to a backboard using standard straps or backboard cable ties Always ensure the following 1 Make sure that the patient s ar...

Page 56: ...r Administrative Menu is active use the Move Up and Down arrow buttons to highlight the desired menu item and the Select Choice Button to select it Information presented about the Last Patient session...

Page 57: ...from the platform Currently the platform will upload the patient information from at least the last three patient sessions and potentially many more depending on the length of the resuscitation effor...

Page 58: ...Alternatively you may enter directly into the Communication Mode by depressing the Menu Mode Switch button as you power up the platform Figure 3 19 Infrared Communication Set up 4 Aim the host compute...

Page 59: ...ction panel screen is displayed If a connection can not be established within ten minutes the Platform will automatically power down Figure 3 21 Connected Display Panel Screen 6 When a connection is e...

Page 60: ...complete the panel screen will return to the Connected display see Figure 3 21 If while transmitting data the Platform loses communication with the host computer it will automatically try to reestabl...

Page 61: ...ry Charger Note If a Li Ion Battery s internal temperature is below a nominal 41 F 5 C the Battery will fail to charge in the Battery Charger If a Battery is retrieved from cold storage or extensive e...

Page 62: ...ving a Battery during a Test Cycle will cause the Battery Charger to automatically enter a Test Cycle mode the next time the Battery is inserted into it 5 To remove a Battery from the Battery Charger...

Page 63: ...parts nor does the device require regular maintenance There are no components that require calibration Users should periodically inspect the AutoPulse system to ensure the device s functionality In ca...

Page 64: ...Battery Charge Status Icon on the Platform User Control Panel should also be visible with 4 bars if not replace the Battery with a fully charged Battery from the Battery Charger 5 If the Platform RED...

Page 65: ...g plans for electronic waste 4 5 2 Battery Charger Dispose of in accordance with local governing ordinances and recycling plans for electronic waste 4 5 3 Batteries Do not throw your batteries away or...

Page 66: ...Page 4 6 User Guide This page left intentionally blank...

Page 67: ...ll be accompanied with an audio warning of four rapid beeps which will be followed by two beeps every 30 seconds until the battery is replaced or depleted If operation continues without changing the B...

Page 68: ...llow these general steps to troubleshoot Advisories and Faults 1 Check for correct patient alignment refer to Section 3 1 Deploying the AutoPulse System for more information fully extend LifeBand and...

Page 69: ...latform information menu refer to section Section 3 7 Viewing Platform Information on page 3 18 Figure 5 3 A User Advisory Screen Figure 5 4 A Fault Screen 30 2 m e n u RESTART P u l l u p L i f e B a...

Page 70: ...978 421 9655 Warning Removing the band clip when the driveshaft is not at its home position see Figure 2 8 on page 2 7 will result in a permanent User Advisory 45 that the user will not be able to cl...

Page 71: ...s to return the Platform to normal operation The Platform has detected an unrecoverable problem and cannot be restarted Therefore you must 1 Begin manual CPR immediately 2 Contact ZOLL at 1 800 348 90...

Page 72: ...Page 5 6 User Guide This page left intentionally blank...

Page 73: ...WER LED will remain lit The Battery Charge Status Icon on the Platform User Control Panel should also be visible with 4 bars if not replace Battery with a fully charged Battery from the Battery Charge...

Page 74: ...Page A 2 User Guide This page left intentionally blank...

Page 75: ...The AutoPulse System is intended for use on adults 18 years of age or older Table B 1 Operating Parameters Category Specifications Chest displacement Equal to 20 reduction in anterior posterior chest...

Page 76: ...ts IEC 61000 4 2 6 KV Contact 8 KV Air Electromagnetic emissions Meets CISPR 11 EN55011 Group 1 Class A Patient contacting materials Meets ISO 10993 1 Biological evaluation of medical devices Shock Me...

Page 77: ...ks starting with a fully charged Battery Operating altitude 0 to 15 000 ft 0 to 4 572 m Enclosure protection Meets IP24 per IEC 60529 Shock Meets IEC 60068 2 27 Basic Environmental Testing Procedures...

Page 78: ...nsport temperature 40 to 158 F 40 to 70 C Relative humidity 5 to 95 non condensing Operating altitude 0 to 10 000 ft 0 to 3 048 m Enclosure protection Meets IP22 per IEC 60529 Shock Meets IEC 60068 2...

Page 79: ...rmance of this device To mitigate disruptive electromagnetic interference position this device away from radio frequency transmitters and other sources of electromagnetic energy Dips interruptions and...

Page 80: ...rnal function only Therefore its RF emissions are very low and are not likely to cause any interference in nearby equipment RF Emissions CISPR 11 Class A The Platform is suitable for use in all establ...

Page 81: ...tact 15 kV air Floors should be wood concrete or ceramic tile If floors are covered with synthetic material the relative humidity should be at least 30 Electricalfasttransient burst IEC 61000 4 4 Not...

Page 82: ...d 0 35 P 80 to 800 MHz d 0 7 P 800 MHz to 2 7 GHz Where P is the maximum output power rating of the transmitter in watts W according to the transmitter manufacturer and d is the recommended separatio...

Page 83: ...bands between 0 15 MHz and 80 MHz are 1 8 MHz to 2 0 MHz 3 5 MHz to 4 0 MHz 5 3 MHz to 5 4 MHz 7 MHz to 7 3 MHz 10 1 MHz to 10 15 MHz 14 MHz to 14 2 MHz 18 07 MHz to 18 17 MHz 21 0 MHz to 21 4 MHz 24...

Page 84: ...rs and cables other than those specified by the manufacturer may result in increased Emissions or decreased Immunity of the AutoPulse System The AutoPulse System should be observed to verify normal op...

Page 85: ...request repair or replacement under this warranty Purchaser should contact ZOLL Circulation Inc 2000 Ringwood Avenue San Jose CA 95131 1 408 541 2140 main 1 408 541 1030 fax ZOLL Circulation will inf...

Page 86: ...THE ACTUAL PAYMENTS RECEIVED BY ZOLL CIRCULATION IN CONNECTION THEREWITH ZOLL CIRCULATION SHALL NOT BE LIABLE FOR ANY INCIDENTAL SPECIAL OR CONSEQUENTIAL LOSS DAMAGE OR EXPENSE INCLUDING WITHOUT LIMIT...

Page 87: ...apacity B 3 charge time B 3 specifications B 2 test cycle time B 3 Battery charge icon 1 10 Battery charge status 1 8 button increase decrease contrast 1 8 C Chest bands See Lifeband Chest Compression...

Page 88: ...3 15 patient AutoPulse Platform positioning 3 5 performance characteristics 1 10 physical specifications B 4 physiological duty cycle 1 1 B 1 Platform environmental specifications B 2 Platform operati...

Reviews: