background image

8

© 2020.  Todos los derechos reservados.

Opción 2 - Utilice su dispositivo móvil o computadora para conectarse al controlador Basement Sentry directamente

En lugar de utilizar un dispositivo móvil y la aplicación Z 

Control®, también puede utilizar su dispositivo móvil o 

computadora para conectarse al controlador directamente.

Antes de comenzar: 

• 

 Sepa cuál es el nombre (es decir, el SSID) y la 

contraseña de su router WiFi. Para evitar uno de 

los problemas más comunes, vuelva a verificar la 

contraseña para saber cómo se escribe exactamente, 

incluido si tiene mayúsculas o minúsculas.

• 

 Verifique que su dispositivo móvil tenga WiFi en 

funcionamiento con una señal fuerte cuando esté junto 

al controlador Basement Sentry. Si la señal es dudosa, 

es posible que el controlador no pueda mantener una 

conexión estable.

• 

Verifique que su router WiFi esté conectado a Internet 

y que esté transmitiendo una red visible y segura de 

2.4 GHz.

• 

 Se requiere una red de 2.4 GHz. Si solo ve redes de 5 

GHz, puede que tenga que iniciar sesión en su router 

de banda dual para elegir transmitir las redes por 

separado.

•  Es probable que sea necesario apagar temporalmente 

el direccionamiento de banda durante la configuración.

• 

La red de 2.4 GHz debe utilizar seguridad WPA o 

WPA2. No se aceptan redes WEP ni abiertas.

•  Puede ser necesario apagar temporalmente cualquier 

VPN u otros controles de red durante la configuración.

• 

Cree una cuenta gratuita en zcontrolcloud.com. 

• 

Localice el ID de dispositivo del Basement Sentry 

situado en la parte superior del controlador.

NOTA

: La lista anterior también puede ayudar a solucionar 

problemas de conectividad.
Si el controlador aún no se conecta después de probar 

las sugerencias anteriores, siga los mismos pasos para 

conectar el controlador al punto de acceso de un teléfono 

móvil en lugar del router WiFi de la casa. Si el controlador 

se conecta con éxito a la nube a través del punto de 

acceso, entonces es probable que el problema esté 

relacionado con la configuración del router.

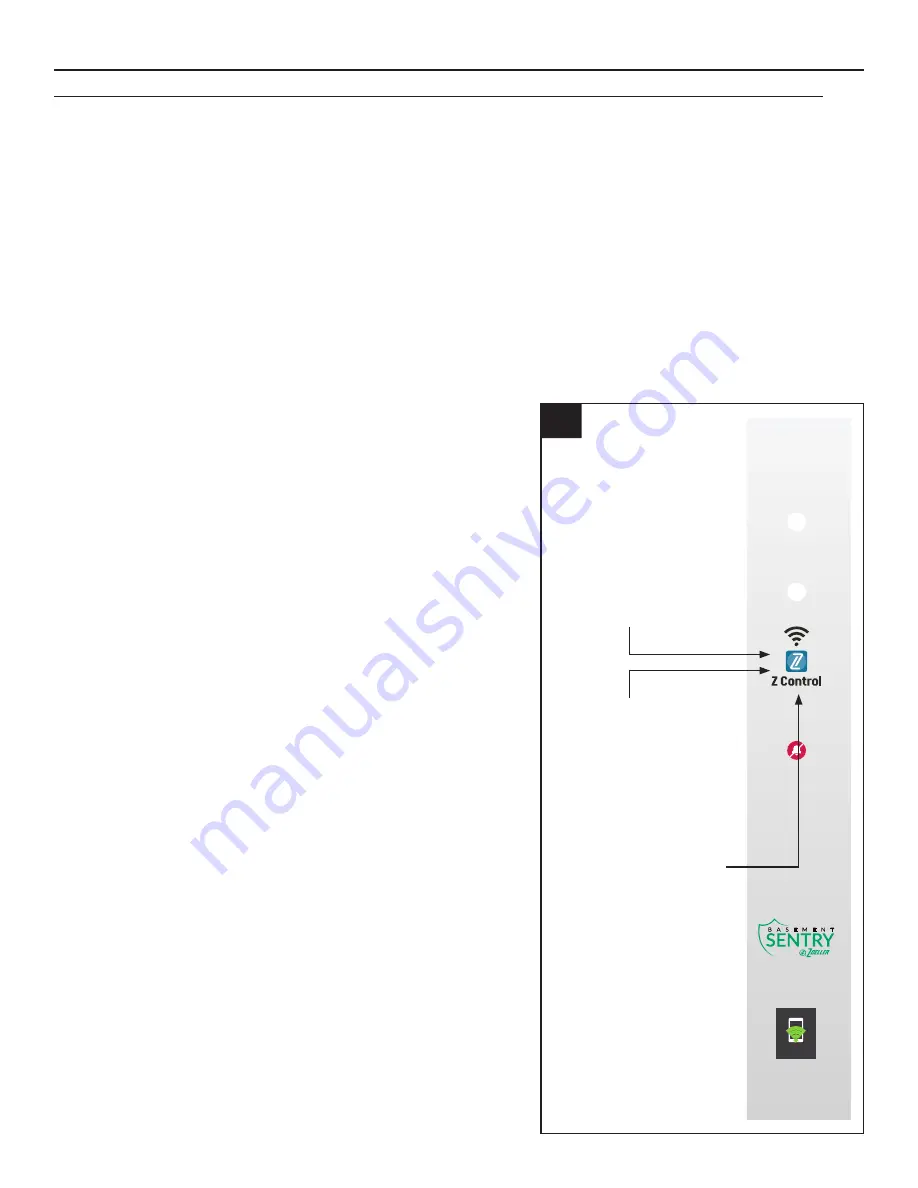
* El modo AP es cuando el controlador transmite su “nombre” o SSID. 

El SSID está en un formato similar a ZCTL_SSUMP_XXXX, donde 

“xxxx” son los primeros 4 dígitos del ID de su dispositivo controlador 

(ver figura 2). El SSID del controlador Basement Sentry aparecerá 

en la lista de opciones de WiFi disponibles en su teléfono/tableta/

computadora y al seleccionarlo le dará conectividad directa al 

controlador. Esto es necesario para que su controlador reciba las 

credenciales necesarias de la contraseña para conectarse al WiFi 

que elija.

1

21mm

252mm

Reset: 

Press for 3 seconds

SILENCE

ALARM

SW1590 A

POWER

B Y

INTELLIGENT

SUMP

CONNECTS TO 

MOBILE 

DEVICES

Aplique alimentación 

de CA al controlador. 

El LED de Z Control® 

parpadeará y luego se 

apagará, indicando que el 

controlador está en Modo 

AP* y está transmitiendo 

un SSID. 

Si el LED parpadea y 

no está en modo AP, 

presione el botón de 

Z Control durante 12 

segundos y suéltelo. 

El LED ahora estará 

apagado, lo que indica 

que el controlador está 

en modo AP. Se requiere 

el uso de una pluma o un 

palillo de dientes o algo 

similar para presionar el 

botón del Z Control®.

1.   Enchufe el controlador en una toma de CA. El LED de 

alimentación se iluminará.  El LED de alarma y el Z Control 

blanco parpadearán una vez, indicando que el controlador está 

transmitiendo

CONECTAR LA BOMBA STBS700 AL CONTROLADOR


(CONTINUACIÓN)

Summary of Contents for Basement Sentry STBS700

Page 1: ...tSentry com Zoeller is a registered trademark of Zoeller Co All Rights Reserved Purchase Date Questions problems missing parts Before returning to your retailer call our customer service department at 1 800 584 8089 7 30 a m 5 00 p m EST Monday Friday ATTACH YOUR RECEIPT HERE SW1589 A Español p 17 ...

Page 2: ...ollow these warnings could result in death or serious injury and or property damage RISK OF ELECTRIC SHOCK These pumps have not been investigated for use in swimming pool and marine areas RISK OF ELECTRIC SHOCK Always disconnect power source before attempting to install service or maintain the pump Never handle a pump with wet hands or when standing on wet or damp surface or in water Fatal electri...

Page 3: ...ROP65 WARNING FOR CALIFORNIA RESIDENTS Cancer and Reproductive Harm www P65Warnings ca gov CAUTION PERSONAL INJURY OR PRODUCT DAMAGE MAY RESULT This pump operates on 115 volts Make certain that the power source conforms to the requirements of your equipment PRODUCT DAMAGE MAY RESULT The continuous operating water temperature for this pump must not exceed 104 F 40 C PRODUCT DAMAGE MAY RESULT This p...

Page 4: ...an be close to the STBS700 pump during the installation process Locate and note the STBS700 pump Device ID on the silver sticker on the back of the pump Option 1 Use the Mobile App iOS and Android Before you begin Know what the WiFi router is named i e SSID and password To prevent the most common troubleshooting issues double check to be sure you know exactly how the password is spelled including ...

Page 5: ...our account If you do not have an account you will need to click the link at the bottom of the home screen to create an account 1 2 3 Once you re logged in to your account create locations by touching the from the Locations screen 3 2 Open your profile to set up any additional phone numbers or email addresses where notifications should be sent Touch to create locations Use the Mobile App iOS and A...

Page 6: ...he to start adding a device Allow access to the camera so you can scan the data matrix Touch to add a device 5 5 The app will ask you to scan the data matrix QR code on the controller You can also bypass this step and manually input the SSID of the controller which is found on the controller label Click to manually input SSID SSID input field CONNECTING THE STBS700 PUMP TO THE CONTROLLER CONTINUED...

Page 7: ... downloaded The Z Control LED will be solid and all other LEDs will turn off while the update is being installed After up to one minute the controller will restart and return to normal operation The controller alert history on the Z Control Cloud will also be updated with the firmware update information and any email accounts that are set up will be notified 7 7 You can now return to the Z Control...

Page 8: ... also helps to troubleshoot connectivity issues If the controller still will not connect after trying the above suggestions follow the same steps to connect the controller to a mobile phone hotspot instead of the home WiFi router If the controller successfully connects to the cloud through the hotspot then the conflict is probably related to router settings AP Mode is when the controller is broadc...

Page 9: ...n the controller network ignore this and connect to it anyway 2 3 On the setup screen press the WiFi Scan button scroll down to see the list of WiFi signals found and choose the WiFi you want the Basement Sentry controller to use for internet connectivity Enter the password for the router you chose in the field indicated If the password is correct the controller will connect to the router and star...

Page 10: ...ou can also edit how each device sends out notifications from the devices Alarm Settings tab You can now open the product s configuration by clicking the View button to modify the controller device and notification settings You can also install the Z Control mobile app on your mobile device Android and iOS versions available search Z Control in the app stores Firmware Updates The Basement Sentry c...

Page 11: ...nd returns STBS700 controller to standby mode Hold 4 seconds Initiates an LED and Alarm Test Will flash and double beep 3 times Hold while applying AC to STBS700 controller STBS700 controller will enter AP mode For STBS700 controller to revert to previous WIFI settings power cycle again Hold 12 seconds Complete reset of STBS700 controller to factory settings including erasing WIFI settings STBS700...

Page 12: ...down position If the pump runs for more than 25 seconds primary float is high and the small backup float is in the down position the primary float will be temporarily disabled If the primary float moves to the down position or three minutes have elapsed the primary float is re enabled If the backup float moves up the pump will turn on When the backup float moves down a 10 second timer will be enab...

Page 13: ...e to avoid any possible electrical shock hazards Before installing the pump in the sump pit be sure to unplug the pump from the outlet Disconnect the existing pump from the power source Disconnect or cut the main discharge pipe and separate the primary sump pump from the discharge pipe Remove the pump from the sump basin WARNING Never handle a pump with wet hands or when standing on wet or damp su...

Page 14: ... the same size as the discharge of pump 1 1 2 in or larger A check valve must be installed in the discharge pipe to keep water from draining back into the sump basin when it is not operating NOTE Make sure there is enough room in the basin for the float to move freely If the float is restricted the pump will not operate SUMP PUMP INSTALLATION CONTINUED 6 A Fasten second float to right angle mounti...

Page 15: ...revent it from interfering with the motion of the float 115 V GFCI outlet 7 Hose Clamp Discharge Pipe 6C 6 C Attach mounting bracket to the discharge pipe as shown using hose clamp included WARNING DO NOT install high water float in direct line of incoming water or close to the vent hole On level Discharge Pipe Right angle Mounting Bracket 6B 6 B Position second float float at desired on level on ...

Page 16: ...her than for what it was designed and manufactured RETURN OF WARRANTED COMPONENTS Any item to be repaired or replaced under this warranty must be returned to the manufacturer at Kendallville Indiana or such other place as the manufacturer may designate freight prepaid THE WARRANTY PROVIDED HEREIN IS IN LIEU OF ALL OTHER EXPRESS WARRANTIES AND MAY NOT BE EXTENDED OR MODIFIED BY ANYONE ANY IMPLIED W...

Page 17: ...BasementSentry com Zoeller es una marca registrada de Zoeller Co Todos derechos reservados SW1589S A Fecha de compra Preguntas problemas partes faltantes Antes de acudir al minorista llame a nuestro departamento de servicio al cliente al 1 800 584 8089 de lunes a viernes de 7 30 a m a 5 00 p m EST ADJUNTE SU RECIBO AQUÍ ...

Page 18: ...se de Normalización CSA satisfacen la norma C22 2 de la CSA 108 PELIGRO PELIGRO DE INCENDIO O EXPLOSIÓN Bombee solo agua limpia No bombee líquidos inflamables o explosivos como gasolina gasoil queroseno etc No la utilice en una atmósfera inflamable o explosiva No seguir estas instrucciones puede provocar la muerte lesiones graves o daños a la propiedad RIESGO DE DESCARGA ELÉCTRICA No se ha verific...

Page 19: ...trico de objetos afilados superficies calientes aceite y otras sustancias químicas Evite torcer el cable ADVERTENCIA DE PROPOSICIÓN 65 PARA RESIDENTES DE CALIFORNIA Advertencia Cáncer y Daño Reproductivo www P65Warnings ca gov PRECAUCIÓN PODRÍAN PRODUCIRSE LESIONES PERSONALES O DAÑOS AL PRODUCTO El adaptador de CA opera a 115 V Asegúrese de que la fuente de alimentación cumpla con los requisitos d...

Page 20: ...e usted pueda estar cerca del controlador Basement Sentry durante el proceso de instalación Localice y anote la identificación del dispositivo de la bomba STBS700 en la calcomanía plateada que se encuentra en la parte trasera de la bomba Opción 1 Utilizar la aplicación móvil iOS y Android Antes de comenzar Sepa cuál es el nombre es decir el SSID y la contraseña de su router WiFi Para evitar uno de...

Page 21: ...nta Si no tiene una cuenta deberá hacer clic en el enlace en la parte inferior de la pantalla de inicio para crear una 1 2 3 Una vez que haya iniciado sesión en su cuenta cree ubicaciones tocando el signo desde la pantalla Ubicaciones 3 2 Abra su perfil para configurar números de teléfono o direcciones de correo electrónico adicionales donde se deberían enviar las notificaciones Toque para crear u...

Page 22: ...signo para comenzar a agregar un dispositivo Permita acceso a la cámara así puede escanear la matriz de datos Toque para agregar un dispositivo 5 5 La aplicación le pedirá que escanee el código QR de la matriz de datos en el controlador Puede omitir este paso e ingresar manualmente el SSID del controlador que se encuentra en la etiqueta del controlador Click to manually input SSID Campo de entrada...

Page 23: ...ol se quedará fijo y todos los otros LED se apagarán durante la instalación de la actualización Después de un minuto como máximo el controlador se reiniciará y volverá a funcionar normalmente El historial de alertas del controlador en la nube de Z Control también se actualizará con la información de actualización del firmware y se enviarán notificaciones a las cuentas de correo electrónico que se ...

Page 24: ...puede ayudar a solucionar problemas de conectividad Si el controlador aún no se conecta después de probar las sugerencias anteriores siga los mismos pasos para conectar el controlador al punto de acceso de un teléfono móvil en lugar del router WiFi de la casa Si el controlador se conecta con éxito a la nube a través del punto de acceso entonces es probable que el problema esté relacionado con la c...

Page 25: ...rnet o de seguridad en la red del controlador ignórelo y conéctese igual 2 3 En la pantalla de configuración presione el botón WiFi Scan Escanear WiFi deslícese hacia abajo para ver la lista de señales de WiFi encontradas y elija el WiFi que quiere usar para que el controlador Basement Sentry tenga conexión a Internet Ingrese la contraseña del router que eligió en el campo indicado Si la contraseñ...

Page 26: ...a forma en que cada dispositivo envía notificaciones desde la pestaña Alarm Settings Configuraciones de alarma del dispositivo Ahora puede abrir la configuración del producto al hacer clic en el botón View Ver para modificar las configuraciones del dispositivo del controlador y de las notificaciones También puede instalar la aplicación móvil Z Control en su dispositivo móvil versiones disponibles ...

Page 27: ...rma activa y regresa el controlador STBS700 al modo de espera Mantener presionado por 4 segundos Inicia una prueba de LED y alarma Parpadeará y hará pitidos dobles 3 veces Mantener presionado al conectar el controlador STBS700 a la alimentación CA El controlador STBS700 entrará al modo AP Para que el controlador STBS700 regrese a los ajustes de WiFi anteriores apague y vuelva a encender Mantener p...

Page 28: ... segundos el flotador principal está alto y el flotador secundario pequeño está abajo el flotador principal se deshabilitará temporalmente El flotador principal se vuelve a habilitar si el flotador principal se mueve hacia abajo o si han transcurrido tres minutos La bomba se encenderá si el flotador de reserva se mueve hacia arriba Se habilitará un temporizador de 10 segundos cuando el flotador de...

Page 29: ...s riesgos de descarga eléctrica Antes de instalar la bomba en el pozo del sumidero asegúrese de desconectar la bomba de la toma de corriente Desconecte la bomba existente de la fuente de energía Desconecte o corte la tubería de descarga principal y separe la bomba de sumidero principal de la tubería de descarga Retire la bomba del contenedor para agua de sumidero ADVERTENCIA No manipule la bomba c...

Page 30: ...la descarga de la bomba 1 1 2 o mayor Se debe instalar una válvula de retención en la tubería de descarga para evitar que el agua se devuelva hacia el recipiente del sumidero cuando no esté en funcionamiento NOTA Asegúrese de que haya el espacio suficiente en el recipiente para que el flotador se mueva libremente Si el flotador no se puede mover con libertad la bomba no funcionará INSTALACIÓN DE B...

Page 31: ...erfiera con el movimiento del flotador Tomacorriente GFCI de 115 V 7 Abrazadera de manguera Tubería de descarga 6C 6 C Fije un soporte de montaje en el tubo de descarga como se muestra utilizando una abrazadera de manguera incluida ADVERTENCIA NO instale el flotador de nivel de agua alto en línea directa del agua entrante o cerca del orificio de ventilación Nivel de encendido Tubería de descarga S...

Page 32: ...DE COMPONENTES EN GARANTÍA Cualquier elemento a ser reparado o reemplazado bajo esta garantía debe ser devuelto al fabricante en Kendallville Indiana o a cualquier otro lugar que el fabricante pueda designar con flete prepagado LA GARANTÍA AQUÍ CONTENIDA ESTÁ EN LUGAR DE TODAS LAS OTRAS GARANTÍAS EXPRESAS Y NO PUEDE SER AMPLIADA O MODIFICADA POR NADIE CUALQUIER GARANTÍA IMPLÍCITA DEBERÁ LIMITARSE ...

Reviews: