background image

4

© Copyright 2018 Zoeller

®

 Co. All rights reserved.

General Information

GRINDER PUMP DESCRIPTION

1.  Pumps are constructed of class 30 cast iron protected with powder 

coated epoxy for long life when pumping sewage in submersible 

applications.  The cutter assembly is comprised of stainless steel 

components hardened to a value of 55-60 on the Rockwell C scale; 

a star shaped cutter and a precision ground flat disk.  Cutting action 

takes place with the rotation of the star cutter at 3450 RPM against 

the stationary cutter plate (see page 11).

2.  The cutter mechanism on the model 7011 is bidirectional, enabling 

it to cut in either direction. A control panel with the reversing feature 

will alternate the pump’s rotational direction with each duty cycle. The 

cutter mechanism on the model 7012 & 7013 is single directional.

3.  Pump motors are available in single and three phase design.  Single 

phase motors require a Zoeller approved starting relay, starting 

capacitor and a run capacitor, which are mounted in a control panel 

(ref. page 8).

4.  The 7011, 7012 and 7013 Grinder Pumps are dual seal and have seal 

leak probes. Single phase units have an internal thermal overload. 

Three phase pumps have a thermal sensor.

5.  Three phase pumps require overload protection in the control 

panel.

6.  A Grinder Pump is an intermittent duty pump designed for pumping 

sanitary sewage. It is not a dewatering or trash pump.

FIELD ASSEMBLED INSTALLATION

1.  Installation and piping instructions are included with the control panel, 

rail system and basin instructions.  If pump is being retrofitted to an 

existing rail system, accessory parts may be required.  Consult the 

factory and advise make and model of rail system being used.

2.  Refer to the appropriate Indoor/Outdoor prepackaged instructions 

on pages 6-9 for more information on system installation.

3.  All electrical connections including pump to control box and power 

supply to control panels must comply with the “National Electrical 

Code” and applicable local codes.  Conduit and panel enclosure 

openings must have a gas and watertight seal.  Installation of 

electrical panels, conduit and connections should be made by a 

qualified licensed electrician.  A UL Listed potting kit, P/N 10-2350, 

is available from Zoeller Company.

4.  A properly sized disconnect switch, supplied by others, shall be 

installed on the service side of the pump and control panel.

5.  When installing a pump with a check valve, or a rail system with 

a check valve, you must give the pump case time to fill to help 

prevent air lock when lowering the unit into the liquid.  The pump 

case has an air vent located behind the discharge.  This air vent is 

across the pump housing mounting surface and must be cleaned 

before each reinstall.  An extra air vent hole (3/16") may be drilled 

in discharge pipe below the check valve to help prevent air lock. 

This drilled hole must be cleaned before each reinstall. After the 

pump is installed, run the unit submerged to assure the pump case 

is filled (Water should come out of 3/16" diameter hole).

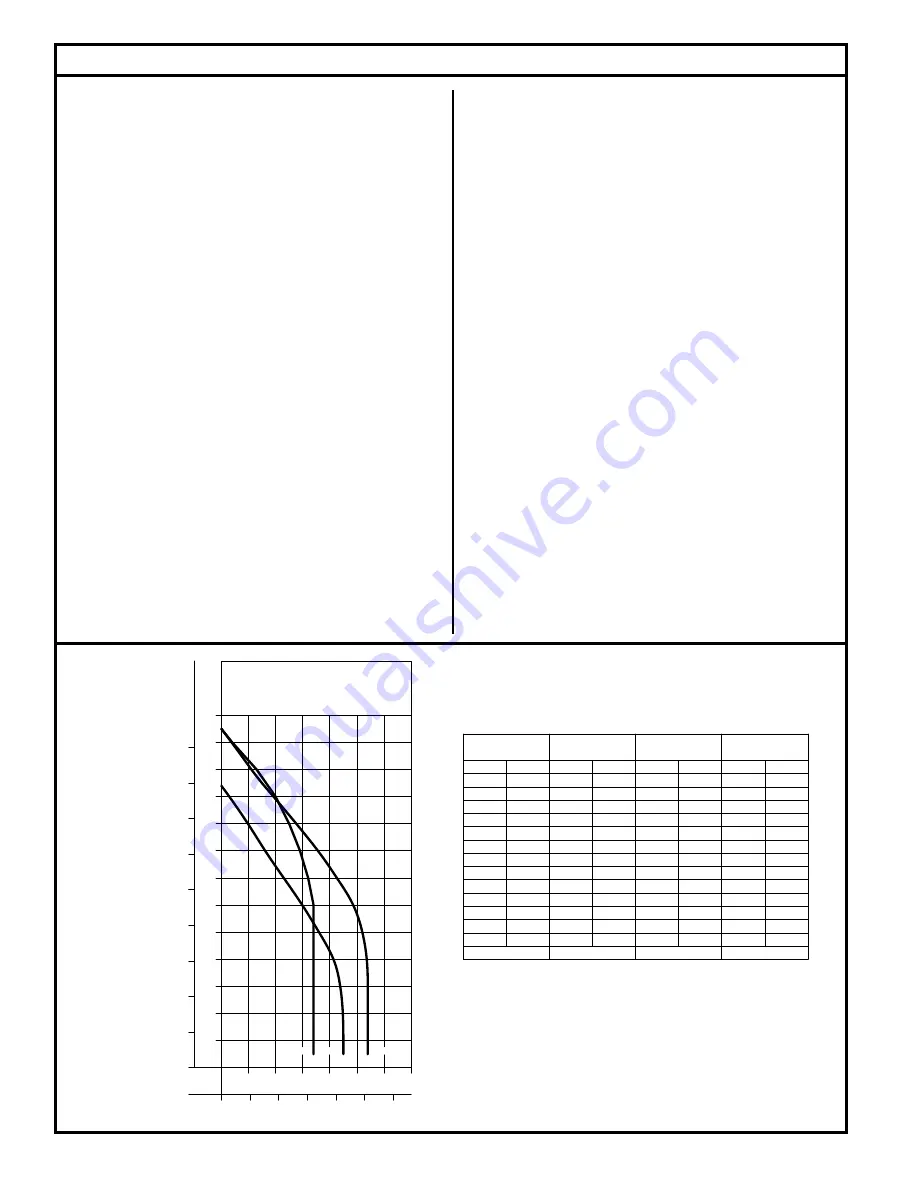
FIGURE 1.

016532

HEAD CAPACITY CURVE 

MODEL 7011/7012/7013

0

40

80

120

160

200

240

70

60

50

40

30

20

10

0

10

4

8

12

16

20

130

70

60

50

40

30

20

FLOW PER MINUTE

GALLONS
LITERS

TO

TAL D

YNAMIC HEAD

80

90

28

24

METERS

FEET

100

110

120

32

36

7011

7013

7012

TOTAL DYNAMIC HEAD/FLOW

PER MINUTE

SEWAGE

MODEL

Feet

Shut-off Head:

7011

Meters

Gal.

Liters

5

10
20
30

9.1

6.1

3.0

1.5

44

45

167

170

104 ft (31.7 m)

60

50

40

90

80

70

110

100

120

12.2
15.2
18.3

21.3
24.4
27.4
30.5
33.5
36.6

42
36
30

114

136

159

23
16
10

38

61

87

3

--
--

--

--

11

125 ft (38.1 m)

7013

Gal.

Liters

45

170

45

170

125 ft (38.1 m)

95

25

13

4

20

76
49
15

34

32
29

34

34

34
34

129

121

110

129

129

129
129

7012

Gal.

34
34

129
129

Liters

52
49

185

197

43
36
28

106

136

163

19

11

4

15

42

72

54

204

54

204

54

204

54

204

54

204

Summary of Contents for BA7011

Page 1: ...LL cause serious personal injury death or major property damage Warns of hazards that CAN cause serious personal injury death or major property damage Warns of hazards that CAN cause personal injury or property damage INDICATESSPECIALINSTRUCTIONSWHICHARE VERY IMPORTANT AND MUST BE FOLLOWED THOROUGHLY REVIEW ALL INSTRUCTIONS AND WARNINGS PRIOR TO PERFORMING ANY WORK ON THIS PUMP MAINTAIN ALL SAFETY...

Page 2: ... warranty does not apply to and there shall be no warranty for any material or product that has been disassembled without prior approval ofManufacturer subjectedtomisuse misapplication neglect alteration accidentoractofGod thathasnotbeeninstalled operatedormaintained inaccordancewithManufacturer sinstallationinstructions thathasbeen exposed to outside substances including but not limited to the fo...

Page 3: ... that float control switches will not hang up on the grinder pump or other pit peculiarities and are secured so that the grinder pump will shut off It is recommended to use rigid pipe and fittings and the pit be 24 in diameter for simplex systems and 36 in diameter for duplex systems or larger 4 Grinderinstallationsshouldbecheckedyearlyfordebrisand orbuild up which may interfere with the ON or OFF...

Page 4: ...em installation 3 All electrical connections including pump to control box and power supply to control panels must comply with the National Electrical Code and applicable local codes Conduit and panel enclosure openings must have a gas and watertight seal Installation of electrical panels conduit and connections should be made by a qualified licensed electrician AULListed potting kit P N 10 2350 i...

Page 5: ...ectrical shock Do not remove the power supply cord and strain relief or connect conduit directly to pump Installation and checking of electrical circuits and hardware should be performed by a qualified licensed electrician FIGURE 2 LEAD IDENTIFICATION WIRING DIAGRAM SINGLE PHASE 2 BHP MODEL 7011 SK1367 009048 THREE PHASE MODELS 7011 7012 7013 FIGURE 4 FIGURE 3 L1 START RELAY START CAPACITOR GREEN ...

Page 6: ...d All installations must comply with all applicable electrical and plumbing codes including but not limited to the National Electrical Code local regional and or state plumbing codes etc Indoor Prepackaged System FIGURE 5 SK1695 36 48 60 24 NOMINAL ...

Page 7: ...ly 5 Dig a hole for the basin The basin should be located in a very low trafficareawithin15 ofthepowerdisconnect Theholeshouldbeat least8 largerindiameterthanthebasininordertoleave4 ofbackfill all the way around the perimeter A minimum of 4 of compacted subbase is also required Backfill and subbase should be 1 8 to 3 4 pea gravel or 1 8 to 1 2 crushed stone Also reference the basin installation in...

Page 8: ...GLASS AFD 1 25 2 Z RAIL 2 CAST IRON CHECK VALVE 3 4 GUIDE RAILS 2 SCH 80 BALL VALVE 2 FLEX BOOT FITTING LOCATION VARIES WITH BASIN DEPTH FLOAT TREE ASSEMBLY 2HP GRINDER PUMP 2 PVC SCH 80 PLBG 1 8 302 STAINLESS STEEL LIFTING CABLE ALARM ON OFF SOLID FIBERGLASS COVER HIGH WATER ALARM OR SIMPLEX CONTROL PANEL FIELD INSTALLED ALARM FLOAT SWITCH MUST OPERATE OFF LOW VOLTAGE TO BE USED WITH QWIK BOX SK3...

Page 9: ...in the basin s side wall in a 5 hole drilled with a hole saw at a location lining up with the inlet pipe 6 The bottom of the excavation can now be properly backfilled compactedandleveled Setbasininhole Ensuretheremovable cover extends above the finished grade line and the grade slopes awayfromtheunit Backfillandsubbaseshouldbe1 8 3 4 pea gravel or 1 8 1 2 crushed stone Reference basin installation...

Page 10: ...talled Floats positioned properly Discharge valves open 3 16 vent hole drilled in pipe between check valve and pump Once the above has been verified proceed with the following checks Pump power cables and control floats properly installed and voltage verified Conduit connections to panel and junction box are properly sealed After installing the pump into the containment area with adequate submerge...

Page 11: ...the spacer shims located behind the star cutter 5 Remove the three cap screws holding the disc and remove disc from the pump 6 The disc and star cutter can be replaced with new service partsorresurfacedbygrinding Resurfacingisaccomplished by surface grinding both disc and star cutter to a 32 micro finish Do not attempt grinding in the field Send parts to a qualified machine shop or return to the f...

Page 12: ...ring insulated protective sole shoes and not standing in water Under flooded conditions contact your local electric company or a qualified licensed electrician for disconnecting electrical service to the pump prior to removal Grinder pumps contain oil which becomes pressurized and hot under operating conditions Allow 2 1 2 hours after shut down before servicing pump Condition Common Causes A Pump ...

Reviews: