


H03818-00.A3 EN – 2012-03
7
• Remove the cleaner from the
pool
after the cleaning cycle is completed
and store on the caddy.
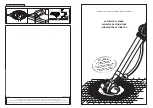
• Never lift the cleaner out of the pool
by the floating cable. Always use the
handle to remove it from the pool.
3. Maintenance
3.1 Cleaning the filter bag
•
To avoid electric shock and other hazards which could result in permanent injury or death, disconnect
(unplug) the cleaner from the control unit before performing any cleaning and maintenance.
•
The fi
lter canister should be cleaned at the end of each
cycle.
•
Ensure that the control unit cable has been
disconnected from the electrical ou
tlet or that the fl
oating cable has
been disconnected from the
control unit.
•
Remove the cleaner from the water and let the
remaining water drain by maintaining the cleaner
in the vertical
position.
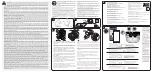
•
Set the unit on its wheels.
•
Push the cover lock (1) and lift the cover (2) until
it is se
cured in the vertical position
(Figure 1).
•
Remove the fi
l
ter assembly from the body (3)
(Figure 2).
•
Push the quick release button on the canister
a
ssembly (4) and pull open the filter assembly (5)
(Figure 3).
•
Separate the filter canister from the filter support
(6)
(Figure 4).
•
Wash the filter canister, the filter support, and the
cleaner under water or using a
hose (7)
(Figure 5).
Approximately 15 minutes after the cycle is completed, the light located on the control unit will flash
slowly to indicate that the cleaner may be removed from the pool. The 15 minute period allows the
motor to cool and will prevent damage to the cleaner.
• Remove the cleaner from pool when super chlorinating.
• Do not handle cleaner while it is in operation.
• Use your cleaner as often as needed to keep your pool clean.
• Clean the filter canister after each cleaning cycle.
• Do not leave your cleaner in the pool on a permanent basis.
• At the end of each cycle, remove the cleaner from the pool. Start at the cleaner head and untangle
any coils in the hose before storing the cleaner.