background image


H03818-00.A3 EN – 2012-03


Contents 


1. Information before use ............................................................................................ 3


2. Use .......................................................................................................................... 5


3. Maintenance ............................................................................................................ 7


4. Replacing the Brushes .............................................................................................. 8


5. Replacing the Tyres on the Cleaner .......................................................................... 9


6. Troubleshooting ....................................................................................................... 9


7. Zodiac Australia - Express Warranty and Guarantees ............................................. 10


8. Conformity ............................................................................................................. 11


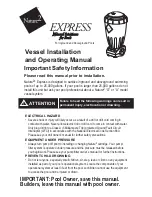
Failure to comply with the following warnings could cause damage to pool equipment or personal injury. 


•  This  product  is  intended  for  use  with  permanently

-

installed  pools.  Do  not  use  with  storable  pools.  A


permanently

-

installed pool is constructed in or on the ground or in a building such that it cannot be readily


disassembled for storage. A storable pool is constructed so that it is capable of being readily disassembled 

for 

storage and reassembled to its original integrity.


• The cleaner must be installed and operated as specified.


• Turn the cleaner


off before removing it from water, and do not operate out of water.


• Do not remove the cleaner


from the pool for 15 minutes after the cleaning cycle has completed.


• Clean filter canister in the cleaner

 after each use. 

• Do not use the product in your pool if the water temperature is above 35° C or below 13°


C.


USE OF THE CLEANER IN A VINYL LINER POOL 

Certain vinyl liner patterns are particularly susceptible to rapid surface wear of pattern removal caused by 
objects


coming  into  contact  with  the  vinyl  surface,  including  pool  brushes,  pool  toys,  floats,  fountains, 

chlorine  dispensers,


and  automatic  pool  cleaners.  Some  vinyl  liner  patterns  can  be  seriously  scratched  or 

abraded simply by rubbing


the surface with a pool brush. Ink from the pattern can also rub off during the 

installation process or when it


comes into contact with objects in the pool. Zodiac Group Australia Pty Ltd., is 

not responsible for, and the Limited


Warranty does not cover, pattern removal, abrasion or markings on vinyl


liners.


Warnings 

EN 

Summary of Contents for V3

Page 1: ...EN...

Page 2: ...er to the installation instructions relating to the swimming pool equipment for which the cleaner will be an integral part The cleaner is to be supplied through a Residual Current Device RCD with a ra...

Page 3: ...before removing it from water and do not operate out of water Do not remove the cleaner from the pool for 15 minutes after the cleaning cycle has completed Clean filter canister in the cleaner after e...

Page 4: ...n the cart as shown 1 Make sure the upper tubes handles are in the proper orientation and align the screw holes Position the bottom power cable hook as shown 2 Place the cable hook plate opposite the...

Page 5: ...s to the caddy using four screws V3 figure 9 V3 4WD figure 10 The transport caddy is now ready to use 1 4 Connecting the control unit to the caddy Position the control unit over the control unit hook...

Page 6: ...re starting a cleaning cycle Do not leave the cleaner in the water permanently Stow your cleaner on its caddy as soon as possible after use in order to avoid distorting the flexible edge at the openin...

Page 7: ...When the cleaner is powered ON it will remain in standby until the Cycle I button is pressed 1 When the Cycle I program button is selected the indicator light above will illuminate The cleaner will s...

Page 8: ...t the cover 2 until it is secured in the vertical position Figure 1 Remove the filter assembly from the body 3 Figure 2 Push the quick release button on the canister assembly 4 and pull open the filte...

Page 9: ...es as soon as one of the wear indicators has been reached even if the blade wear is not even It recommended to replace the brushes every two 2 years Lift the cleaner to a vertical position so that the...

Page 10: ...s appear just after start pressing the Power or Cycle button to start the cleaner 20 seconds Floating cable is not properly plugged into the control unit Unplug the floating cable from the control uni...

Page 11: ...trike Symptom Cause Solution The cleaner does not stay firmly on the pool bottom There is air in the appliance casing Submerge the cleaner following the procedure in Section 2 2 Submerging the Cleaner...

Page 12: ...and obtain a warranty ID number for the warranty claim Contact details are Zodiac Group Australia Pty Ltd Customer Service 219 Woodpark Road Telephone 1800 688 552 Smithfield NSW 2164 Email address a...

Page 13: ...Notes...

Page 14: ...Notes...

Page 15: ...Notes...

Page 16: ......

Reviews: