background image

4/8/16Channel DVR Quick Manual 


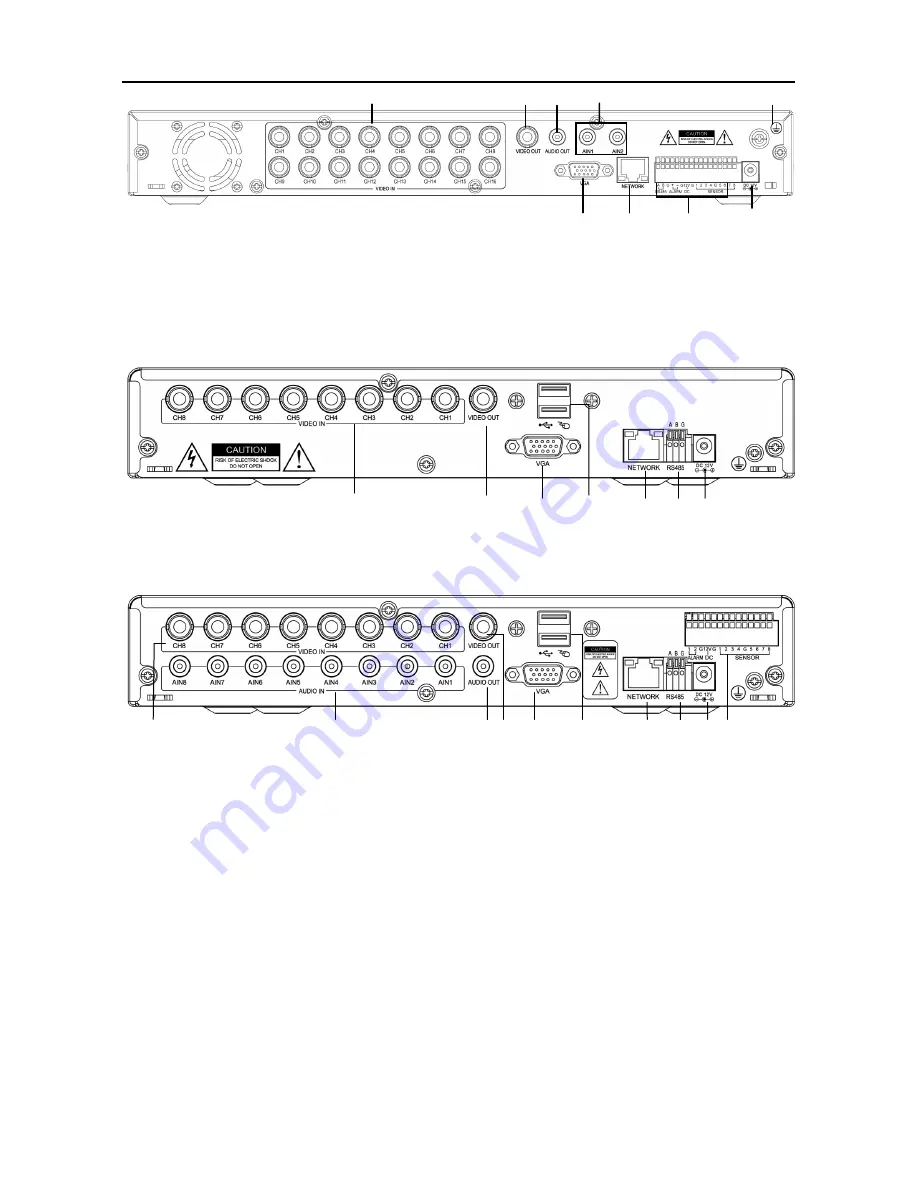
1.  Video  in    2.  Video  out  (BNC  port)    3.  Audio  out    4.  Audio  in    5.  VGA  output  port   
6.Network  port    7.RS485    8.Public  terminal    9.  Alarm  output    10.  Alarm  input    11. 
Power input    12.Grounding terminal 

Note: The above picture is the back panel of 16CH DVR. 

Back panel 3


1.Video  in    2.Video  out    3.VGA  output  port    4.USB  interface    5.Network  interface   
6.RS485    7.Power in 

Back panel 4


1.Video in    2.Audio in    3.Audio out    4.Video out    5.VGA output port    6.USB interface   
7.Network port    8.RS485    9.Power in    10.Alarm output; Public terminal; Alarm input 

1.3 Quick Installation 

1.3.1 HDD installation 

HDD must be installed by technicians to avoid damage to the equipment and hard disk. The 

DVR mainframe must be powered off before operation. The DVR supports HDD with SATA 

HDD interface. 

Installation procedures are as follows:   

A. Open the equipment and a HDD bracket can be seen;   

B. Connect the HDD data and power cable well; 

C. Put the HDD into the bracket and target the screw holes at the bracket;   

D. Fix the HDD on the bracket with screws, and cover the DVR. 

5  6  7 

8  9  10 

(7、

8、

9、

10)


12 

11 

Summary of Contents for SFN6

Page 1: ...4 8 16Channel DVR Quick Manual 0 ...

Page 2: ...g operation The DVR should be installed to ensure proper connection with other devices Please buy HDD from official channel to meet DVR s long time and large data reading and writing requirements Statement This manual only introduces basic operation and please refers to the E manual in the CD for detailed operation Please refer to the real product and this manual is just for reference Products upd...

Page 3: ...k 8 2 4 1 Search and playback 8 2 4 2 Recording backup 8 2 5 Alarm Setup 8 2 5 1 Alarm basic setup 9 2 5 2 E mail alarm setup 9 2 6 PTZ Control 10 2 7 Motion Detection 11 2 8 Network setup 12 2 9 Port mapping 13 2 10 Mobile phone surveillance 14 2 10 1 Mobile phone surveillance 14 2 10 2 Mobile Phone end login 14 2 11 Client end and playing software 15 2 11 1 Client end installation running 15 2 1...

Page 4: ...of User Manual One SATA HDD cable already installed in the case One DC12V3A power adapter One HDD bracket already installed and a set of mounting screws One HDD power supply cable installed in the case One piece of CD Specific product accessories may be different so please refer to the real products 1 2 Product appearance and port Front panel 1 1 Power switch 2 Start recording 3 Stop recording 4 V...

Page 5: ... Forward 5 Manual start stop recording 6 up down left right and Confirm 7 ESC Exit Return 8 Remote control infrared receiver 9 Mute 10 Video search 11 PTZ control 12 DISPLAY Display mode 13 MENU Main menu 14 Status indicator Front panel 4 Back panel 1 1 Video in 2 Audio in 3 Video out 4 Audio out 5 VGA video output port 6 Network port 7 RS485 8 Power supply 9 Alarm output 10 Auxiliary DC12V output...

Page 6: ...t 6 USB interface 7 Network port 8 RS485 9 Power in 10 Alarm output Public terminal Alarm input 1 3 Quick Installation 1 3 1 HDD installation HDD must be installed by technicians to avoid damage to the equipment and hard disk The DVR mainframe must be powered off before operation The DVR supports HDD with SATA HDD interface Installation procedures are as follows A Open the equipment and a HDD brac...

Page 7: ...ware interface basic operation any password the user can password and administrator password The administrator has all the operating privileges while ordinary users can only carry out monitor and video search playback operations The mainframe will match automatically when you enter ifferent permissions will be given according to different passwords menu after the password is set the system will di...

Page 8: ...88 among which D1 is of the highest resolution Quality best fine and normal quality corresponding to 3 data stream standards of highest high and medium bit rates Frame rate Adjust video frame rate Record Set the record switch Package Time There are four options 15 minutes 30 minutes 45 minutes and 60 minutes REC mode Startup recording and Timing recording When powered on starting recording when th...

Page 9: ...t and playback the file you want to 2 4 2 Recording backup Enter the Detailed file list interface picture below for backup operations The backup of recording files can be achieved through USB storage device Before backup the user must insert storage peripheral devices to USB2 0 slot first Move the cursor up and down in the interface of detailed file list and select Backup The file is undergoing ba...

Page 10: ...ll display on the corresponding screen HDD LOSS On When the system cannot recognize the HDD a red logo H will display on the channel HDD SPACE On When the remaining space of the HDD is less than 500M the DVR will have alarm indication VIDEO LOSS On When the video of a certain channel is lost this channel will display in the lower part of the Video Preview screen Video Loss ALARM MANAGEMENT OUTPUT ...

Page 11: ...alarm Please pay attention to the space of your mailbox timely lest the normal operation of the mailbox be affected due to an excess number of pictures 2 6 PTZ Control Enter from Main Menu Advanced to the PTZ setup interface as shown below CHANNEL selecting the channel to which the dome camera is connected to select any of the latter 4 channels click Next Page PROTOCOL selecting the dome protocol ...

Page 12: ...ates motion detection is activated for this area and a transparent block indicates motion detection is not activated as shown below Motion detection setup procedures A Turn On the corresponding channel in the Channel Switch option B Set the sensitivity level as necessary usually set at 3 or 4 C Set the motion area of the corresponding channel in the Area Setup option D In the Recording Mode screen...

Page 13: ...PC UPNP function on the router end the DVR will map the port and IP into the router automatically Click DDNS Setup to enter the screen picture Channel DVR Quick Manual 12 display mode to select full screen or blank ick the mouse and drag the motion box to set the area of dynamic For detailed operation procedures please refer to the manual in the CD Enter the Network screen from Main Menu Advanced ...

Page 14: ... server PASSWORD Enter the password registered on the dynamic domain name server Please refer to the detailed manual in the CD for the application of domain name 2 9 Port mapping If the router and DVR both switch on UPNP functions this step can be saved Mapping steps 1 Set the host IP address refer to Network Setup 2 Login the router taking Cisco router for example If the IP address of the router ...

Page 15: ...me and password of the monitoring video by using the mobile phone to log in the DVR Service port The setting range is 1024 65535 This port needs to be mapped on the router and the setting method is the same as the mapping method of network setting User name admin by default Password empty by default 2 10 2 Mobile Phone end login Taking the iPhone for example run the iPhone s APP Store program and ...

Page 16: ...e rate is 25fps n different LAN choose image video transmission format is CIF and the frame rate is 6fps Chinese and English are optional open the attached player and play local backup video file login the interface is the same as IE end Please refer to the manual in the CD for detailed operation Channel DVR Quick Manual 15 Note Please refer to the Mobile Phone Surveillance Manual for detailed ins...

Page 17: ...reen Corresponding playing operation and setting can be carried out Please refer to the manual in the CD for detailed operation Firstly add the IP address of DVR to the system s trusted sites and operate it according to the following steps on the XP system Open Channel DVR Quick Manual H 264 format video compression is adopted and PlaybackSetup exe in After installing successfully as prompted run ...

Page 18: ...installation of the plug in units according to the indication 2 12 2 IE login After finishing the plug in units installation and then login For example the DVR s domain name is dvrtest01 3322 org and the port is 88 enter the domain name http dvrtest01 3322 org 88 in the IE address bar as shown below 1 Security 2 Sites 4 Add 3 Cancel 5 Enable 6 Ok ...

Page 19: ... English are optional Login Click to login into DVR internet Reset Re enter the above information After login the following real time preview screen will display Users can preview at the IE end and perform the functions of video playback video setup alarming setup etc Please refer to the manual in the CD for detailed operation 2 13 Central Management Software CMS This system supports connection to...

Page 20: ...tion menu user cfg The default installation menu is C Program Files DVRCMS Please enter into the main interface of management software after successful login In the management software there are adding device live preview video playback system setup advanced setting PTZ control and so on Please refer to the detailed instruction of CMS in the CD for specific operation Add DVR Del DVR DVR list Syste...

Page 21: ...4 8 16Channel DVR Quick Manual 20 Appendix System Connection Picture ...

Page 22: ...4 8 16Channel DVR Quick Manual 21 ...

Reviews: