background image

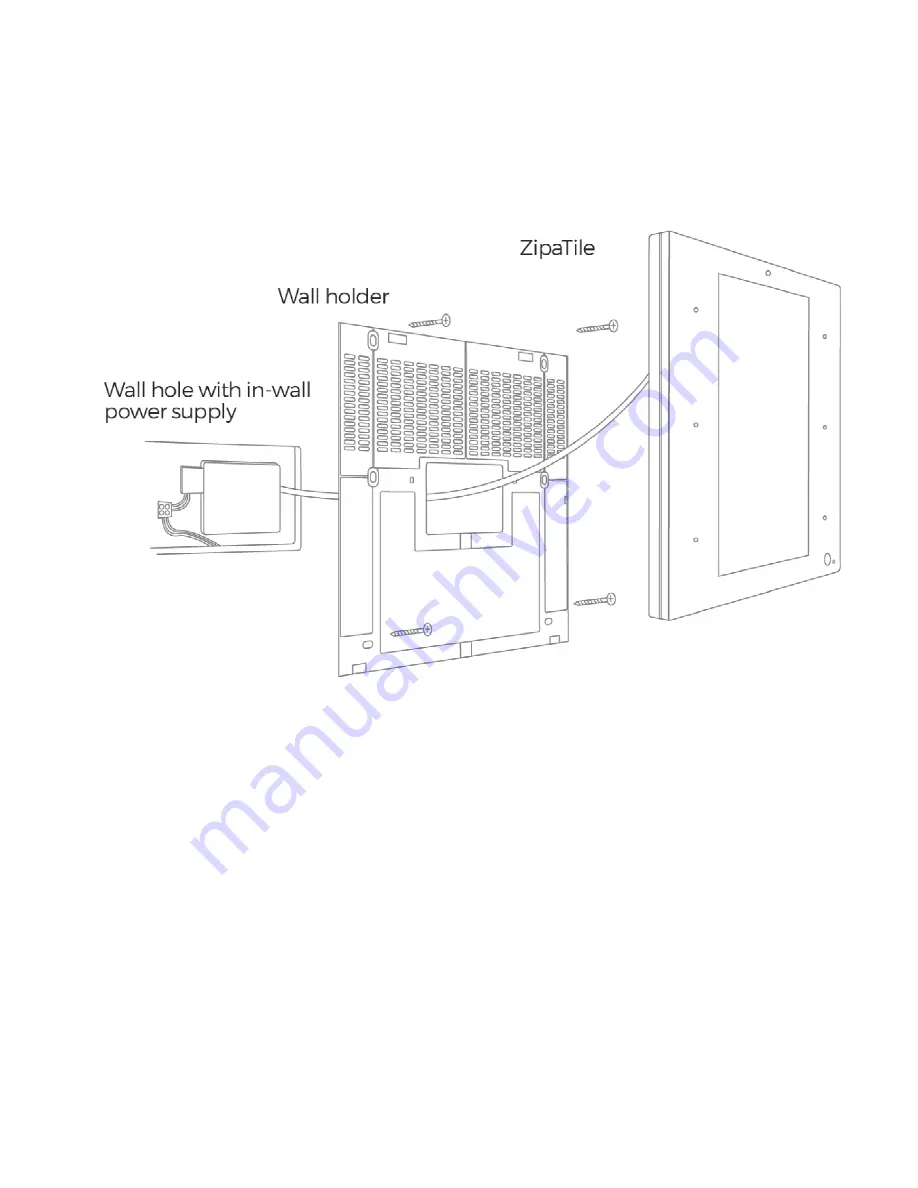
Wall mount with built in power supply

This is a default way of using ZipaTile. It requires usage of in-wall power supply and a wall hole with the
110-220V power wire at the place where you want to mount the ZipaTile.

Press firmly wire socket to charger pins, clamps inside the wire socket need to be widened with pins by
hand pressure for tight fit.

Figure 7. Installing the wall holder

Before performing any electrical work turn OFF the power to the AC wires leading into in-wall box at the
main power source. Before starting installation make sure the power is really off by using a non-contact
voltage detector.

Installations should be performed in accordance with all national and local electrical codes. If you are
unsure or have questions about the installation, please seek an advice of a qualified electrician. Do not
apply power to the ZipaTile before completing installation. Please make sure that a proper power cut-off
device is part of your power supply circuit (electrical fuse).

Summary of Contents for ZIPATILE

Page 1: ...Zipatile User s Manual Version 1 0...

Page 2: ...t not limited to implied warranties of merchantability or fitness for a particular purpose The published information in the manual is subject to change without notice TPG reserves the right to make ch...

Page 3: ...sor and a siren integrated inside Furthermore it is constantly supervised by 24 7 free monitoring station which will alert you in case of any incident Also it has a built in IP camera which will send...

Page 4: ...ules within Zipato Rule Creator based on SIP server events Intercom function is not availabe yet Once it is ready we will upgrade the sofware remotely and enable it automatically Info panel Featuring...

Page 5: ...ch may be needed Screwdrivers Flathead and Philips Pliers Wire stripper Non contact voltage detector Wire cutter Electrical tape Drill and drill bits appropriate for the wall type Overview Figure 1 Zi...

Page 6: ...Figure 2 ZipaTile rear view Figure 3 ZipaTile top view Figure 4 Wiring diagram EU RU IN...

Page 7: ...n this case please keep the wall holder affixed to ZipaTile and use the built in table top stand at the back of the wall holder Just plug AC DC adapter into free electrical socket and other side into...

Page 8: ...erforming any electrical work turn OFF the power to the AC wires leading into in wall box at the main power source Before starting installation make sure the power is really off by using a non contact...

Page 9: ...of the wall holder to place the power wires behind the ZipaTile and use the bundled plug in power supply to connect to the wall socket Figure 8 Powering the ZipaTile with plug in power supply Screen...

Page 10: ...screen and it will finish when you see the ZipaTile lock screen Figure 9 Lock screen To unlock the device just swipe up from bottom of your screen You can add more users within ZipaTile Settings and...

Page 11: ...twork password 7 Touch the Show Password checkbox so that you can see what you re typing some of those network 8 passwords can be long 9 Press the Connect button The network is connected immediately I...

Page 12: ...lerts as well as to get the local weather information on your ZipaTile Once registered and logged in to the Zipato application ZipaTile will be automatically configured and you will be able to see the...

Page 13: ...ity partition You can change the status by pressing it or by pressing the button aside of Security widget 2 Thermostat widget Showing the status of the Zipato thermostat You can change the status by p...

Page 14: ...s the system In this case no ZONE will activate the alarm In order to control Intruder alarm you have to enter PIN code Default PIN code is 0000 You can change your PIN code if you go to Intruder alar...

Page 15: ...e sent if ZipaTile is connected to the Internet Settings Safety alarm settings you can find within Zipato admin portal at my zipato com Go to Security Safety alarm In order to setup your system proper...

Page 16: ...ew IP camera to ZipaTile go to my zipato com add new device ip cameras Live view Download and install Zipato application from Google Play store for Android based devices or Apple store for iOS based d...

Page 17: ...Door Phone setup In order to connect supported SIP based door phone to Zipato Intercom you have to first add door phone as the client go to your controller settings intercom add new doorphone once af...

Page 18: ...sensor statuses after registration Sometimes it takes time for Zipatile to synchronize all information with the cloud during the initialization Within 30 minutes at most you should have all statuses...

Page 19: ...AFB DOMOTICS S L C Garcilaso 213 2 1 08027 Barcelona Spain a 34 934 081 741 www afbdomotics com BY...

Reviews: