background image

Add urea

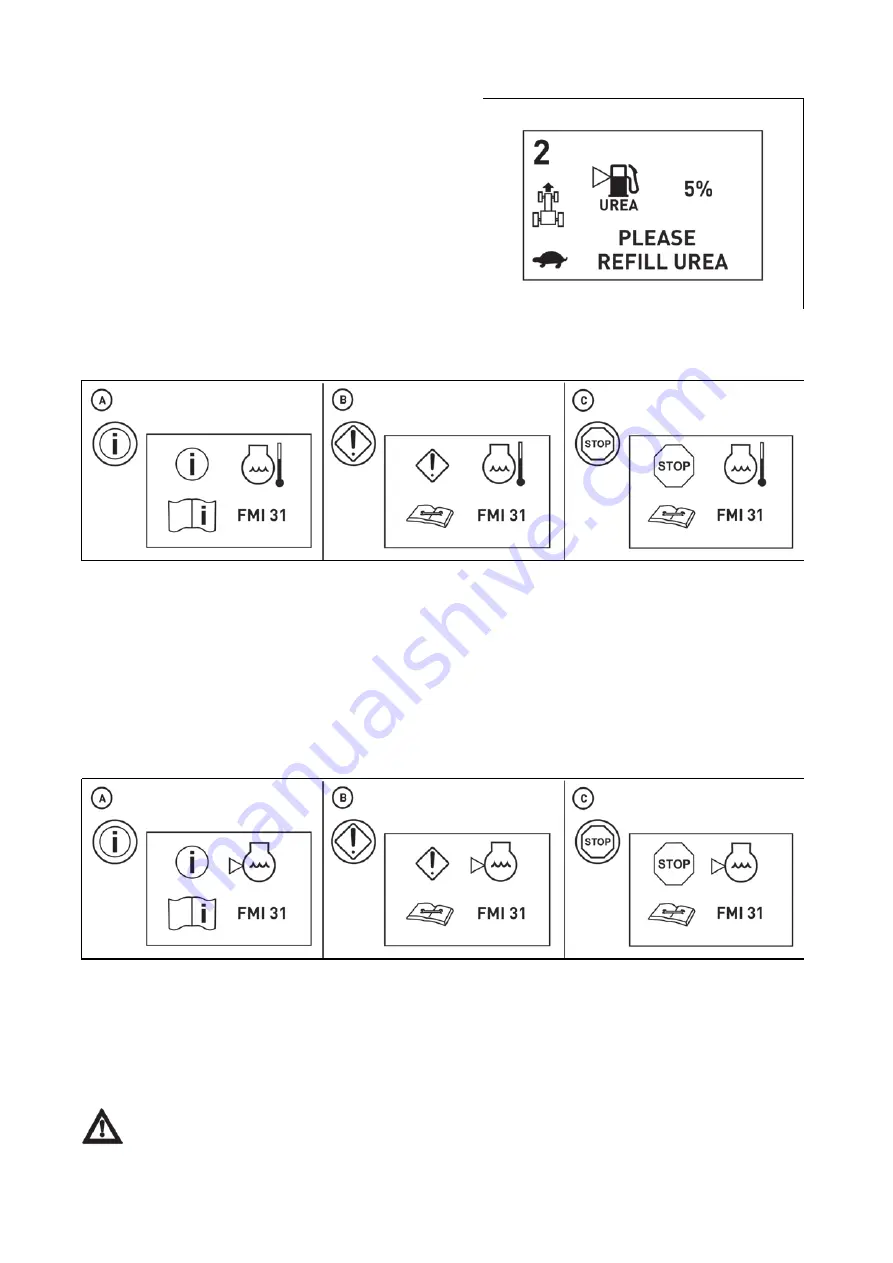
High temperature of the cooling liquid

C15N112

High temperature of the cooling liguid is indicated in several stages of warning

A - informative - reduce the engine power
B - warning - stop the tractor, set the engine to idling until the temperature of the cooling liquid is reduced

C - caution - stop the engine, wait until the temperature of the cooling liquid is reduced and check the level of 

the cooling liquid; if the cooling liquid starts to be overheated again when the engine is started, stop the 

engine and contact the service centre

Low level of the cooling liquid

C15N113

Low level of the cooling liguid is indicated in several stages of warning

A - informative

B - warning - the cooling liquid must be replenished

C - caution - stop the engine, wait until the temperature of the cooling liquid is reduced and replenish the 

cooling liquid

Do not release the overpressure plug unless the cooling liquid is cold! Danger of scald burns!

When the level of the urea tank content drops, the prompt 
for the addition of urea and the amount of urea in the tank 

in percentage of the tank volume are shortly displayed on 

the display.

C15N151

DASHBOARD 

61

Summary of Contents for CRYSTAL Series

Page 1: ...150 160 Tractor is Zetor Since 1946 OPERATOR S MANUAL CRYSTAL 1 2015...

Page 2: ...a lot of new information and get a perfect overview of how to use the tractor with maximum efficiency during various kinds of work If you observe the rules of tractor operation and maintenance and dr...

Page 3: ...2...

Page 4: ...Cab filtration 23 Hitches 23 After work with front implements and in case of cooler clogging 23 Tyres and wheels 24 Short functional test 24 Acquaintance with the tractor 25 Safety cabin 25 Opening t...

Page 5: ...nel buttons 44 Display description 45 Change of the look of display 45 Display change of display 45 Display resetting data 49 Display manual brake 50 Display indicator of service inspection intervals...

Page 6: ...72 The way of controlling the travel clutch by 72 The differences in ways of controlling the travel clutch by 72 Interrupted sound signal 73 Dead start of the tractor 73 Dead start of tractor in regu...

Page 7: ...g connection of joint shaft of an aggregated machine to the tractor 97 Selection switch of rear PTO clutch revolutions P T O 97 Replaceable end points of rear PTO shaft 98 Rear PTO switch 98 Engaging...

Page 8: ...riving with agricultural machines attached to the front three point hitch 121 Wheel track change 123 Front wheels track of front drive axle in tractors equipped with non removable discs 123 Toe in of...

Page 9: ...nce instructions 152 Recovery of the mainair cleaner element 152 Replacing the safety element of the air cleaner 152 Reassembly of the air cleaner elements 152 Bleeding the hydraulic circuit of the hy...

Page 10: ...Permitted maximum weight of set tractor mounted machine kg 168 Manoeuvrability condition 168 Front tires steerability 169 Change of the load bearing capacity of the front tyres 169 Bearing capacity of...

Page 11: ...10...

Page 12: ...ber 4 Tractor serial number When ordering spare parts and within all written and oral communication always specify the data of your tractor that should be written in the frames below Tractor type Trac...

Page 13: ...The right left front and back indications refer to the driving direction of the tractor C15N002 LOCATION OF SERIAL NUMBERS 12...

Page 14: ...possibly sections describing handling of dangerous waste This symbol refers to optional tractor accessories installed by the manufacturer on the customer s request Accessories that are not installed b...

Page 15: ...the brake pedals must be connected with a latch z Driving downhill without an engaged gear is forbidden z Pay special attention when driving on a slope and muddy sandy icy or uneven ground z Observe t...

Page 16: ...rol z Brake the tractor with parking brake before leaving tractor with running engine z Before leaving the tractor do not forget to secure the tractor by manual brake Engaging a gear does not secure t...

Page 17: ...the end of their service life you must observe relevant provisions of valid acts and implementation directives of these acts of the country where the tractor is used The last seller of the tractor is...

Page 18: ...ith high concentrations of salt etc it is always necessary to clean the tractor thoroughly from chemically aggressive substances and neutralize them after the termination of the work according to the...

Page 19: ...and II A category includes all tractors with set level of vibrations owing to similar specifications of construction Results of measurement on testing bench are listed in the following table pursuant...

Page 20: ...urer of front end loader shall apply z The use of front end loader for transporting material at places accessible to the public is forbidden z The use of front end loader for transporting material in...

Page 21: ...external cables etc z Loader tractor set needs to be parked on a horizontal and solid base the arms of the lifting device must be set in the lower position You will find more information in user s man...

Page 22: ...oil dip stick check the oil quantity in the engine and then check the connection of the engine lubrication system for leaks Maintain the oil level between the dipstick marks C15N005 Check the connecti...

Page 23: ...minimum level C15N007 Check the air system of the brakes for leaks and the efficiency of the tractor brakes with a trailer see the Maintenance instructions chapter the Checking the air systems for le...

Page 24: ...removing the covering grills in the roof overhang At the customer s request we supply filters with active carbon Don t clean the filter don t flush it with compressed air C15N011 Check the condition o...

Page 25: ...s of the front and rear wheels Never drive with loose wheel bolts C15N013 When the engine is started check whether the signal lamp of the hydrostatic control failure and of the charging signal lamp we...

Page 26: ...etting on and getting off the tractor Pay increased attention in the area of gear shifting lever and manual throttle lever Safety cabin is equipped with toned glass C15N046 Door can be opened from the...

Page 27: ...You can open the door by lifting the latch towards yourself upwards and pushing it into the groove Then the window will be secured in the fixed position F25 It is opened by turning the locking lever o...

Page 28: ...bin behind the driver s seat F31 Another shelf is placed on the right mudguard FH12N025 Before the drive or starting the work adjust rear view mirrors so that they enable to monitor the whole drive wa...

Page 29: ...ses by pulling in downward direction it decreases Driver s seat with mechanical suspension Control according to points 1 2 3 4 and 5 Point 2 lever is placed on the right Driver s seat with pneumatic s...

Page 30: ...ontroller to adjust the height of the armrest tighten the controller to lock the armrest position 7 The seat vibration absorption setting move the controller up to get the float seat position move the...

Page 31: ...information in chapter DRIVING 5 Switch of differential closures more information in chapter DRIVING 6 Switch of the control of the front driving axle more information in chapter DRIVING 7 Switch of t...

Page 32: ...roof lights on b roof lights off The switch controls the illumination in the grill or in the roof of the cabin of the tractor Use the lights in the roof of the cabin only when tools covering headligh...

Page 33: ...0 a Acoustic horn press the switch in the direction of an axis b Lower beam head lights c Direction lights to the right d Direction lights to the left e Acoustic horn f Lower beam headlights X139 Swit...

Page 34: ...steering wheel both in terms of angle and height Height setting of steering wheel The setting is done by protrusion or retracting the steering wheel after unlocking arrestment by turning a lever 1 in...

Page 35: ...1 button for disengaging clutch on the head of gear shifting 2 buttons of shifting individual gears of multiplier FH12N037 Reversing speeds can be shifted only by means of reversing lever The scheme...

Page 36: ...er s seat H Road speeds N Neutral L Reduced speeds F72 The lever 1 is placed on the right side of driver s seat For more information see the chapter on Drive of agricultural machines 1 manual brake le...

Page 37: ...ontrol A Disconnect the battery immediately by battery disconnector which is placed on the right side of the tractor with long term standstill repairs or accident a battery connected b battery disconn...

Page 38: ...es off F_02_17a a Surrounding outside air is sucked in through filters to cabin sucking the air from cabin is closed b Air is sucked in from the space of the cabin and again blown off to the cabin inn...

Page 39: ...body F_02_18 With engaged inner recirculation of air is the inflow of fresh air closed and there is foul air in the space of the cabin by operator This state can cause the feeling of fatigue and ther...

Page 40: ...the angle of approx 45 towards the windshield Direct the side outlets 2 under the angle of approx 45 to the cab corners After defrosting of the front windshield direct the side outlets to the side gla...

Page 41: ...roduction is given on the filter If you happen to smell pesticides in the cabin replace the filter immediately and have the sealing of the cabin checked Used filters must be damaged in specialized col...

Page 42: ...e rear wiper is located on the right column of the cabin The single speed engine of the rear wiper is controlled by the single position switch of the rear wiper C15N050 Windshield washer tank is place...

Page 43: ...ide or export pump I of the dosing module all you have to do is to empty and thoroughly clean urea tanks Maintain cleanliness A plastic tank of 300 litres volume is mounted as a standard for all types...

Page 44: ...lights up with charging failure When the engine is at standstill it must be lit 9 Lubrication signal lamp red With engine running lights up with the oil pressure drop below the critical limit 10 Air...

Page 45: ...are achieved 3 Indicator of engine revolutions at which nominal revolutions of the rear PTO at standard revolutions of the rear PTO shaft are achieved E display Instrument panel buttons A Rolling up i...

Page 46: ...reversing 5 road and reduced speeds shifting lever position reduced speeds neutral or road speeds 6 main field of display 7 secondary field of display 8 engagement of front axle drive switch 9 engage...

Page 47: ...ted 2 Rear PTO shaft revolutions when the shaft is switched on 3 Tractor travel speed C15N032 In the main field 1 the total moto hours worked by the tractor are displayed In the secondary field 2 the...

Page 48: ...the fuel consumed from the engine start is displayed The entry is automatically cleared after two hours from the engine start In the secondary field 2 the immediate consumption of the fuel is display...

Page 49: ...minute is displayed In the secondary field 2 the engine load in percentage is displayed C15N040 In the main field 1 the time is displayed In the secondary field 2 the outdoor temperature is displayed...

Page 50: ...e consumption for a certain period you must reset zero the value at the beginning of the measurement The value is updated every 10 s Manual zeroing reset of data Except automatic zeroing of data these...

Page 51: ...ours of the tractor 1 remaining to the maintenance date is displayed on the display Exceeding the service interval If the tractor is not braked by a manual brake a warning is displayed on a display le...

Page 52: ...ted by switching the corresponding signal lamp acoustic signal and error message in the instrument panel display If the error is indicated the signal lamp still glows even though the display is switch...

Page 53: ...display of the defect is minimized into the main field All the tractor s functions remain active it can happen that some of the functions is not undepreciated The state is indicated by the signal lamp...

Page 54: ...enu Entry to service menu You will enter the service menu by a longer pressing of A button The selection of items to be done by B and C buttons The selected item is marked by an arrow 1 Exit from serv...

Page 55: ...ode use buttons A and B to scroll between individuals defects 1 sequence number 2 defect code 3 code of defect specification 4 number of defect repetitions Return to the main screen by pressing button...

Page 56: ...menu Select the item aggregation width marked with an arrow a by B and C buttons and by pressing the button A shift to the menu aggregation width There are three preset values of aggregation width in...

Page 57: ...Select the item machined area marked with an arrow by B and C buttons By pressing the A button you will enter the machined area menu b Select an item 1 by B and C buttons and in the aggregation width...

Page 58: ...s B and C to select the item calibration indicated with arrow b By pressing button A you enter the calibration menu 1 calibration of travelling clutches 2 calibration of travel speed 3 setting of stee...

Page 59: ...C buttons and move to the speed menu by pressing A button select an item 4 by B and C buttons and by pressing the A button move to the following menu The item 3 serves only for setting the travelling...

Page 60: ...yres to the required pressure Start the engine Park the tractor at the start of the track By pressing button A enter the service menu Use buttons B and C to select the item CALIBRATION indicated with...

Page 61: ...y changes are displayed directly in the position 5 Use buttons B and C to select the item minutes 2 by successive pressing of button A ENTER we change the value of minutes in the display changes are d...

Page 62: ...the engine is started stop the engine and contact the service centre Low level of the cooling liquid C15N113 Low level of the cooling liguid is indicated in several stages of warning A informative B...

Page 63: ...ngine is started stop the engine and contact the service centre High air temperature in the engine air intake system C15N115 High air temperature in the engine air intake system is indicated in severa...

Page 64: ...nd perform defecation of the fuel coarse filter see chapter Maintenance Guidelines High oil temperature in the gearbox C15N118 High temperature of the gear oil is indicated in several stages of warnin...

Page 65: ...orm immediate replacement of the oil filter cartridge of the gearbox distributor see chapter Maintenance Guidelines Full pushing filter of the hydraulics C15N122 The full oil filter of the hydraulics...

Page 66: ...ment of exhaust gases SCR of motor vehicles with diesel engines The product is labelled as Urea or AUS 32 AUS Aqueous Urea Solution and complies with the standard ISO 22241 1 Reducing agents NOX AUS 3...

Page 67: ...of the system of additional treatment of exhaust gases must always be performed by a professional service All interventions in the system except authorised service are prohibited stage 1 Reduction of...

Page 68: ...s in neutral position 4 PTO switches are off If clutch pedal is not depressed the tractor cannot be started start protection switch is not switched C15N062 Return the key to 0 position Wait 60 second...

Page 69: ...n start 9 After starting the engine release the key immediately Do not start for more than 20 sec Blocking of the start If the engine cannot be started and the defect signal lamp is flashing it means...

Page 70: ...engine is started the corresponding signal lamp is switched on again and the error message runs through the display 1 The signal lamp of a serious defect of the system red 2 The signal lamp of a less...

Page 71: ...rea The engine power will be limited 3 Add urea Engine revolutions will be minimised 4 Increase the engine load or contact service The engine power will be limited 5 Contact service The engine power w...

Page 72: ...The individual positions of road and reduced speeds lever are signalized by a sign 1 in the left bottom corner of the display road speeds neutral position reduced speeds C15N064 The driver s seat is...

Page 73: ...trolling travel clutch with the function of automatic dead start for the regular operation of tractor with dead start gear shifting or the change of the driving direction 2 Clutch control button on th...

Page 74: ...ed applicable gear followed by dead start without using the clutch pedal or clutch control buttons 1 Start the engine 2 Shift appropriate gear for starting the engine 3 Release the manual brake if you...

Page 75: ...nging the direction of the drive of tractor use reversing lever under the steering wheel without using the clutch pedal For changing the direction of the drive of tractor select the slowliest gear L w...

Page 76: ...ting using the clutch control button on the head of gear shifting lever Press the clutch control button on the head of gear shifting lever At the same time release foot throttle pedal and shift the ap...

Page 77: ...creases the travel speed by two gears FH12N054 Multiplier pre selection switch is located on the control panel on the right rear mudguard Engaging the switch is signalized by a lit symbol on the switc...

Page 78: ...ngine revolutions necessary for automatic multiplier shifting used in this example are purely informative in practice the number of revolutions is set by the driver according to the specific use of tr...

Page 79: ...nalized by blinking of control in a switch After switching off of the blinking control front drive axle is automatically disconnected With the drop of travel speed under 20 km h front drive axle can b...

Page 80: ...ck control of rear and front axle C15N071 Axle lock control button is placed on the panel on the right rear mudguard Engagement of axle locks is done by pressing the button which returns to its initia...

Page 81: ...RIVE OF AGRICULTURAL MACHINES chapter when lowering the arms of the rear three point hitch the axle locks get engaged automatically 3 travel speed is higher than 15 km h with lowered travel speed the...

Page 82: ...ight adjustment of front drive axle works in this position by the button 2 Suspension works by the axle c after pressing the lower part of the button front drive axle goes to automatic mode where the...

Page 83: ...l brake a warning is displayed on a display a letter P in a circle and at the same time there is a sound signal This situation occurs in two cases a a tractor unbraked by a manual brake with engine ru...

Page 84: ...is signalized by alit red control bulb placed on a dashboard Tractor with braked trailer or articulated trailer with pressured drop in air pressure system under 450 kPa must not continue in transport...

Page 85: ...When driving with connected trailer or articulated trailer the pedals of foot brake must be connected and secured by a valve When braking with one brake pedal hydraulic brakes of the trailer are not...

Page 86: ...ever of manual throttle to STOP position 3 The engine stops after turning the key from I position to 0 position C15N143 Before leaving the tractor with a safety cabin do not forget to remove the key f...

Page 87: ...miting travel speed With the threat of exceeding the travel speed of 40 km h the maximum engine revolutions are automatically reduced This function cannot be switched off FHD14N068 DRIVING OPERATION 8...

Page 88: ...mption is normal z Check screw joints in particular in supporting parts of tractor z Learned insufficiencies to be removed immediately you will thus prevent subsequent damage or endangered operation z...

Page 89: ...NOTES 88...

Page 90: ...r in the arrow direction to position 1 you will release the lever and by moving it subsequently to position 2 you will retract the locking pins 3 Now the stage hitch is released and you can adjust its...

Page 91: ...n the reverse order D204 The swinging draw bar console module is located in the stage hitch console Swinging draw bar Disassembly 1 Release and remove the pins 1 2 Slide the swinging draw bar out in t...

Page 92: ...will remove the locking wedge 2 Locking the hitch fig B By moving the lever 1 in the arrow direction you will retract the locking wedge 2 D207 The hitch for a single axle semi trailer may be equipped...

Page 93: ...issible speed of the set results from the maximum permissible speed of the slower vehicle in the set Hitch of class C max weight of the trailer 6 000kg Hitch of class D2 max weight of the trailer 14 0...

Page 94: ...nical certificate of the traktor The maximum permissible speed of the set results from the maximum permissible speed of the slower vehicle in the set Hitch type Permissible vertical static load Hitch...

Page 95: ...NOTES 94...

Page 96: ...nd rear PTO shaft Rear PTO shaft revolutions preselection lever FH13N005 The tractor may be equipped with one of two systems of rear PTO shaft revolutions preselection The system used in the tractor i...

Page 97: ...of the arrow C Dependent and independent rear PTO shaft revolutions FH13N007 The system used in a tractor is marked on the label placed by the rear PTO shaft revolutions preselection lever This syste...

Page 98: ...dent revolution of rear PTO shaft When manipulating with PTO shaft by means of buttons 1 the operator must stand beyond the space of the connected tools not to be caught or injured Selection switch of...

Page 99: ...ear PTO shaft clutch disengaged B rear PTO shaft clutch engaged Check that the PTO shaft revolutions are set properly with regard for the connected tools The tractor is equipped with six or twenty one...

Page 100: ...revolutions of 1500 rpm Engagement of rear PTO shaft dependent revolutions C15N18 The number and the direction of the revolutions are dependent on the engaged gear and the position of reversing lever...

Page 101: ...its original position Further pressing of the button 2 causes deactivation of this function The activation of the function of automatic deactivation of the clutch of PTO shaft is indicated by the symb...

Page 102: ...a new value is saved and the number by H LIMIT item changes and equals to ACTUAL value Setting L LIMIT position 1 Set the arms of the three point hitch to the position of required engagement of rear P...

Page 103: ...rts blinking on the display Restarting rear PTO shaft For subsequent spinning of rear PTO shaft it is necessary to proceed in accordance with see Starting rear PTO shaft If with Stopping rear PTO shaf...

Page 104: ...vity by switch of a switch C15N022 The engagement of front PTO shaft is signalized by displaying the number of revolutions of front PTO shaft on the display of dashboard If the aggregated machine perm...

Page 105: ...harrows reaping machines etc Cardan shaft for drive of these machines must be equipped with the so called freewheel clutch which ensures disconnection of torque transfer with retroaction from the mac...

Page 106: ...c system by the hydraulic pump is limited by a relief valve to 20 MPa Pump type Delivered quantity GHD0 32 12 6L 85 l min F_02_113a Control panel is placed on the right rear mudguard 1 Electrohydrauli...

Page 107: ...2N046 The outer circuit of the tractor hydraulics is controlled by the distributor with three four position sections controlled by levers The control levers of the sections are located in the cabin on...

Page 108: ...ed to the return line 2 4 6 4 Front limit position With an increased force you can shift the control levers from position 3 further to the front to position 4 i e floating free position where the leve...

Page 109: ...led by the upward backward movement of the auxiliary distributor lever The lifting branches of the cylinders must be connected to quick couplers 2 4 or 6 Connecting a rotational hydraulic motor If a r...

Page 110: ...speed 4 Setting the position of lifting device 5 Upper position restriction 6 Smooth setting of manual control automatic control 7 LED diagnostic 8 LED lifting 9 LED lowering 10 Engaging compensator...

Page 111: ...tarted Activation of the EHR B system is only possible when the lubrication indicator has gone off The blocking can only be cancelled system activated with the engine running by moving the lifting lev...

Page 112: ...afety the steering axle is not unloaded so much 2 Stabilization of the transported implement 3 Reduced dynamic stress of the hydraulic system and the rear three point hitch During the adjustment of th...

Page 113: ...mbol of the maximum lowering speed Symbol of the minimum lowering speed F_02_170 For permanent work with free hydraulic system e g during work with a plough with a support wheel the position of the co...

Page 114: ..._02_172a Do the step according to Cancel blocking part Set the control 6 to hitchtronic AHC position By control 4 set the working depth of tools attached to rear three point hitch When the implement a...

Page 115: ...c control buttons are functional also without previous activation of electrohydraulics even in case of electrohydraulics blockage for the reason of possible failure Control the arms of the rear three...

Page 116: ...l safety shutdown of the electro hydraulic system the electro hydraulic system is out of operation the work with the tractor must be stopped 1x 2x 1x 3x 1x 4x 1x 5x 1x 6x 2x 2x Moderately serious erro...

Page 117: ...pin 3x 2x Left dynamometric pin A Faulty contact or interrupted conductor of the dynamometric pin Short circuit of the dynamometric pin conductor Possible overloading of the dynamometric pin 3x 4x Low...

Page 118: ...ding to ISO 37 mm of the upper draw bar opening 32 mm E451 Persons that are not authorized to work with the attached implement must not stand between the tractor and the hitched machine implement A Do...

Page 119: ...er hydraulic draw bars B The pin head 1 and washer 2 are installed vertically The free position enables free connection of the tractor and implement In this case both the draw bar ends may move freely...

Page 120: ...point hitch Lower draw bars with CBM hooks Securing the lower draw bars with CBM hooks The lower 3 and upper 4 draw bars of the hitch are equipped with CBM hooks First suspension CBM balls 1 must be f...

Page 121: ...he tractor over the front axle This hydraulic lock is recommended even in case no machine is attached to the three point hitch E461 Before the start of work with an implement attached to the front thr...

Page 122: ...Changing the position of the draw bars of the front three point hitch 1 Release and remove the pin 1 from the opening 2 Lift the arm from position A to position B 3 Lock the arm by inserting the pin 2...

Page 123: ...NOTES 122...

Page 124: ...nuts fixing the front wheels Toe in of the wheels of the front driving axle Front wheels track 1 974 mm Proper toe in or toe out S of front wheels in a tractor with front drive axle is measured on whe...

Page 125: ...s used on the side by relocating screws a to different openings and also in terms of height by relocating screws b to different openings B Fenders with turnable consoles where the axis of turning corr...

Page 126: ...ase of a nut 2 and unscrewing or screwing in a screw 1 After the change in setting wheel stops with front drive axle it is always necessary to check their setting according to points 1 to 4 Rear wheel...

Page 127: ...NOTES 126...

Page 128: ...ssible after removal of the battery holder Combination of weights pcs Mass of weights kg 2 2x34 68 F223 The front weights of the can type are suspended in the tool carrier They are protected from late...

Page 129: ...r pressure C 6 Remove the hose and unscrew the adapter for water filling 7 Screw on the valve insert and inflate the tyre to the prescribed pressure 8 After inflating screw the protective cap on the v...

Page 130: ...turn it with the valve upwards A 2 Deflate the tyre and unscrew the valve insert turn the wheel with the valve downwards During draining of liquid vacuum may occur in the tyre Therefore turn the wheel...

Page 131: ...NOTES 130...

Page 132: ...onnector This way you will avoid accidental short circuits on the terminals In case of any handling or repair of the started motor the minus pole of the battery must be disconnected and all the shifti...

Page 133: ...thes get stained by electrolyte wash the skin or clothes with water and neutralize them with soap 4 During charging hydrogen is released from the electrolyte on the electrodes Hydrogen mixed with the...

Page 134: ...and proper grounding of the alternator Poles of the alternator may not be re versed even for a short time Electric installation overload Charging is monitored by the red indicator on the combined das...

Page 135: ...e after the left side cover of the control bracket is removed During replacement of fuses it is necessary to adhere to the prescribed value of the fuse If interrupted repeatedly search the nearest ser...

Page 136: ...13 15A Firer two pole socket F14 7 5A air conditioning F15 10A heating of mirrors F16 10A heating of rear window F17 15A compresor of driver s seat F18 20A three pin socket DIN 9680 F19 15A work light...

Page 137: ...grill headlights l distance of the test wall from the headlight 5 m h height of the headlight centre above the road surface h headlight inclination 3 5 to the distance of the test wall 17 5 cm D rais...

Page 138: ...r than 30 m from the front outline of the tractor In the horizontal direction the light beams must be parallel with the longitudinal axis of symmetry of the tractor Check the adjustment of the headlig...

Page 139: ...tance headllight 12V 60W HB3 3 Work headlight 12V 65W H9 4 Dimmed headlight 12V 55W H7 5 Direction light 12V 21W P21W 6 Position light 12V 5W R5W 7 Position brake light 12V 21W 5W P21 5W 8 Lighting of...

Page 140: ...form maintenance of the dry air cleaner in accordance with the signal of the clogging indicator Check the oil quantity in the gearbox and final drive housing Check the oil quantity in the gear box of...

Page 141: ...00 Mth or every 2 years Replacement of cooling liquid every 2 years Replacement of brake liquid every 2 years Replacement of oil in gearbox and final drive housing o o 1 000 Cleaning of magnet and sie...

Page 142: ...s use an oil complying with the specification DQC III 10 Specification of Oil for Tractor Transmission Devices Specification of Oil for the Front Driving Axle Determination name amount in litres Brake...

Page 143: ...80W 90 GL 5 Aral Fluid HGS 80W GL 4 Agip Rotra Multi THT 80W GL 4 Esso Torque Fluid 62 80W GL 4 Fuchs Titan Supergear 80W 90 GL 4 GL 5 Titan Hydramot 1030MC 10W 30 GL 4 Titan Renep 8090MC 80W 90 GL 4...

Page 144: ...AUS Aqueous Urea Solution Add only solution adhering to prescribed specifications Note The urea solution AUS 32 is known in USA and North America as Diesel Exhaust Fluid DEF The lifetime of urea with...

Page 145: ...Shell retinax HD2 DIN 51825 KP 2 K 20 MOGUL LA 2 ISO 6743 9 CCEB 2 3 ISO L XBCEA 2 MOGUL LV 2M ISO 6743 9 CCEB 2 3 MV signum DIN 51825 K 2 C 30 MOL Liton LT 2EP ORLEN OIL Liten Premium T 4 EP2 Positi...

Page 146: ...axle semi trailer Front three point hitch Position number Name Number of greasing points 1 Greasing points 25 Pos no Identification No of lubrication points 1 Hook pin bearings 0 to 4 by version 01F...

Page 147: ...ral overhaul in accordance with the instructions for running in a new tractor Perform the maintenance in the same way as with a new tractor Pos no Identification No of lubrication points 1 Pins of aux...

Page 148: ...stick is a part of the lid of the filling hole B The oil level must always be in the range from MIN and MAX C The lid 1 is released by turning to the left Take out the dipstick wipe it with a clean cl...

Page 149: ...ained oil under the drain plug 1 in the left side of the engine 2 Unscrew the drain plug 1 in the left side of the engine 3 Drain the oil to the retaining vessel 3 Clean the drain plug 4 Screw the dra...

Page 150: ...sealing ring 2 and oil it slightly Press the new filter element 5 into the clamp 6 and carefully put them together in the guide 4 Firmly screw the cover 1 25 Nm in clockwise direction Check the tightn...

Page 151: ...ter cartridge 2 and screw it off using appropriate tools 4 Dismantle the draining bolt 4 with the condensate level sensor 5 Before screwing on a new filter cartridge clean the packing surface of the f...

Page 152: ...ter element 5 into the clamp 6 and carefully put them together in the guide 4 Firmly screw the cover 1 25 Nm in clockwise direction Check the tightness when the engine is running Fuel system venting R...

Page 153: ...ment This way you can recover the main element 3 times at the most The element must be replaced once a year NM14D015 Remove the safety element of the dry cleaner 3 by pulling The safety element cannot...

Page 154: ...alizing vessel 2 Drain the cooling liquid from the cooler The drain plug C is accessible when the engine bonnet is open 3 Drain the cooling liquid from the engine block The drain plug D is located in...

Page 155: ...ractor FH12N015 1 Clean the magnet it is part of the lid and the strainer element of the suctioning filter 2 2 After cleaning screw all the drain screws back on 3 Fill oil start the engine and let it...

Page 156: ...en the engine is not running and the key is removed from the switch box The urea cleaner is located in the right side of the engine on the urea pump block A B Procedure for replacement 1 dismount the...

Page 157: ...ch the bottom edge of the inspection opening During the oil replacement the oil cleaning strainer 2 must be cleaned The cleaning strainer is accessible after the disassembly of the locking ring and re...

Page 158: ...osition of air suctioned from the outside The fan control must be in the maximum position WARNING The filter does not provide complete protection from toxic substances When handling the filter wear pr...

Page 159: ...on the left side of the tractor as standard or two air reservoirs positioned on the right and left side of the tractor if air pressure brakes are in stalled F268 fill the air reservoir to the maximum...

Page 160: ...ttom part of the air reservoir A After inflating the tyres you must put the rubber cap back on the pressure controller The value of the permitted load bearing capacity of the front axle must not excee...

Page 161: ...e On the same axle of the tractor there must not be tyres of different dimensions and designs in this case tyre design means the diagonal or radial tyre version Tyredimensions and design Principal wor...

Page 162: ...the tractor is to be put out of operation for a shorter period inflate the tyres to the value required for road transport In case of a longer period of inactivity of the tractor storage support the tr...

Page 163: ...NOTES 162...

Page 164: ...the prescribed value after releasing the fixation screws of the AC compressor C15N119 The proper play between the piston rod of the brake pedals and the piston of the main cylinder is 0 5 1 0 mm 3 6...

Page 165: ...rake pedal and repeat the procedure until air bubbles stop escaping from the hose Foot brake check During the bleeding observe the liquid level in the compensation tank to avoid aspiration of air A Ma...

Page 166: ...nbraked position Perform the adjustment in such a way that the self locking nut 1 of the parking brake draw bar can touch the pin 2 in the disc brake lever 3 After this basic adjustment check the oper...

Page 167: ...NOTAS 166...

Page 168: ...ystal 150 Crystal 160 Engine type TCD6 1L6 C4ST106A TCD6 1L6 C4ST120 Engine design serial standing water cooled Engine type diesel for stroke with direct fuel injection turbocharged with cooling of fi...

Page 169: ...Load bearing capacity of the rear tyres Permitted maximum weight of set tractor mounted machine kg Travelling speed km h Wheel track mm 1 974 6 6 000 8 5 000 20 4 200 30 4 200 40 4 200 Travelling spee...

Page 170: ...30 4060 160 2100 4200 145 The specified inflation values are minimum valued adapted to the current tyre load so that the tyre deformation can remain in the range in which all the operation requirement...

Page 171: ...95 3000 6000 80 3000 6000 80 3500 7000 80 520 70R38 3000 6000 140 3000 6000 120 3000 6000 95 3500 7000 110 600 65R38 3000 6000 100 3000 6000 90 3000 6000 65 3500 7000 80 Permitted combinations of whe...

Page 172: ...e end of the lower draw bars of the front three point hitch in the whole lifting range at the maximum usable pressure kN Zuidberg front three point hitch 35 Traktor type Crystal 150 Crystal 160 Engine...

Page 173: ...21 9 22 8 3 H 17 9 18 7 20 7 21 6 M 15 5 16 1 17 9 18 7 L 13 4 13 9 15 5 16 1 2 H 12 6 13 1 14 5 15 1 M 10 9 11 3 12 6 13 1 L 9 4 9 8 10 9 11 3 1 H 9 2 9 6 10 7 11 2 M 8 0 8 3 9 2 9 6 L 7 0 7 2 8 0 8...

Page 174: ...492 M 202 368 234 425 L 175 318 202 368 1 H 172 313 200 362 M 149 270 172 312 L 129 234 149 270 Reduced speeds 5 H 674 1 225 780 1 417 M 582 1 059 674 1 224 L 504 915 582 1 058 4 H 471 855 545 990 M...

Page 175: ...E80 Track width front 1974 mm Tire size front 540 65R28 rear 1850 mm rear 650 65R38 Left Right Track diameter Without engagement of the front driving axle 12840 mm 12870 mm With engagement of the fron...

Page 176: ...on the right rear mudguard 30 Controlling front three point hitch 120 Controlling the front and rear PTO shaft 95 Cooling system 21 D Dashboard 43 Dead start using the clutch pedal 74 Dead start by m...

Page 177: ...l in gearbox 154 Checking the oil level in the engine 147 I If you do not succeed in starting the engine 67 Immediately after cooling the cabin 38 Immediately after start 68 In first 10 hours of opera...

Page 178: ...ing Axle 141 Specification of Oil for Tractor Transmission Devices 141 Speed of the Zuidberg front PTO 174 Speed of tractor with engine revolutions of 2 100 rpm and parameter of rear wheels km h 172 S...

Page 179: ...ansport position of the front three point hitch 121 Working pressure of air brakes 158 Z Zeroing reset of the indicator of service inspection intervals 51 ZETOR Service Fillings 141 Zetor tractors use...

Page 180: ...NOTES 179...

Page 181: ...Operator s manual CRYSTAL 150 CRYSTAL 160 Edition 1 100 2015 Publication No 22 22 12 752 ZETOR TRACTORS a s Department of Technical Documentation Trnkova 111 628 00 Brno 180...

Page 182: ...Made in EU www zetor com zetor zetor com...

Reviews: