background image

16 


6.


Physical description 


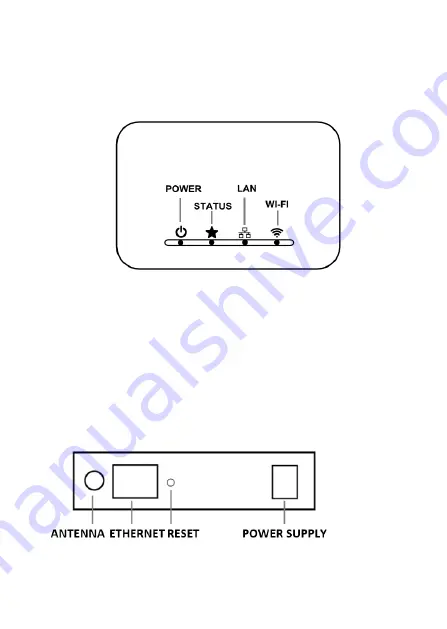
a) led diodes on the top of the enclosure 


POWER

 – on when power supply is connected 


STATUS

  –  blinks  during  radio  transmission  to  receiver,  and 

gives information about booting of the device 


LAN

 – on when Ethernet cable is properly connected  


WI-FI

 – on when wireless LAN interface is operational  


b) back panel  


Summary of Contents for SmartControl ZSC1

Page 1: ...1 Zenpro SmartControl MODEL ZSC1 PL Instrukcja obsługi ENG Manual DE Anweisung ...

Page 2: ...m kontrolować rolety oraz inne urządzenia działające w paśmie 433 92 MHz za pomocą urządzeń mobilnych oraz komputera Centrala poszerza możliwości systemu o opcje grupowania urządzeń dodaje obsługę zdarzeń czasowych i scen oraz umożliwia zdalną kontrolę przez sieć Internet Dodatkowe materiały instruktażowe można znaleźć pod adresem www zenpro pl instrukcje 2 Zawartość zestawu Centrala Zenpro SmartC...

Page 3: ...zgodnej z parametrami podanymi w instrukcji 3 Nie należy korzystać z urządzenia podczas kąpieli lub pod prysznicem 4 Nie należy umieszczać urządzenia w pobliżu źródeł ciepła takich jak grzejniki kominki piece i inne 5 Urządzenie należy umieścić w miejscu niedostępnym dla dzieci 6 Urządzenia nie należy zakrywać Zalecane jest pozostawienie 10cm wolnej przestrzeni po bokach urządzenia 7 Przed czyszcz...

Page 4: ...eży podłączać urządzenia do zasilacza nie spełniającego obowiązujących norm i wymogów bezpieczeństwa 13 Należy chronić urządzenie przed wibracjami i wstrząsami Mobile Labs Sp z o o nie ponosi odpowiedzialności za działanie akcesoriów innych producentów współpracujących z urządzeniem oraz za ich zgodność z normami bezpieczeństwa i innymi przepisami 5 Utylizacja Niniejszy symbol oznacza że po zakońc...

Page 5: ...jscowym urzędzie lub punkcie w którym urządzenie zostało nabyte 6 Budowa urządzenia a diody led na obudowie POWER zapalona dioda sygnalizuje prawidłowe podpięcie urządzenia do zasilania STATUS dioda statusowa zapala się w trakcie transmisji radiowej do urządzeń oraz potwierdza takie operacje jak reset i ładowanie systemu LAN dioda zapala się w momencie prawidłowego podpięcia przewodu sieciowego WI...

Page 6: ...an miganiem diody statusowej W momencie kiedy dioda statusowa przestanie migać centrala jest gotowa do pracy Centrala przy pierwszym uruchomieniu domyślnie udostępnia własną sieć Wi Fi SmartControl_SERIALNUMBER gdzie SERIALNUMBER to numer seryjny naszego urządzenia do której należy połączyć się za pomocą urządzenia mobilnego W tym celu należy wykonać następujące kroki 1 Na urządzeniu mobilnym pobi...

Page 7: ...wciskamy przycisk Wyszukaj Centralę Po pozytywnym wyszukaniu centrali należy połączyć się do centralki wciskając żółty przycisk Połącz PODŁĄCZENIE CENTRALI STERUJĄCEJ DO DOMOWEJ Wi Fi Połączenie centrali do domowego routera z dostępem do Internetu umożliwia sterowanie urządzeniami w domu przez Internet za pomocą zdalnego dostępu Ponadto możliwe staje się uaktualniania oprogramowania centralki Cent...

Page 8: ...lę W razie problemów z wyszukaniem centrali np zostało podane złe hasło do sieci Wi Fi należy zresetować ustawienia centrali zgodnie z procedurą opisaną w następnym punkcie Centrala ponownie udostępni domyślną sieć Wi Fi SmartControl_SERIALNUMBER 2 Poprzez przewód sieciowy dołączony do zestawu Wpinamy przewód sieciowy w złącze Ethernet na tylnym panelu centrali oraz w wolne złącze Routera Następni...

Page 9: ...Adres możemy sprawdzić w aplikacji mobilnej w zakładce Zaawansowane Połączenie do centralki adres IP centrali pojawia się też po wyszukaniu centrali w panelu logowania DODAWANIE URZĄDZEŃ DO SYSTEMU W aplikacji mobilnej w zakładce Ustawienia wchodzimy w menu Urządzenia a następnie wybieramy przycisk Dodaj Urządzenie Z rozwijanego menu wybieramy typ urządzenia np roleta wpisujemy nazwę i korzystamy ...

Page 10: ...my procedurę opisaną powyżej Po dodaniu nowego urządzenia i wprowadzeniu nazwy rolety przechodzimy do widoku z przyciskami sterującymi Jednocześnie korzystamy z tradycyjnego pilota który już współpracuje z dodawanym do centrali silnikiem rolety Wciskamy przycisk PROG P2 na tylnej obudowie tradycyjnego pilota przypisanego do rolety Roleta potwierdzi wejście w tryb programowania ruchem góra dół i kr...

Page 11: ...czy zdarzenie ma być aktywne oraz ewentualnie wybieramy czas uruchomienia Na liście możemy wybrać akcje wykonywane przez wybrane urządzenia w momencie uruchomienia zdarzenia Zdarzenie czasowe nie musi być aktywne w takim przypadku nie będzie automatycznie uruchamiane przez centralkę Użytkownik może je uruchomić samodzielnie korzystając z przycisku widocznego w zakładce Zdarzenia przy każdym zdarze...

Page 12: ... Kiedy telefon znajduje się poza zasięgiem domowej sieci Wi Fi pojawi się okno Połączenia do Centrali Wybieramy opcję Zdalny dostęp Powinno nastąpić połączenie do Centrali c powrót do dostępu lokalnego Wchodzimy w zakładkę Ustawienia Ustawienia centrali są widoczne jedynie podczas dostępu lokalnego i wduszamy przycisk Powrót 8 Deklaracja CE Firma Mobile Labs Sp z o o deklaruje że urządzenie został...

Page 13: ...n technologically advanced controller which allows to control blinds and other devices working in 433 92 MHz band through mobile devices and PC Zenpro controller extends system capabilities by consolidating devices into groups time events scenes and allows for remote control devices through Internet Additional instructional materials can be found at www zenpro eu manuals 2 Kit contents Zenpro Smar...

Page 14: ... device while taking a shower or bath 4 Do not place the device close to heat sources like heaters radiators chimneys stoves and others 5 Keep the device and accessories beyond the reach of children 6 Do not cover the device It s recommended to leave 10cm of space at sides of the device 7 Before cleaning or maintenance unplug the device from mains The device is not waterproof Protect the device fr...

Page 15: ...r devices provided by other manufacturers that cooperate with the Zenpro device 5 Disposal instructions The crossed bin symbol means that the device contains electronic and electrical parts and it shouldn t be disposed together with domestic waste It must be separately collected with electrical and electronic waste according to currently valid legislation Information about places of electronic was...

Page 16: ...losure POWER on when power supply is connected STATUS blinks during radio transmission to receiver and gives information about booting of the device LAN on when Ethernet cable is properly connected WI FI on when wireless LAN interface is operational b back panel ...

Page 17: ...us diode stops to blink the device is ready to use The Zenpro device by default provides own Wi Fi network SmartControl_SERIALNO where SERIALNO is the serial number of your Zenpro device Connect to this network with mobile device Following steps should be taken 1 On the mobile device download Zenpro SmartContol application for Android Google Play or iOS Appstore Type Zenpro SmartControl in the sea...

Page 18: ...Fi network To connect ZSC1 to home network through Wi Fi you have to open the mobile app go to SETTINGS Network connections Wireless network configuration WLAN In the Network mode menu check the Connection to home Wi Fi network Next Choose Wi Fi network and type in the home Wi Fi password if it s set up The ZSC1 device will stop broadcasting SmartConrol_SERIALNO Wi Fi network and the mobile device...

Page 19: ...ssible to reset the device settings 1 Pressing shortly the Reset button on the back panel will result in resetting the Wi Fi settings The default SmartControl_SERIALNUMBER Wi Fi network will be available 2 Holding the reset button for 5 seconds will result with factory reset It will delete all devices and groups that were added to system and will bring back all the settings to the factory state CO...

Page 20: ...itional remote controller Next step is to pair the physical device with the central controller To do this you need to follow the device manual and do the same things as you would like to add new remote controller to the device However instead of the traditional remote controller use the steering buttons Additional instructional materials concerning adding devices can be found at www zenpro eu manu...

Page 21: ...th up down sequence and sound You can test the new device with up down stop buttons in the mobile app TIME EVENTS In the mobile app in Events bar you can create and manage time events scenes For example you can close all the roller shutters at home at a certain time To create a time event you need to go to Events menu and use add time event button Next give it a name check the active option set up...

Page 22: ... Advanced Remote Access and check the On option You can check if remote access is working correctly by pressing Test button 2 Using the remote access When your mobile device is away from your home network and you turn on the Zenpro app after few seconds the connection window will show up Pick up the Remote access button in the bottom Your mobile device should connect to ZSC1 Unit 3 Getting back to...

Page 23: ... declares that the Zenpro ZSC1 device has been designed and manufactured to comply with all applicable essential requirements of the directives EMC 2004 108 WE directive and RTTE 1999 5 WE directive CE declaration of conformity is available on the webpage www zenpro eu declaration ...

Page 24: ...n Rollladen und andere Geräte im Band 433 92 MHz anhand der Mobil als auch Computer kontrollieren kann Die Zentrale erweitert die Möglichkeiten des Systems mit der Option der Gruppierung des Gerätes gibt die Bedienung des Zeitgeschehens und der Szene an und ermöglicht die Fernüberwachung über das Internet Zusätzliche Unterrichtsmaterialien finden Sie unter www zenpro eu anleitung 2 Inhalt des Satz...

Page 25: ...immung und mit den angegebenen Parametern aus dem Handbuch stehen 3 Verwenden Sie das Gerät nicht während dem Baden oder Duschen 4 Stellen Sie das Gerät nicht in der Nähe von Wärmequellen wie Heizungen Kamine Öfen oder andere 5 Stellen Sie das Gerät außerhalb der Reichweite von Kindern 6 Nicht abdecken Es wird empfohlen 10 cm Freiraum an den Seiten der Vorrichtung zu lassen 7 Vor Reinigung oder Wa...

Page 26: ...s Gerät nicht an die Stromversorgung nicht den geltenden Normen und Sicherheitsanforderungen gerecht zu warden 13 Schützen Sie das Gerät vor Vibrationen und Stößen Mobile Labs Sp z o o ist nicht für den Betrieb von Zubehör anderer Hersteller die Zusammenarbeit mit dem Gerät oder die Einhaltung von Sicherheitsstandards und Vorschriften verantwortlich 5 Entsorgung Dieses Symbol bedeutet nach der Ver...

Page 27: ...es a LEDs auf dem Gehäuse POWER leuchtende LED zeigt korrekten Anschluss des Netzkabels STATUS Der Status LED leuchtet inmitten der die Funkübertragung mit dem Gerät und bestätigt die Operationen wie Reset und Booten LAN Diode leuchtet wenn das Netzkabel richtig anschlossen ist WI FI Diode stellt die Aktivität der Wireless Netzwerkschnittstelle ...

Page 28: ...blinkt ist das Bedienfeld betriebsbereit Beim ersten Start bietet Das Panel einen eigenen Wi Fi SmartControl_SERIALNUMBER an wobei die SERIALNUMBER die Seriennummer des Geräts ist zu welcher man sich in Verbindung mit mobilen Gerät setzen muss Gehen Sie hierzu folgendermaßen vor 1 Von dem mobilen Gerät laden wir die Applikation Zenpro SmartControl von dem Google Play Store Geschäft für Android ode...

Page 29: ...Taste Verbindung drücken ANSCHLUSS BEDIENFELD FOR HOME WLAN Das Anschlussfeld auf die Heim Router mit Internet Zugang können Sie die Geräte im Haus über das Internet für den Fernzugriff steuern Darüber hinaus ist es möglich die Steuergeräte Software zu aktualisieren Das Panel kann auf Ihre Wi Fi Netzwerk auf zwei Arten angeschlossen werden 1 Mit Wi Fi Um die Kontrollleiste mit dem Wi Fi Netzwerk z...

Page 30: ...der im nächsten Abschnitt beschriebenen Verfahren Das Panel wird gibt noch einmal den Zugang zu dem Wi Fi SmartControl_SERIALNUMBER 2 Durch den Netzstecker zu den Satz beigelegt Stecken Sie den Netzkabel in den Ethernet Anschluss auf der Rückseite und freien USB Router Verbinden Sie sich mit dem mobilen Gerät mit dem Wi Fi Netzwerk und suchen sie den Panel Rücksetzen System Bei Problemen mit der K...

Page 31: ...nmeldefenster Hinfügen der Geräten zum SYSTEM Die mobile Anwendung im Menü Einstellungen gehen Sie in die Geräte ein und klicken Sie auf Gerät hinzufügen Wählen Sie im Drop down Menü Sie den Typ des Geräts z B Blinde geben Sie den Namen an und benutzen die Taste Weiter Es zeigt sich ein Fenster in dem Sie den Pulsbetrie den wir konfigurieren können falls das Gerät es ermöglicht und Steuertasten pr...

Page 32: ...ten auf Gleichzeitig nutzen wir den traditionellen Pilot welcher bereits mit der Motorsteuerung des Blinds zusammenarbeitet Drücken Sie die Taste PROG P2 auf der Rückseite des traditionellen Pilot zu den Blinds zugeordnet Blinde bestätigen die Eingabe der Programmiermodus mit der Bewegung oben unten und mit einem kurzem Piepton Drücken Sie die Taste erneut PROG P2 blind bestätigt ein weiteres kurz...

Page 33: ...tisch durch die Steuereinheit aktiviert wird Sie können sie selbst ausführen mit der Taste in den Ereignis sichtbar bei jedem Zeitereignis FERNZURGIFF Für den Fall wenn wir uns außerhalb der Reichweite eines Wi Fi Netzwerks befinden die mit der Steuereinheit verbunden ist können wir eine verschlüsselte Verbindung über das Internet verwenden Remote Access Fernzugriff Das der Fernzugriff funktionier...

Page 34: ...ollte zur Zentrale eine Verbindung gehen c an den lokalen Zugriff zurück Geben Sie auf die Registerkarte Einstellungen und drücken Sie die Taste Zurück Steuereinstellungen werden nur beim lokalen Zugriff gezeigt 8 CE Erklärung Die Firma Mobile Labs Sp z o o erklärt dass das Gerät entwickelt wurde hergestellt und in Übereinstimmung mit den Anforderungen der EMV Richtlinie 2004 108 EG und R TTE Rich...

Reviews: