


5
806310NZ v1.06 08.19 CW ChillMaster & EconoMaster
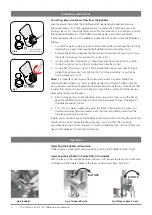
Fig.13
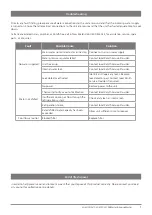
1. ROTATE
2. PULL DOWN
1. INSERT
2. ROTATE
REMOVE FILTER
INSERT FILTER
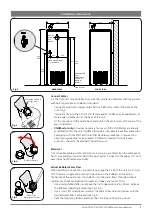
Condenser (all models)
The Condenser should be cleaned at regular 12-monthly intervals, or
when the filter is replaced (for ChillMaster).
To access the Condenser: Disconnect power and remove the 4 screws
(Fig.11). Remove the panel and clean the Condenser using a soft-bristled
brush or vacuum. Replace the panel and restore power when complete.
Leak Detector (all models)
If water should leak within the appliance, the cotton pad in the Leak
Detector will close the valve to stop water flow. Identify and repair any
leaks. The Leak Detector Pad must then be replaced.
ChillMaster:
Leak Detector is supplied ready to use.
EconoMaster & SiteMaster:
Leak Detector is supplied but not enabled.
To enable the Leak Detector, put a pad inside and close the cover.
To access the Leak Detector:
Turn OFF power and unplug the power
lead. Remove the front panel of the appliance. The Leak Detector is
located towards the front of the unit at its base.
Open the cover of the Leak Detector to insert/replace the pad (Fig.12).
Dampened pads must be replaced and then can be discarded. Close
the cover of the Leak Detector and check that water flow has returned.
Replace the appliance panel and restore power.
New units are supplied with two Leak Detector Pads. If required, call
Zenith Service for replacement P/N 95127NZ.
Filter Replacement (ChillMaster only)
ChillMaster has a filter replacement reminder light that shows through the
front label. During normal operation, the light flashes once per minute.
When the filter cartridge is due for replacement, the light flashes once
per second. Refer to the Service section for filter timer duration.
NOTE:
For safe operation, the filter cartridge should be replaced at least
every 6-12 months, when the reminder light flashes once per second,
or earlier if you notice a persistent reduction in water pressure from the
appliance or an unpleasant taste or odour in the water.
1. Turn OFF water and power to the unit. Remove the front cover.
2. Turn the chilled water tap lever to release the water pressure in the
unit. Once water has stopped running from the tap, turn off the tap.
3. Rotate the filter clockwise and gently pull the cartridge down to
release it from the filter head (Fig.13). Dispose of the filter cartridge
responsibly. Clean any water that has pooled below the filter head.
4. Fit a new filter by rotating the filter anti-clockwise and gently pushing
up. The filter will click into place.
5. Turn ON the water supply to the unit. Turn ON the chilled water tap.
Allow 7.5 litres to flow from the outlet.
6. Turn OFF the chilled water tap.
7. Turn ON the power supply to the unit.
8. At the same time as the filter replacement, it is recommended to
replace the 2x AAA batteries for the reminder light, and clean the
condenser.
Fig.12
Warning:
Not changing filter cartridges when required may cause the water to become biologically unsafe.
If the Zenith ChillMaster is switched off for a long period of time (e.g. more than 2-3 days), run water
through the chilled water outlet for at least 5 minutes before consumption.
Replacement filter cartridges can be obtained through plumbing suppliers or directly from Zenith. Use only
the appropriate Zenith 0.2 or 3 micron filter.
Fig.11
Maintenance


