16
HDVI5 Component Video Switch
1
HDVI5 Component Video Switch
Disabling Front Panel or Remote
If you are using the rear panel IR jack , you might want to disable the
IR sensors to prevent use of the remote control.
Or if you have a household with young curious fingers that likes
playing with buttons, you also have the capability of disabling the
front panel switches and only operating the HDVI5 with a remote.
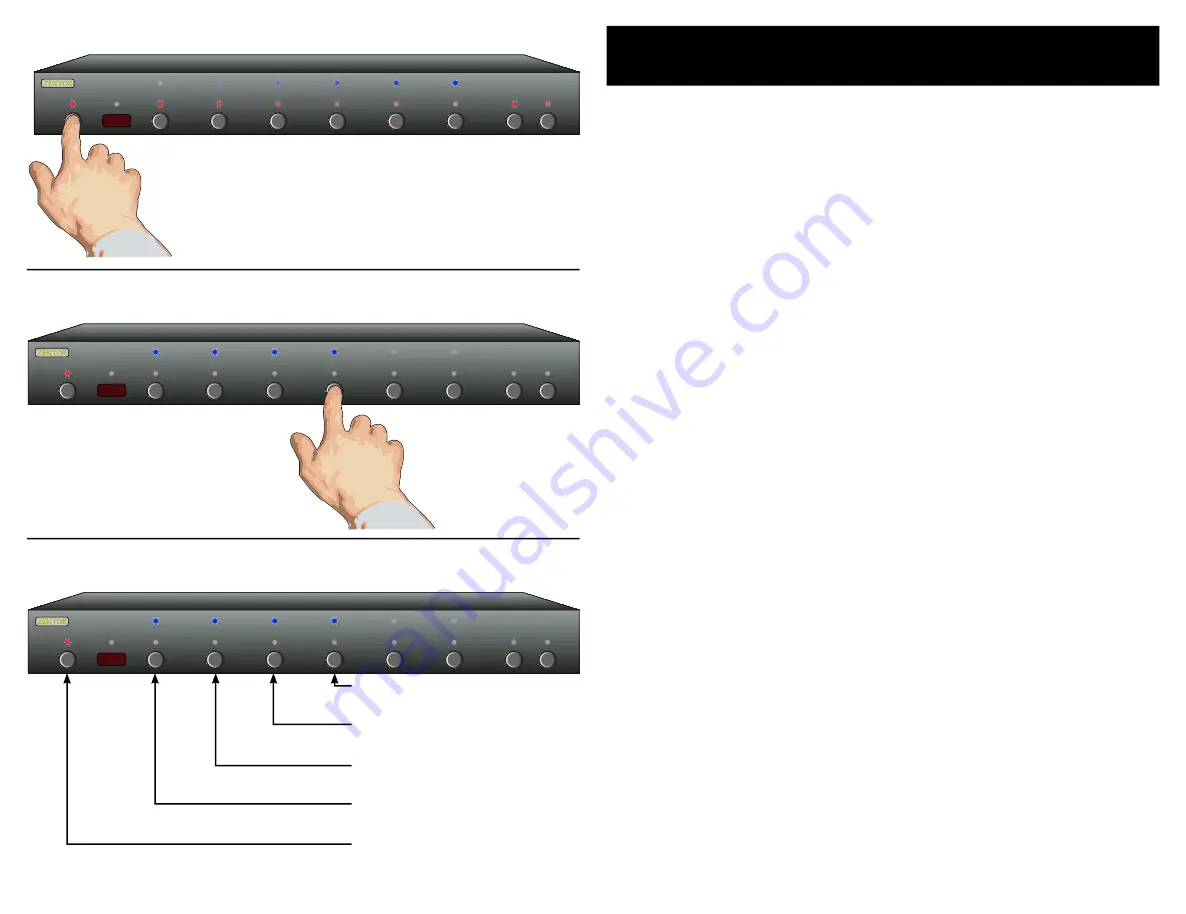
To enable / disable the front panel switches or remote capabilities...
Step 1: Enter the Setup Mode
The HDVI5 is placed into the setup mode by pressing and
holding the Power button for about seconds.
Step 2: Enter the Enable / Disable control state
While in the setup mode, press '' to enter the Enable /
Disable control state. The current status will be displayed
using the front panel LEDs.
A Blue LED indicates an option is enabled, and Red LED
indicates disabled.
Step 3: Enable or Disable Front Panel and / or IR control
Use '1' to enable / disable the IR Jack hardware.
Use '2' to enable / disable the IR Sensor hardware.
Use '' to enable / disable the front panel buttons.
Use '' to enable / disable IR control.
Note 1: When disabling the IR Jack and IR Sensor, the ac tual
hardware is disabled. Whereas 'IR Control' enables /
disables whether the HDVI5 responds to IR signals re -
ceived. The difference mostly concerns reading IR sig-
nals through the RS-232 por t. If the IR Sensor and Jack
are enabled, and 'IR Control' disabled, IR signals can still
be read through the RS-232 por t, while being ignored by
the HDVI5.
Note 2: Disabling the front panel buttons does not disable the
ability to enter the Setup Modes. Even with the front
panel disabled you can per form the above steps, allow-
ing you to once again enable the front panel buttons.
Note 3: The new settings are saved in non-volatile memor y and
are not affec ted by a power failure.
•
1.
2.
1.
2.
3.
4.
Step 3: Enable or Disable Front Panel and / or IR Control Functions
1 2 3 4 5 SEL A1 A2
Enable / Disable IR Control
Enable / Disable Buttons
Enable / Disable IR Sensor
Enable / DIsable IR Jack
Exit Setup Mode
1 2 3 4 5 SEL A1 A2
Step 1: Place the HDVI5 into the Setup Mode
Press and hold the Power Button until the
display goes wild. (About seconds.)
Step 2: Enter the Enable / Disable control state.
1 2 3 4 5 SEL A1 A2
After ‘’ is pressed, the standby
LED continues to flash, and the
front panel will display the cur-
rent settings.
All manuals and user guides at all-guides.com


