background image

12

3.4 How much is the 

bitride-my bike

 app?

The 

bitride-my bike

 app is available for free.

3.5 How do you install the 

bitride

 app?

Depending on your mobile device, go either to the Apple Store or to Google Play and 
search for “

bitride

” in the search dialog.  The detailed procedure is listed below.

On iPhone:


o

Open App Store


o

Tap the search icon


o

Enter “

bitride

” in the search field


o

Select 

bitride-my bike

 in the search results


o

Follow the standard installation procedure


o

Register with a valid e-mail address

On Android:


o

Open Google Play


o

Tap the search icon


o

Enter “

bitride

” in the search field


o

Select 

bitride-my bike

 in the search results


o

Follow the standard installation procedure


o

Register with a valid e-mail address

3.6 Connecting 

bitride

 to your BIKE+ all in one

!

 NOTE: 

bitride-my bike

 connects trough Bluetooth to your BIKE+ all in one. When first con-

necting to a factory reset BIKE+ all in one, the name of the device will be Bikep-XXXX, 
where XXXX is a number.

!

 NOTE: In order to register a BIKE+ all in one the app 

bitride-my bike 

needs to access a 

stable internet connection and it requires geolocation


Once your 

BIKE+ all in one

 is turned on (see 1.3), you can connect 

bitride-my bike

 to the 

Summary of Contents for BIKE+

Page 1: ...BIKE all in one User manual ...

Page 2: ...This page was intentionally left blank ...

Page 3: ... the charging connector see Figure 1 Warranty is void if the bike is being used without protecting the connector o o Please observe all national regulations on registering and using e bikes o o The term battery pack refers to an internal part of the BIKE all in one system DO NOT try to access the battery pack o o BIKE all in one must not be subjected to direct mechanical impacts There is a risk th...

Page 4: ...lectric shock o o Do not charge the battery near flammable surfaces Risk of fire o o Before any charging operation check the battery charger status cable plug connectors If any damage is detected DO NOT use the charger and contact a qualified retailer o o Do not operate the battery charger on flammable surfaces o o Vapors can escape in case of damage or improper use of the charger Avoid contacts w...

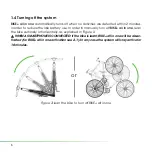
Page 5: ...ctivated when the battery state of charge is sufficient In order to check the battery state of charge of your BIKE all in one please refer to 5 1 3 Turning on the system BIKE all in one turns on automatically when the rear wheel reaches a speed higher than 5 km h Thus to turn on BIKE all in one just start pedaling your bike as usual or spin the wheel while you lift the bike as explained in Figure ...

Page 6: ...order to manually turn off BIKE all in one lean the bike vertically or horizontally as explained in Figure 3 WHEN A SMARTPHONE IS CONNECTED if the bike is leant BIKE all in one will be de ac tivated for BIKE all in one activation see 2 1 In any case the system will stay active for 10 minutes Figure 3 lean the bike to turn off BIKE all in one Deutsch Deutsch or ...

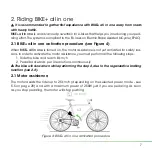
Page 7: ... assistance is not yet activated for safety rea sons In order to activate the motor assistance you must perform all the following steps 1 Ride the bike and reach 8 km h 2 Pedal backwards per 3 revolutions continuously The bike will slow down while performing the step 2 due to the regenerative braking function see 2 2 2 1 Motor assistance The motor assists the rider up to 25 km h depending on the s...

Page 8: ...ws you to slow down the bicycle using the electric motor as a generator recharging the batteries thanks to the integrated Kinetic Energy Recuperation System KERS In order to activate the regen erative braking you need to pedal backwards As soon as you stop pedaling the motor will stop braking CAUTION Regenerative braking DOES NOT substitute safety mechanical brakes Please do NOT remove the mechani...

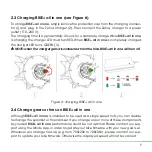
Page 9: ...s disconnected from the bike BIKE all in one will turn off I 2 3 100 Figure 6 charging BIKE all in one 2 4 Change gears or tires on BIKE all in one Although BIKE all in one is intended to be used as a single speed hub you can decide to change the sprocket or the crankset If you change one or more of these components by yourself BIKE all in one performance could be not optimal Please contact our su...

Page 10: ... hub is not mounted correctly you will receive a warning when connecting with the app see 5 7 2 6 Careful handling of the bike Please observe the operating storage temperature of BIKE all in one Protect the charging connector from impacts that can damage it Components can be damaged if exposed to extreme temperatures CAUTION ALWAYS seal the connector on BIKE all in one with the proper protection c...

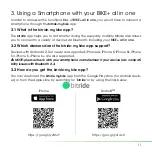
Page 11: ...r BIKE all in one 3 2 Which devices does the bitride my bike app support Devices with Android 4 2 3 or newer are supported iPhone 4s iPhone 5 iPhone 5s iPhone 5c iPhone 6 iPhone 6 are also supported NOTE please check with your smartphone manufacturer if your device has compati bility issues with Bluetooth 2 3 3 3 How do you get the bitride my bike app You can download the bitride my bike app from ...

Page 12: ...il address On Android o o Open Google Play o o Tap the search icon o o Enter bitride in the search field o o Select bitride my bike in the search results o o Follow the standard installation procedure o o Register with a valid e mail address 3 6 Connecting bitride to your BIKE all in one NOTE bitride my bike connects trough Bluetooth to your BIKE all in one When first con necting to a factory rese...

Page 13: ...o Select your device from the list NOTE If you have an iPhone bitride my bike will auto connect to your BIKE all in one I Bluetooth Settings Bikep 3D25 Ü Ö k á Ö Ü í Ü ï â Bluetooth detectable as iPhone ZEHUS DEVICES after the first time the device is paired On Android o o Launch bitride o o Allow the app to Enable your Bluetooth o o Tap your BIKE all in one name o o Wait for pairing and connectio...

Page 14: ...o power mode for more power modes see 5 5 In order to use your BIKE all in one together with bitride you need to register it using your bitride app By registering to bitride you will be able to o o change your BIKE all in one name o o change your BIKE all in one power modes o o access to online fault diagnosis o o access to remote Maintenance o o access to remote anti theft service Enable 2 I ...

Page 15: ...curity for your BIKE all in one NOTE the bike name will change at the first reboot of the bike INTERNET CONNECTION NEEDED to perform the registration internet connection Safari 100 8 08 AM Bike name Bike name PIN DEVICE REGISTRATION Done Choose a name for your bike and a PIN of 4 digit Safari 100 8 08 AM In order to register your BIKE all in one please fill in the registration form in the app welc...

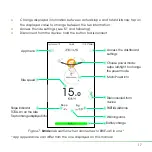
Page 16: ...d select RIDE To access the online dashboard please connect to your BIKE all in one by following the instructions in 3 6 5 Using the ride section The ride section within bitride my bike displays the following information see Figure 7 o o Bike SPEED Km h or mi h o o Total ODO Km or mi o o Partial ODO km or mi o o Road slope o o Motor Power W o o State of charge of the battery o o Active power mode ...

Page 17: ... device hold the button to disconnect Slopeindicator TOTALkmonthebike Taptochangedisplayedinfo Slope 2 Access the dashboard settings Choosepowermode swipe left right to change thepowermode Batterycharge Bikespeed Appmenu Disconnectedfrom device PARTIALdistance Warningicons Figure 7 bitride ride section when connected to BIKE all in one MotorPowerinfo app appearance can differ from the one displaye...

Page 18: ... bike by sliding the factory reset icon on the right side of your screen For any modification performed in this screen the bike must not be moving speed must be 0 km h POWER MODE Factory reset Slope Calibration Save Kers min max Bike Safari 100 8 08 AM KERSvalue BIKE allinone Powermodes BIKE allinonePowermodes Figure 8 Ride settings section and power modes icons Saveandback Slopecalibration Factor...

Page 19: ...n of the slope sensor carefully at the first connection A wrong calibration could lead to a non correct and unpleasant behavior of your bike In order to calibrate the slope sensor please place your bike on a flat surface 0 slope Then tap slope calibration and insert your PIN number when prompted This will start the calibration procedure Please refer to Figure 8 and Figure 9 for further information...

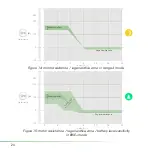
Page 20: ...range 2 range 3 BIKE and OFF Here you can find a detailed description of BIKE all in one power modes o o turbo Figure 10 this power mode is a regular pedelec or Electric Pedal Assisted biCylce The motor assists you up to 25 km h and with a maximum power of 250 W depending on the speed of the bike and on the effort on the pedals With this power mode you can cover up to 35 km o o e bike Figure 11 th...

Page 21: ...ously in order to keep the battery charged The motor assistance and the cutoff speed both de pends on the battery charge the input from the pedals speed torque and the road slope In this power mode you never need to charge the batteries o o OFF in this power mode the motor is completely turned OFF The regenerative brak ing is turned off too In this power mode you never need to charge the batteries...

Page 22: ...peed km h 200 250 100 100 0 0 5 10 15 20 25 30 Motor Power W Pedalling effort Figure 11 motor assistance in e bike mode Speed km h 200 250 100 100 0 0 5 10 15 20 25 30 Motor Power W Pedalling effort Figure 10 motor assistance in turbo power mode ...

Page 23: ...ower W Pedalling effort Regenerative zone Figure 12 motor assistance regenerative zone in range 1 mode Figure 13 motor assistance regenerative zone in range 2 mode Speed km h 200 250 100 100 0 0 5 10 15 20 25 30 Motor Power W Pedalling effort Regenerative zone ...

Page 24: ...14 motor assistance regenerative zone in range 3 mode Speed km h 200 250 100 100 0 0 5 10 15 20 25 30 Motor Power W B a t t e r y l e v e l Pedalling effort B a t t e r y t t e B a B a a t t e t t e r y e e Regenerative zone Figure 15 motor assistance regenerative zone battery level sensitivity in BIKE mode ...

Page 25: ...e damaged Connectivity WARNING This icon appears when there is a connectivity problem with the bike Even if the Bluetooth is connecting to the bike it could be possible to get this warning Please contact Zehus using the support section see 6 on page 26 Mounting WARNING This icon appears when you mounted your Bike all in one upside down Please flip it by 180 horizontally Please refer to 2 5 on page...

Page 26: ... section This section allows you to o o Check warranty and manuals related to your product o o Check a F A Q section o o Perform a diagnosis on your All in One and send it to Zehus Support team o o Send a generic feedback to Zehus Support team 6 1 Sending an online or offline feedback to Zehus Support team When you notice something wrong with your powertrain it is possible to send a feedback to Ze...

Page 27: ...ected to the bike This generic feedback can be used for questions or in case you can not connect to your BIKE all in one to gather diagnostic data Tapheretocheckusermanual gettingstartedmanual warrantytermsandprivacypolicy TapheretochecktheFAQsonyourproduct Datafrom BIKE allinone ...

Page 28: ...as a memory error you will be able to see the EOL parameter warning in the ride section see 5 8 on page 25 End Of Line parameters are very important and need to be set correctly If not set or set in a wrong way BIKE all in one may not work properly Please contact the Zehus Support team providing the brand and model of your bike your frame number if applicable your BIKE all in one serial number Our...

Page 29: ...able internet connection NOTE All the recovery procedures listed above does not work if the bike is charging NOTE All the recovery procedures listed above does not work if the bike is moving 8 Using the other sections of bitride my bike 8 1 Using the Map section As of today the map section is just a display of a third party map service 8 2 Using the Profile section In the profile section you can s...

Page 30: ...st deep discharging overcharging overheating and short circuit through the Battery Management System BMS In case of dangerous situ ation an electronic protection will switch the battery pack off Although the battery pack is protected from deep discharging it is recommended to fully charge the battery pack before the first use of the bike 9 1 Charging BIKE all in one battery pack see also 2 3 The b...

Page 31: ... storage conditions BIKE all in one has to be stored at the right temperature The battery pack life can be maximized by following the rules for a correct storage and handling In case of malfunctioning your battery pack will have to be replaced Please refer to a Zehus retailer to have your battery pack replaced Note when not using the bike for long periods it is recommended to charge the bat tery p...

Page 32: ...29 2 Rated Capacity mAh 5300 Energy Wh 154 8 HUB Weight Kg 3 2 Operating Temperature C 20 C to 70 C Storage Temperature C 40 C to 60 C Charging Temperature C 20 C to 60 C Degree of protection IP54 Charger Voltage Input V 100 240 V 50 60 Hz Output voltage V 33 6 Charging current A 2 Charging time h 2 5 ...

Page 33: ...n answer please contact us through the procedures explained in 6 on page 26 or send an e mail to support zehus it When contacting Zehus for an issue related to BIKE all in one please provide one of the following information together with the problem description o o Registration e mail for your BIKE all in one o o Bike name o o Bike MAC address it can be found in the Bluetooth option on your smartp...

Page 34: ...n authorized Zehus dealer Bicycle dealers can also provide suitable transport packaging 11 4 Disposal BIKE all in one and all its components should be sorted for environmental friendly recy cling Only for EC countries According to European Guideline 2012 19 EU electrical devices tools that are no lon ger usable and according to European Guideline 2006 66 EC defective or used battery packs batterie...

Page 35: ...This page was intentionally left blank ...

Page 36: ... limited to claims or damages based on infringement of patents copyrights or other intellectual property rights Made for iPhone means that an electronic accessory has been designed to connect specifically to iPod iPhone or iPad respec tively and has been certified by the developer to meet Apple per formance standards Apple is not responsible for the operation of this device or its compliance with ...

Reviews: