ZCS AZZURRO Series Manual To Monitoring Download Page 17


          17 / 45 


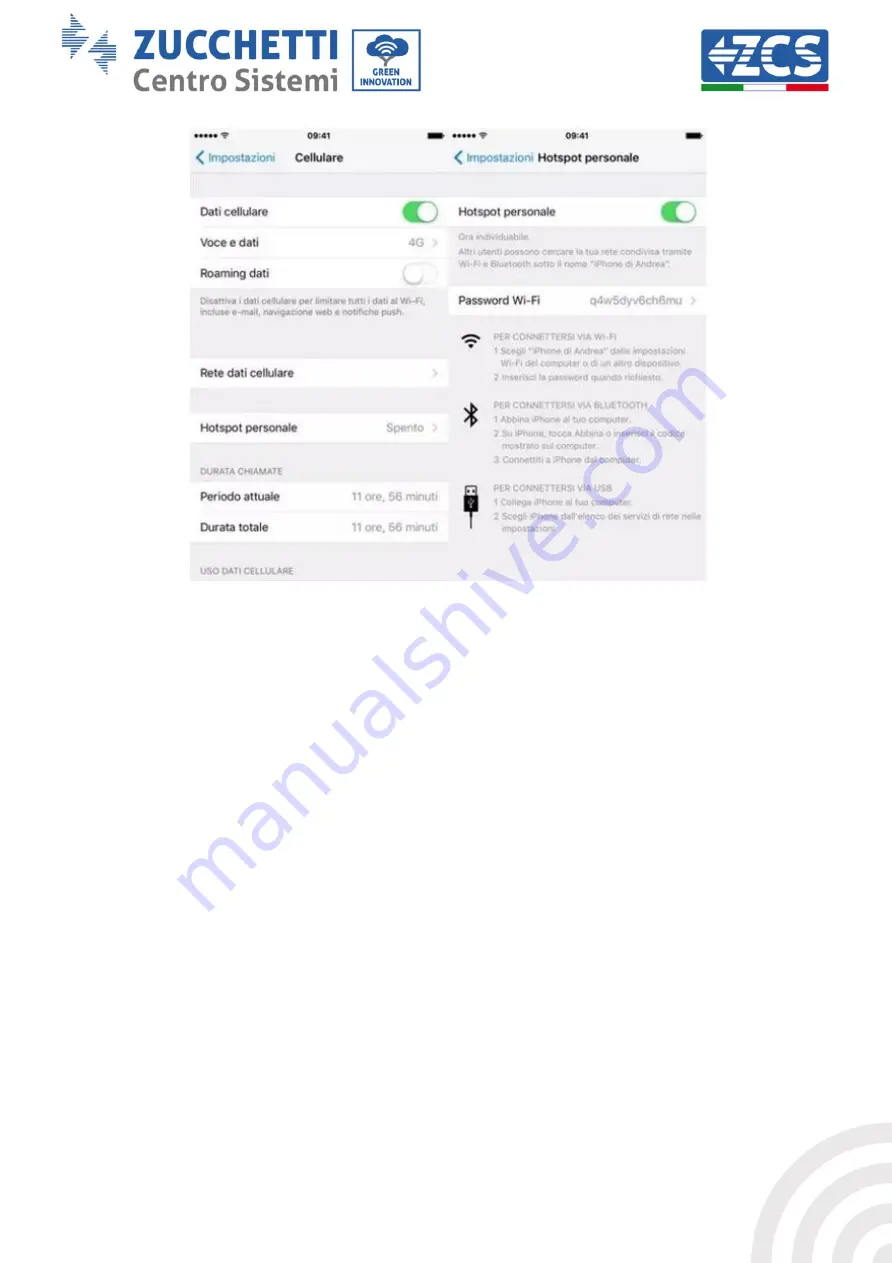
Figure 20 - Configuration of an iOS smartphone as a hotspot router


At this point, it is necessary to re-configure the Wi-Fi card using a PC or smartphone other 
than the one used as a modem. 

During this procedure, when asked to select the Wi-Fi network, choose the one activated by 

the smartphone and then enter the password associated with it (which can be changed from 

the  personal  hotspot  settings).  If  at  the  end  of  the  configuration  the  word  “Unpingable” 
appears next to “Remote Server A”, then the problem depends on the home router. 

It is therefore advisable to check the brand and model of the home router you are trying to 

connect to the Wi-Fi card; some router brands may have closed communication ports. In this 

case, contact the customer service of the router’s manufacturer and ask them to open port 
80 (direct from the network to external users). 


Summary of Contents for AZZURRO Series

Page 1: ...g no 03225010481 REA AR no 94189 ISO 9001 Certified Company Certificate no 9151 CNS0 IT 17778 Zucchetti Centro Sistemi S p A Green Innovation Division Via Lungarno 248 52028 Terranuova Bracciolini Arezzo Italy tel 39 055 91971 fax 39 055 9197515 innovation zcscompany com zcs pec it www zcsazzurro com GUIDE TO MONITORING OF AZZURRO ZCS SYSTEMS ...

Page 2: ...Verification 13 1 4 Troubleshooting 14 2 External Wi Fi adapter 18 2 1 Installation 18 2 2 Configuration 19 2 3 Verification 28 2 4 Troubleshooting 31 3 Ethernet adapter 35 3 1 Installation 35 3 2 Verification 37 3 3 Troubleshooting 38 4 4G adapter 41 4 1 Installation 41 4 2 Verification 43 ...

Page 3: ...s and Conditions offered by ZCS Azzurro please refer to the documentation inside the product box and on the website www zcsazzurro com 1 Switch off the photovoltaic inverter by first disconnecting the AC line via the appropriate wall switch and then the DC line via the appropriate wall switch 2 Unscrew and remove the four Allen screws on the front panel of the inverter using a 5 mm screwdriver Fig...

Page 4: ... Figure 2 Opening of the hooks on the slot of the flat connector 5 Insert the Wi Fi card into the dedicated slot on the communication board which is also marked by an outline as shown in the following image Figure 3 Position of the Wi Fi card on the communication board Make sure to first insert the two plastic connectors in the slots positioned at the top and then match the pins of the Wi Fi card ...

Page 5: ...crews that were previously removed 8 Start the inverter in the regular way as described in the manual first supplying DC voltage and then AC voltage using the wall mounted switches 1 2 Configuration Configuration of the Wi Fi card requires the presence of a Wi Fi network near the inverter in order to achieve stable transmission of data from the inverter card to the Wi Fi modem Tools required for c...

Page 6: ...left and Android smartphone right Note Disconnect from any Wi Fi networks to which you are connected by disabling automatic connection Figure 6 Disabling automatic reconnection to a network 2 Connect to a Wi Fi network generated by the inverter s Wi Fi card i e AP_ where indicates the serial number of the Wi Fi card shown on the left side of the inverter which operates as an access point ...

Page 7: ...on procedure enable automatic reconnection of the AP_ network Figure 7 Password entry prompt Note the Access Point is not able to provide internet access confirm to maintain the Wi Fi connection even if the internet is not available Figure 8 Screen indicating that the Internet cannot be accessed ...

Page 8: ...the Username and Password Figure 9 Screen for accessing the web server to configure the Wi Fi card 5 The status screen will open showing the logger information such as the serial number and firmware version Check that the Inverter Information fields are filled in with the inverter information The language of the page can be changed using the command in the top right hand corner ...

Page 9: ...hat the Received Signal Strength Indicator RSSI is greater than 30 If the network is not visible press the Refresh button Note check that the signal strength is greater than 30 if not make sure the antenna has been fully extracted by following the three steps shown in the figure If the antenna has been correctly extracted bring the router closer or install a repeater or signal amplifier Click Next...

Page 10: ...e it is correct the password should not contain special characters and spaces Note During this step the system is not able to ensure that the password entered is the one actually requested by the modem therefore please make sure you enter the correct password Also check that the box below is set to Enable Then click Next and wait a few seconds for verification ...

Page 11: ...5 Figure 12 Screen for entering the password of the wireless network 2 8 Click Next again without ticking any of the options relating to the card security Figure 13 Screen for setting the security options 3 ...

Page 12: ...is successful the following screen will appear If this screen does not appear try refreshing the browser page The screen will prompt you to manually close the page close the page from the background of your telephone or from the close key on your PC Figure 15 Successful configuration screen ...

Page 13: ...dmin for both username and password Once logged in the following screen will appear from here check the following information Wireless STA mode Router SSID Router name Signal Quality other than 0 IP address other than 0 0 0 0 Remote server information Remote server A Pingable Figure 16 Main screen of status and verification of correct configuration ...

Page 14: ...the configuration procedure can be repeated again Figure 17 Reset screen 1 4 Troubleshooting 1 The AP_ Wi Fi network generated by the card installed on the inverter is not visible Check the Modbus address set on the inverter Enter the main menu with the ESC key first key on the left go to System Info and press ENTER to enter the submenu Scroll down to the Modbus address parameter and make sure it ...

Page 15: ...cessary increase the signal strength by using a network extender or a router dedicated to monitoring the inverter Check that the router has access to the network and that the connection is stable check that it is possible to access the Internet from a PC or smartphone Check that port 80 of the router is open and enabled to send data Reset the card as described in the previous section and configure...

Page 16: ...the wireless network to be created To change the name of the wireless network SSID or your password select Configure Wi Fi hotspot Figure 19 Configuration of an Android smartphone as a hotspot router Using an iPhone as a modem a In order to share the iPhone connection verify that the 3G LTE network is active by going to Settings Mobile Phone and making sure that the Voice and data option is set to...

Page 17: ...rd associated with it which can be changed from the personal hotspot settings If at the end of the configuration the word Unpingable appears next to Remote Server A then the problem depends on the home router It is therefore advisable to check the brand and model of the home router you are trying to connect to the Wi Fi card some router brands may have closed communication ports In this case conta...

Page 18: ...irectly from the display Installation tools Cross screwdriver External Wi Fi adapter 1 Switch off the inverter following the procedure described in this manual 2 Remove the cover for accessing the Wi Fi connector on the bottom of the inverter by unscrewing the two cross head screws a or by unscrewing the cover b as shown in the figure a b Figure 21 Port for external Wi Fi adapter 3 Connect the Wi ...

Page 19: ...r to the Wi Fi modem Tools required for configuration Smartphone PC or tablet Go to front of the inverter and search for the Wi Fi network using a smartphone PC or tablet making sure that the signal from the home Wi Fi network reaches the place where the inverter is installed If the Wi Fi signal is present at the location where the inverter is installed the configuration procedure can begin If the...

Page 20: ...ne left and Android smartphone right Note Disconnect from any Wi Fi networks to which you are connected by removing automatic access Figure 24 Disabling automatic reconnection to a network 2 Connect to a Wi Fi network generated by the inverter s Wi Fi adapter i e AP_ where indicates the serial number of the Wi Fi adapter shown on the label of the device which operates as an access point ...

Page 21: ...on Wi Fi adapter you will be prompted for a password to connect to the inverter s Wi Fi network Use the password found on the box or on the Wi Fi adapter Figure 26 Password of external Wi Fi adapter Note To ensure that the adapter is connected to the PC or smartphone during the configuration procedure enable automatic reconnection of the AP_ network ...

Page 22: ...he Wi Fi connection even if the internet is not available Figure 28 Screen indicating that the Internet cannot be accessed 4 Open a browser Google Chrome Safari Firefox and enter the IP address 10 10 100 254 in the address bar at the top of the screen In the box that appears enter admin as both the Username and Password ...

Page 23: ...r 5 The status screen will open showing the logger information such as the serial number and firmware version Check that the Inverter Information fields are filled in with the inverter information The language of the page can be changed using the command in the top right hand corner ...

Page 24: ...i Fi network to which you want to connect the Wi Fi adapter making sure that the Received Signal Strength Indicator RSSI is greater than 30 If the network is not visible press the Refresh button Note check that the signal strength is greater than 30 if not bring the router closer or install a repeater or signal amplifier Click Next ...

Page 25: ...e it is correct the password should not contain special characters and spaces Note During this step the system is not able to ensure that the password entered is the one actually requested by the modem therefore please make sure you enter the correct password Also check that the box below is set to Enable Then click Next and wait a few seconds for verification ...

Page 26: ... Figure 32 Screen for entering the password of the wireless network 2 9 Click Next again without ticking any of the options relating to the system security Figure 33 Screen for setting the security options 3 ...

Page 27: ...n of the adapter is successful the last configuration screen will appear and the telephone or PC will unpair from the inverter s Wi Fi network 12 Manually close the web page with the Close key on the PC por remove it from the background of the telephone Figure 35 Successful configuration screen ...

Page 28: ...ul configuration of the Wi Fi adapter Figure 36 Wi Fi network search on Smartphone iOS and Android Access point of the Wi Fi adapter is no longer visible If the Wi Fi network is still present in the list connect to it again and enter the status page Check the following information a Wireless STA mode i Router SSID Router name ii Signal Quality other than 0 iii IP address other than 0 0 0 0 b Remot...

Page 29: ... LEDs present on the adapter 1 Initial status NET left LED off COM central LED steady on READY right LED flashing on Figure 38 Initial status of LEDs 2 Final status NET left LED steady on COM central LED steady on READY right LED flashing on ...

Page 30: ...he device was disconnected during connection It is necessary to reset the adapter Press the Reset button for 10 seconds and release After a few seconds the LEDs will turn off and READY will start to flash quickly The adapter has now returned to its initial state At this point the configuration procedure can be repeated again The adapter can only be reset when the inverter is switched on Figure 40 ...

Page 31: ... Scroll down to the Modbus address parameter and make sure it is set to 01 and in any case other than 00 If the value is not 01 go to Settings basic settings for hybrid inverters and enter the Modbus Address menu where the 01 value can be set Check that the Wi Fi adapter is correctly and securely connected to the inverter making sure to tighten the two cross head screws provided Check that the Wi ...

Page 32: ... extender or a router dedicated to inverter monitoring Check that the router has access to the network and that the connection is stable check that a PC or smartphone can access the Internet Check that port 80 of the router is open and enabled to send data Reset the adapter as described in the previous section If at the end of the previous checks and subsequent configuration Remote server A is sti...

Page 33: ...the wireless network to be created To change the name of the wireless network SSID or your password select Configure Wi Fi hotspot Figure 44 Configuration of an Android smartphone as a hotspot router Using an iPhone as a modem a In order to share the iPhone connection verify that the 3G LTE network is active by going to Settings Mobile Phone and making sure that the Voice and data option is set to...

Page 34: ...e password associated with it which can be changed from the personal hotspot settings If at the end of configuration Connected appears next to Remote Server A then the problem is with the home router It is therefore advisable to check the brand and model of the home router you are trying to connect to the Wi Fi adapter some router brands may have closed communication ports In this case contact the...

Page 35: ... from the inverter to the server In order to monitor the inverter the RS485 communication address must be set to 01 directly from the display Installation tools Cross screwdriver Ethernet adapter Shielded network Cat 5 or Cat 6 crimped with RJ45 connectors 1 Switch off the inverter following the procedure described in this manual 2 Remove the cover for accessing the Wi Fi Eth connector on the bott...

Page 36: ...e port on the inside of the adapter and tighten the ring nut and cable gland to ensure a stable connection Figure 47 Inserting the network cable inside the device 4 Connect the Ethernet adapter to the appropriate port making sure to follow the direction of the connection and ensure correct contact between the two parts a b Figure 48 Inserting and securing the ethernet adapter ...

Page 37: ...owing the procedure described in the manual 7 Unlike Wi Fi cards the Ethernet adapter does not need to be configured and starts transmitting data shortly after the inverter is switched on 3 2 Verification Wait two minutes after installing the adapter and check the status of the LEDs on the device Status of LEDs present on the adapter 1 Initial status NET left LED off COM central LED steady on SER ...

Page 38: ... LED steady on COM central LED steady on SER right LED flashing on Figure 51 Final status of LEDs 3 3 Troubleshooting Status of LEDs present on the adapter 1 Irregular communication with inverter NET left LED steady on COM central LED off SER right LED flashing on ...

Page 39: ...e other than 00 If the value is not 01 go to Settings basic settings for hybrid inverters and enter the Modbus Address menu where the 01 value can be set Check that the Ethernet adapter is correctly and securely connected to the inverter making sure to tighten the two cross head screws provided Check that the network cable is correctly inserted into the device and modem and that the RJ45 connector...

Page 40: ...ss the Internet Check that port 80 of the router is open and enabled to send data It is advisable to check the brand and model of the home router you are trying to connect to the Ethernet adapter some router brands may have closed communication ports In this case contact the customer service of the router s manufacturer and ask them to open port 80 direct from the network to external users ...

Page 41: ...ation must be carried out for all inverters compatible with the adapter However the procedure is quicker and easier as there is no need to open the front cover of the inverter Installation tools Cross screwdriver 4G adapter 1 Switch off the inverter following the procedure described in this manual 2 Remove the cover for accessing the Wi Fi GPRS connector on the bottom of the inverter by unscrewing...

Page 42: ...he two parts Secure the 4G adapter by tightening the two screws inside the package a b Figure 55 Inserting and securing the 4G adapter 4 Switch on the inverter by following the procedure described in the manual 5 Unlike Wi Fi cards the 4G adapter does not need to be configured and starts transmitting data shortly after the inverter is switched on ...

Page 43: ... LED off COM central LED flashing on SER right LED flashing on Figure 56 Initial status of LEDs 2 Registration NET left LED flashes rapidly for about 50 seconds the registration process takes about 30 seconds COM central LED flashes rapidly 3 times after 50 seconds 3 Final status approx 150 seconds after the inverter has started NET left LED flashing on off and on at equal intervals COM central LE...

Page 44: ...er the main menu with the ESC key first key on the left go to System Info and press ENTER to enter the submenu Scroll down to the Modbus address parameter and make sure it is set to 01 and in any case other than 00 If the value is not 01 go to Settings basic settings for hybrid inverters and enter the Modbus Address menu where the 01 value can be set Check that the 4G adapter is correctly and secu...

Page 45: ...nstallation location the adapter uses the Vodafone network for 4G transmission if this network is not present or the signal is weak the SIM will use a different network or will limit the data transmission speed Ensure that the installation location is suitable for 4G signal transmission and that there are no obstacles that could affect data transmission Check the status of the 4G adapter and that ...

Reviews: