background image

23


DOC-USR-0080-01 


____________________________________________________________________________________


Z3 Technology, LLC 

 100 N. 8th St. STE 250 

 Lincoln, NE 68508-1369 USA 

 +1.402.323.0702 

(8)


Click “Start Encoder” to start the RTMP stream. 

 
Now you are ready to view the content in Wowza. 
(9)


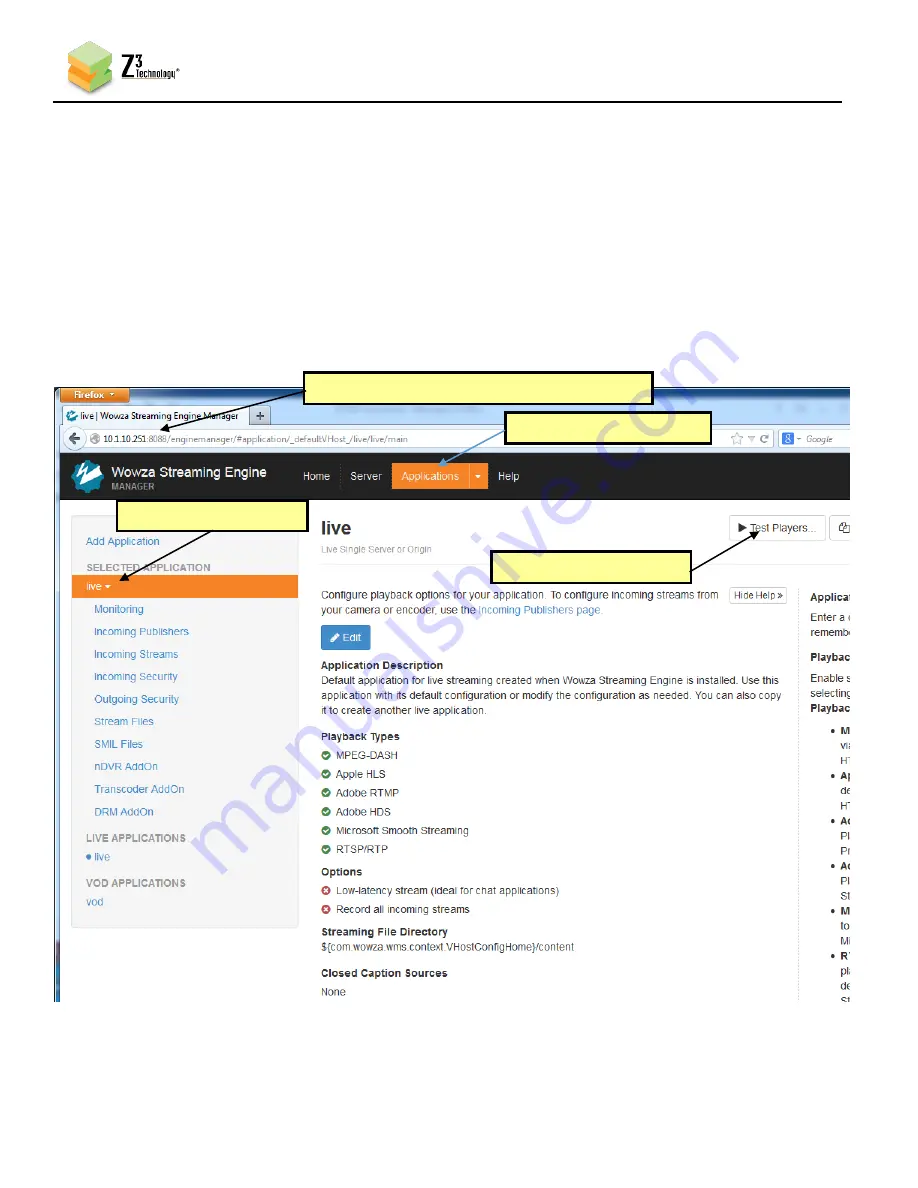
Go to a PC that is on the same network as the Wowza server and open a web browser (in this 

example, FireFox is used). Type in the URL of the Wowza server with the port 8088 (in this 
example, “10.1.10.251:8088”). This will bring up the Wowza home page. Log in with your user 
name and password. 

(10)


At the top you will see four options:  Home, Server, Applications, and Help.  Click on “Applications” 

and select “live”. Click the “Test Players” button in the top right hand corner. 


(1) Use IP address of Wowza  “:8088” 

(2) Select “Applications” 

(3) Select “live” 

(4) Select “Test Players” 

Figure 23  Getting to the Wowza Test Player 

Summary of Contents for Z3-MVE-10

Page 1: ...l rights reserved This document contains proprietary and confidential information of Z3 Technology LLC Z3 This document may not be used reproduced disclosed or disseminated to anyone without the prior written approval of an authorized representative of Z3 Z3 Technology LLC incorporates HDMI technology The terms of HDMI and HDMI High Definition Multimedia Interface and the HDMI Logo are trademarks ...

Page 2: ...Revision History Version Date Change Note Author 1 00 00 09 02 15 Original release KA ...

Page 3: ...owering up the Z3 MVE 10 9 6 3 Finding the Z3 MVE 10 on the Network using ZFinder 10 6 4 Opening a VLC Client to Receive the Encoded Stream 14 6 5 Streaming RTP 15 6 6 Using DHCP 17 6 7 Dynamically Changing Bitrate Frame Rate 19 6 8 Tuning for Latency 20 6 9 Streaming RTMP 21 6 10 Encoding Closed Caption Data 25 7 0 RUNNING DECODE ON THE Z3 MVE 10 27 8 0 PERFORMING OTHER OPERATIONS WITH THE Z3 MVE...

Page 4: ...e DHCP 17 Figure 18 New IP Address in ZFinder 18 Figure 19 Web GUI using New IP Address 18 Figure 20 Changing Bitrate on the Fly 19 Figure 21 Tuning for Various Use Cases 20 Figure 22 Settings to Stream RTMP to Wowza 22 Figure 23 Getting to the Wowza Test Player 23 Figure 24 Viewing Z3 MVE 10 Content in Wowza 24 Figure 25 Connections for Closed Caption Extraction 25 Figure 26 Sample Encoder Settin...

Page 5: ...features multiple I O interfaces including HD SDI HDMI composite component ASI and Ethernet Multiple interfaces allow customers to quickly integrate full H 264 1080p performance in their network without the power consumption and physical space required of a PC based platform 2 0 QUICK START GUIDE 2 1 If you have Received a System from Z3 with the Software Preloaded To start working with the encode...

Page 6: ...___________ Z3 Technology LLC 100 N 8th St STE 250 Lincoln NE 68508 1369 USA 1 402 323 0702 Figure 1 Parts Included with the Z3 MVE 10 3 0 INCLUDED PARTS LIST Z3 MVE 10 AC Power Supply 3x BNC to BNC Cable 1x DB9 Serial Cable 1x RCA to RCA Cable Ear Rack Brackets x 2 4 mm L x 3 mm D Screws x 6 ...

Page 7: ...caption data from composite input or SDI input SD Card interface for local storage and firmware updates Web based configuration software for user friendly configuration and control RS 232 serial port for configuration and control Operating 0 to 40 degrees C at 20 80 relative humidity non condensing Storage 40 to 70 degrees C at 20 80 relative humidity non condensing Measurements 1RU 430 x 194 x 44...

Page 8: ...TING CONTROLS FRONT VIEW REAR VIEW 1 3 2 4 5 2 Status LED 1 3 Status LED 2 4 USB 5 SD Card 1 Power Switch 6 7 8 9 10 11 12 13 14 15 16 17 18 6 Analog Audio In L 7 Analog Audio In R 8 Composite In 9 Component In Y 10 ASI SDI Out 11 Component In Pb 12 ASI SDI In 13 Component In Pr 14 HDMI In 15 Serial 16 VGA In 17 Ethernet 18 Power In Figure 2 Z3 MVE 10 Front View Figure 3 Z3 MVE 10 Rear View ...

Page 9: ...ower on the HD Source Connect an HDMI cable from the HD Source to a monitor Set the HD Source to 1080p30 or 1080i output Select and begin playback of the content If you see playback on the monitor you ve confirmed the source works 2 Move the HDMI cable from the monitor to the Z3 MVE 10 HDMI In port 6 2 Connecting and Powering up the Z3 MVE 10 3 Connect an Ethernet cable to Ethernet on the Z3 MVE 1...

Page 10: ...uct on your network If you have not downloaded this to your computer you can find it on the flash drive provided with your system 7 Verify your Windows PC is connected to the same network the Z3 MVE 10 is connected to 8 Run the ZFinder PC Utility on your Windows PC The ZFinder window appears ZFinder then completes a scan of the network and lists the location of all Z3 systems connected to the netw...

Page 11: ...Open Device and Flash LEDs boxes to activate 10 By clicking Edit Device you can change the Name IP Address Netmask and Gateway address of the Z3 MVE 10 You can also flash the LEDs on the Z3 MVE 10 by clicking Flash LEDs this is useful if there are multiple Z3 MVE 10 s connected Click on Open Device An internet browser window is opened default browser used is Firefox and the Web GUI appears Figure ...

Page 12: ... to modify the settings for your encoding preferences Change Video Source to HDMI confirm Output Interface is Ethernet VBR change Output Format to MPEG 2 TS change Dest IP Address to 225 1 2 3 and change Dest Port to 8888 3 Change Output Format to MPEG 2 TS 4 Set Dest IP Address to 225 1 2 3 2 Confirm Output Interface is set to Ethernet VBR 1 Change Video Source to HDMI 5 Set Dest Port to 8888 Fig...

Page 13: ...ay have already started If it has click on Stop Encoder The status should then change to Stopped Then click on Start Encoder Once you do this the status will change If the encoder hadn t started already simply click on Start Encoder and observe the status change 2 Status changes to Stopped 3 Click Start Encoder 1 If necessary click Stop Encoder Figure 10 Z3 MVE 10 Web Menu Start Stop Status Sectio...

Page 14: ... 0702 6 4 Opening a VLC Client to Receive the Encoded Stream 13 Run VLC on your PC version used in testing at Z3 3 0 0 We recommend using Version 1 1 or higher 14 Select Media Open Network Stream In the box type udp 225 1 2 3 8888 15 Press Enter 16 You should now see video streaming from VLC Figure 11 VLC Open Network Screen Figure 12 Example of Z3 Video Streaming to VLC UDP TS ...

Page 15: ...lete the following steps 17 Click on Stop Encoder to stop the current encoding session 18 Verify Output Interface is Ethernet VBR 19 Change Output Format from MPEG 2 TS to RTP Note Be sure not to select MPEG 2 TS over RTP 20 Confirm that Dest Port is 8888 This will be important for the VLC configuration 21 Click on Start Encoder to start the RTP encoding session Once you finish your settings shoul...

Page 16: ...Media box type rtsp 192 168 0 65 name mp4 where 192 168 0 65 is the IP address of the Z3 MVE 10 and name is z3 1 for unicast streaming and z3 1m for multicast streaming For example for the settings in Figure 13 since 225 1 2 3 is a multicast address the value would be rtsp 192 168 0 65 z3 1m mp4 24 Click Play You should then see RTP video streaming on VLC Figure 15 Example of Z3 Video Streaming to...

Page 17: ...k box in the Web GUI Once it is checked you will see that the values of the Local IP Address Local Netmask and Default Gateway will no longer be editable 26 Click on Save User Wait for the Saved All to User message to appear 27 Power off the Z3 MVE 10 28 Power back on the Z3 MVE 10 Wait approximately one minute for the ready LED to turn on 1 Check use DHCP 2 Values no longer editable Figure 16 Usi...

Page 18: ...k Refresh on ZFinder The Z3 MVE 10 should appear with a new IP address based on what it received through DHCP 30 As you did previously select the Z3 MVE 10 row and then click Open Device A browser will then appear with the GUI this time using the new IP address 1 Click Refresh 2 New IP Address appears Figure 18 New IP Address in ZFinder New IP Address Figure 19 Web GUI using New IP Address ...

Page 19: ...o change two parameters in the middle of an encoding session 1 Video Bitrate 2 Frame Decimation To change these simply enter the new desired value and then click the Start Encoder button The web page will respond with the following message Status Changed rate The video stream will then continue interrupted with the new parameter 3 Changed rate appears in Status area 1 Change bitrate 2 Click Start ...

Page 20: ...cordingly To minimize latency this value should be set to the lowest possible value The lowest value Z3 recommends is 150 Figure 21 shows the suggested values for Video Burst Size for three common use cases Video Burst Size Case 1 Highest Quality Highest Latency 2000 Case 2 Good Quality Standard Latency 1000 Case 3 Normal Quality Lowest Latency 150 Figure 21 Tuning for Various Use Cases RTP offers...

Page 21: ...onnect the Z3 MVE 10 for encode and bring up the Web GUI 2 If using Wowza install the Wowza server on a PC on your network for details on configuring Wowza please see APPENDIX A Configuring the Wowza Server for RTMP 3 In the Encoder Web GUI set Output Interface to Ethernet VBR 4 Set Output Format to RTMP This will cause Dest IP Address and Dest Path to appear 5 In Dest IP Address type the IP addre...

Page 22: ... Technology LLC 100 N 8th St STE 250 Lincoln NE 68508 1369 USA 1 402 323 0702 After finishing steps 1 7 the GUI should look like the following 1 Set to Ethernet VBR 2 Set to RTMP 3 Set to IP Address of Wowza Server 4 Set to live 1080 5 Set to 1080i or Follow input Figure 22 Settings to Stream RTMP to Wowza ...

Page 23: ...rver and open a web browser in this example FireFox is used Type in the URL of the Wowza server with the port 8088 in this example 10 1 10 251 8088 This will bring up the Wowza home page Log in with your user name and password 10 At the top you will see four options Home Server Applications and Help Click on Applications and select live Click the Test Players button in the top right hand corner 1 ...

Page 24: ... You should see the Test Players popup screen Select the Adobe RTMP tab change the Stream name to 1080 should match the directory you are streaming to in the Z3 MVE 10 and click Start You should then see the content streamed from the Z3 MVE 10 1 Select Adobe RTMP tab 2 Type 1080 for Stream name 3 Click Start 4 Audio and Video start to appear Figure 24 Viewing Z3 MVE 10 Content in Wowza ...

Page 25: ...atically occurs any time composite input with closed caption data included is used To utilize this feature complete the following 1 Connect a composite input with closed caption data to the composite connector note A BNC to RCA adapter may be necessary Also connect the audio if available 2 Configure the Encoder to use composite input 1 Connect composite with CC data 2 Connect analog audio Figure 2...

Page 26: ...n VLC select Subtitle Sub Track Closed Caption 1 This configures VLC to use the extracted closed caption data that the encoder has extracted and encoded You should then see the subtitles on the screen 5 Extraction of closed caption through SDI input is also possible In that case SDI In of the Z3 MVE 10 is used The procedure for seeing the closed caption data through VLC is the same as shown above ...

Page 27: ...ct the Ethernet to a hub or router connected to the control PC and the streaming source 3 Connect the power to the Z3 MVE 10 4 Power on the Decoder Z3 MVE 10 7 12 Set up the Decoder to Work with the Encoder 5 If you are using another Z3 MVE 10 as the encoding source you need to make sure that the encoding Z3 MVE 10 and decoding Z3 MVE 10 have different IP addresses If you are using DHCP this will ...

Page 28: ... 402 323 0702 7 13 Configure the Encoder 6 Return to the Encoder system change the settings to match those in the figure below Here a multicast address is used You can also stream unicast to the IP address of the Decoder system Using multicast allows you to also open VLC and view the stream from there Figure 29 Z3 MVE 10 Example Encoder Settings for End to End Streaming ...

Page 29: ...Configure the Decoder 7 Navigate to the Decoder system controls The first step is to switch to Decoder mode This can be done by changing Operating Mode in the lower right corner 8 Once you do this the description at the top right will change from Z3 MVE 10 Encoder to Z3 MVE 10 Decoder Figure 30 Z3 MVE 10 Operating Mode Selector Select Decoder Figure 31 Z3 MVE 10 Decoder Configuration Menu ...

Page 30: ...I 12 Click the MVE Flag if a DME 01 MVE 02 MVE 10 MVE 20 or an MVPR 01 is being used as the Encoder you can click this button to allow for a faster decode Your settings should match the following 13 Click Start Decoder 14 If you have not done so already return to the Encoder system and click Start 15 After a few seconds you should see video on the monitor 16 You can also view the content using VLC...

Page 31: ... would like to preserve you can save it so that when the Z3 MVE 10 is powered off and turned back on it automatically uses those settings This can be done with the following steps 1 Once you make a change you want to save click on Save User at the bottom of the configuration menu This option is available in both encode and decode modes When you reboot the Z3 MVE 10 encode will automatically start ...

Page 32: ... screen On this screen click on Browse 4 Select the name of the img file to update with an click Open Note If using a MFR img to update from version A to version B as an example you will need to follow steps to set up the IP MAC address again as it resets it to factory defaults Please contact Z3 Technology for documentation on how to update In general it is recommended that the UPD img file be use...

Page 33: ...n to write to Note This will cause wherever you specify to be overwritten There is no recovery once you hit Write Device 6 When ZWriter is finished eject the SD Card from your computer 7 Place the SD Card in the socket on the Z3 MVE 10 8 Power on the system The update may take several minutes It is possible to view the update occurring via an optional serial interface for details on this please co...

Page 34: ...on window will appear after the password is successfully registered Type admin for the User Name and the password you have just entered and click Ok 4 Exit the browser and restart it or create another browser window In the new browser enter the IP address of the Z3 MVE 10 When you do so the same authentication window that appeared in step 3 will appear Enter admin and the password as you did previ...

Page 35: ...eckbox Yes No Yes Use DHCP to get IP address at boot up see Using DHCP on page 17 Load Factory Default Settings Button Load settings installed at the factory Load User Settings Load user settings previously saved Save User Settings Save current settings for later use 9 2 Encoder Options Parameter Options default in bold Notes Video Source SDI HDMI Component Composite VGA The input source for encod...

Page 36: ...g exceeded Video Bitrate 0 16Mbps 8Mbps The bitrate to use for video Video Delay 0 1000 Can be used to tweak A V sync while encoding For example if video appears to be 100ms ahead this value can be set to 100 so that audio and video are more in sync Audio Delay 0 1000 Can be used to tweak A V sync while encoding For example if audio appears to be 100ms ahead this value can be set to 100 so that au...

Page 37: ...er MPEG 2 TS RTP sends a stream encapsulated with MPEG 2 TS within an RTP transport stream See Streaming RTMP for details on using RTMP Dest Address x y z w 225 1 2 3 The IP address that the encoder is streaming to Dest Port 0 9999 8888 The port that the encoder is streaming to TS Bit Rate 0 20Mbps 12Mbps Only appears for MPEG 2 TS and MPEG 2 TS RTP Output Formats The overall bit rate for the gene...

Page 38: ...S IP Port x y z w pppp 225 1 2 3 8888 The IP address and port being streamed to Video Codec H 264 The video format being used in the incoming stream Only H 264 is supported in this release Audio Codec AAC MPEG PCM None The audio codec being used in the incoming stream MPEG decodes MP1L2 and MP3 Available options depend on what was licensed MVE Flag Yes No Set this flag if the streaming source is a...

Page 39: ... complete the following steps 1 Log in to the Wowza Streaming Engine Manager Home page by typing http localhost 8088 where localhost is the IP address of the server in this User s Guide 10 1 10 251 2 Click on Server in the top band of options In the left column click on Performance Tuning and then Java Settings Click Edit and then change Java Heap Size to Production Level and Java Garbage Collecti...

Page 40: ...323 0702 3 Click on Applications in the top band of options In the left column click on live and then Incoming Security Click Edit and then make sure RTMP Publishing and RTSP Publishing are both set to Open and Client Restrictions are set to No client restrictions Then click Save The Wowza server is now configured to work with the Z3 MVE 10 Figure 40 Wowza Security Settings ...

Page 41: ...tions to install your Ear Rack Mounts on your Z3 MVE 10 1 Place the Z3 MVE 10 face up on a dry flat surface 2 Place one of the ear rack brackets on the left and one on the right of the Z3 MVE 10 so that the holes on the unit align with the brackets The brackets are identical so it does not matter which bracket goes on which side 3 Using the 4 mm L x 3 mm D screws provided secure each bracket with ...

Page 42: ... 10 from the PC Try pinging the PC from the Z3 MVE 10 serial interface required for this see APPENDIX A C Are all firewalls on the network turned off Try connecting the PC directly to the board without any routers etc Problem Do not see video in VLC UDP Does the IP address set in Dest Address equal the IP address of the PC running VLC Does the port number in Dest Port equal the value entered in th...

Reviews: