background image

DESCRIPTION OF CONTROLS 

INSTALLATION OF BATTERIES

Slide and remove the battery cover 

(

2

)

.

Pull out the battery container 

(

1

using the attached strap.

Slide batteries (or rechargeable batteries) into the battery container. Pay attention to «+» (positive) and «-» 
(negative) symbols marked on the walls of the container. 
Insert the battery container back into the battery compartment. Make sure the battery container is re-inserted 
properly, particularly watching for the orientation of the battery container contacts.
Slide back the battery cover to its original position.

Attention! Do not use batteries of different types or batteries with various charge level because this may 
significantly decrease operating time. 

EXTERNAL POWER SUPPLY

The unit can operate on an external battery such as Power Bank (5V) or a computer (laptop). 
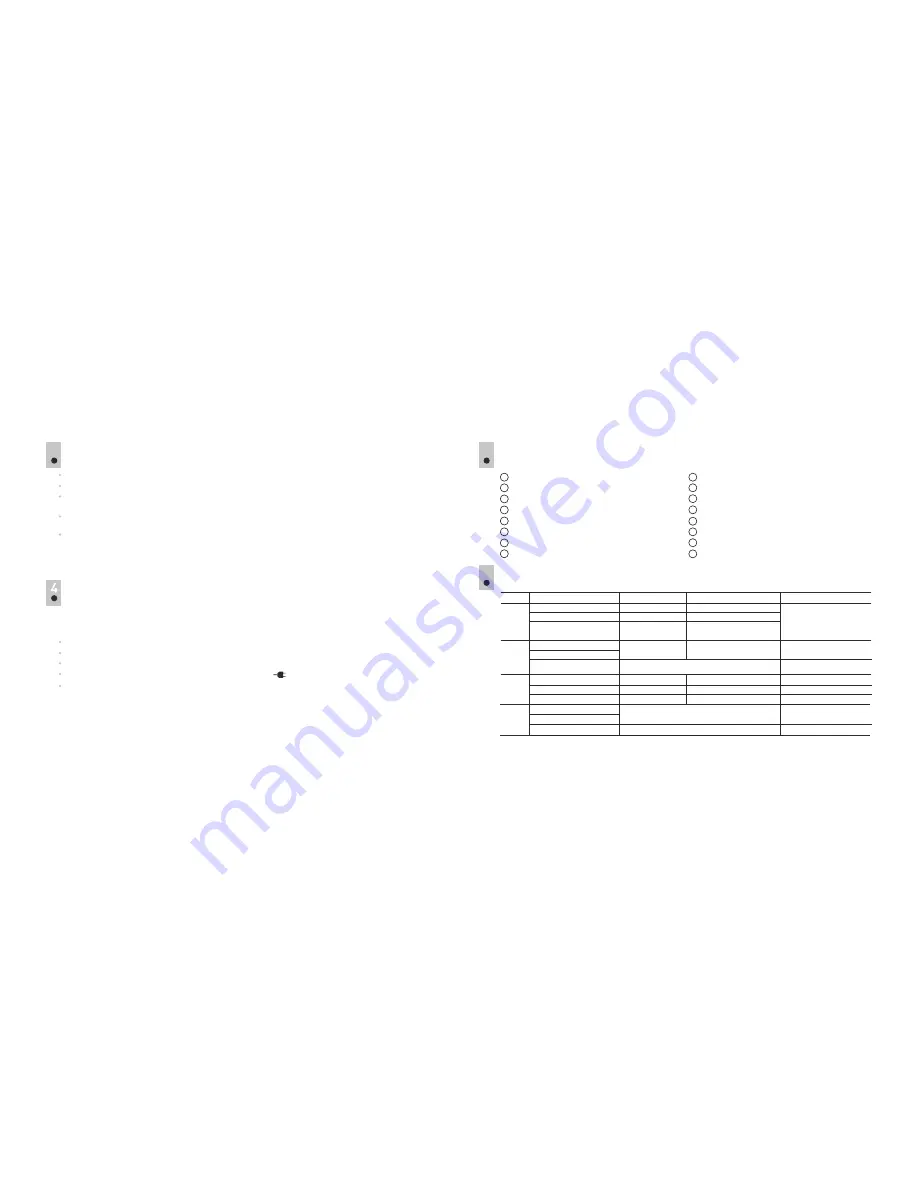
Button 

O

N

ZOOM

REC

Operating mode

The unit is off


The unit is in


 mode

Video / Photo

Video

Photo

st

1  short press

Turns the unit on

Turns the Wi-Fi on

nd

2  short press

Turns the Wi-Fi on

Turns the Wi-Fi off

Long press

Turns the display on/off 

(hold longer than 1 sec)

Turns the unit off  

(hold longer than 3 sec) 

Digital zoom activation 


Switch between files – leftwards navigation 
Return to the beginning of file under review 

Switch to 

Photo

 Mode

The unit is in Review mode

File deletion prompt

See description of Review Mode

Review

Enter the menu

Video

Photo

Review

Start


video


recording

Stop


video


recording

Image capture

Switch to 

Review

 Mode

Recorded


video


review


Pause video review

Switch to 

Video

 Mode

IR

Turns the IR Illuminator off 

Video

Photo

Review

Switch between IR Illuminator modes

Switch between files - rightwards navigation


3

Connect the plug of the USB cable 

(5)

 to the unit’s USB port 

(4)

.

Connect the other plug of the USB cable to a Power bank or a computer.
Upon connection of an external power supply the unit stops operating on batteries.
Operation on external power supply is shown with an icon 
More about powering from Power


Bank


and computer in section 14.

EXTERNAL VIEW AND CONTROLS

5

5

6

7

8

1

2

3

4

Battery container
Battery container cover
Short range IR Illuminator
Micro USB port  
Micro USB cable 
Eyepiece diopter adjustment ring
Display brightness adjustment wheel 
Objective lens

9

10

11

12

13

14

15

16

Radiator
Long range IR Illuminator
Objective lens and IR covers
Button REC 
Button

 IR


Button ZOOM 
Button ON
LED


Indicator

6

4

3

Image capture

Summary of Contents for Ranger RT 6.5x42

Page 1: ......

Page 2: ......

Page 3: ...e digital RANGER RT 6 5x42 6 5x42S 23 46 Monocolo digitale di visibilita notturna RANGER RT 6 5x42 6 5x42S 95 118 RANGER RT 6 5x42 6 5x42S 119 142 ITALIANO Digitales Nachtsichtger t RANGER RT 6 5x42 6...

Page 4: ...t in IR LED Illuminator long range short range Wavelength nm Wi Fi channel Frequency Standard Line of sight reception range m Actual capacity may differ PACKAGE CONTENTS FEATURES Ranger RT 6 5x42 6 5x...

Page 5: ...off hold longer than 3 sec Digital zoom activation Switch between files leftwards navigation Return to the beginning of file under review Switch to Photo Mode The unit is in Review mode File deletion...

Page 6: ...bject by rotating the objective lens 8 Adjust the image brightness by turning the adjustment wheel The brightness level and brightness icon 7 are shown in the right corner of the display The adjustmen...

Page 7: ...nt time 01 42 IR Illuminator and brightness In VIDEO mode the display shows the following information IR Illuminator power level shown by the corresponding icon If the IR Illuminator is off the icon i...

Page 8: ...elf the display shows the following information File type icon photo or video Video clip length shown as mm ss File counter shown as x y common for photo and video files x number of running file y tot...

Page 9: ...08 05 File navigation Leftwards brief press of the ZOOM 14 button Rightwards brief press of the IR 13 button Delete current file 480p YES NO 22 18 2016 08 05 Enter menu ZOOM control IR Illuminator con...

Page 10: ...access only to the video stream from the device Wi Fi Setup This menu item allows you to set a password for the access point This password is used to connect an external device such as a smartphone fo...

Page 11: ...display Icon is shown when sound is deactivated The sound record icon is shown on the display in the VIDEO and PHOTO modes The set value is saved When the unit is next switched on the display shows t...

Page 12: ...f video was recording before activating the DISPLAYOFF function The Wi Fi function keeps running The DISPLAYOFF function deactivates when The ON 15 button is briefly pressed The unit is connected to a...

Page 13: ...The unit will not be detected by the PC until it is switched on brief press of the ON button TRIPOD MOUNT 15 The standard tripod mount in the lower part of the monocular is designed to install the uni...

Page 14: ...bstacles between the unit and the signal receiver concrete walls for example Place the unit in line of sight of the Wi Fi signal Check Corrective action Problem Poor image quality Check that the eyepi...

Page 15: ...e Longuer d onde nm Wi Fi Fr quence Standard Port e de r ception dans la zone de visibilit directe m La capacit r elle peuvent diff rer 2 LOT DE LIVRAISON Monoculaire num rique Ranger RT 6 5x42 6 5x4...

Page 16: ...consulter la section 14 ALIMENTATION EXTERNE L appareil est aliment par une batterie externe de type Power Bank 5V ou partir de un ordinateur 5 5 6 7 8 1 2 3 4 Compartiment piles Couvercle du comparti...

Page 17: ...heur et le dispositif s arr tera Parvenez obtenir la nettet des ic nes sur l cran par rotation de l oculaire 6 Pointez le dispositif sur un objet loign d une distance de 20 30 m Parvenez obtenir la ne...

Page 18: ...re d enregistrement vid o sur l afficheur L ic ne REC s affiche la place de l ic ne VIDEO L indication de minutage d enregistrement s affiche la place de la date et de l heure en cours 13x 04 23pm Mod...

Page 19: ...l afficheur en mode PHOTO Illuminateur IR Luminosit Grossissement total Wi Fi Attention en mode PHOTO l enregistrement sonore n est pas possible L ic ne du type de fichier photo ou vid o La dur e de v...

Page 20: ...rebours de la dur e de vid o Mode REVIEW VIDEO Compteur de fichiers La fl che de saut vers la gauche La fl che de saut vers la droite Date et heure de l enregistrement R solution du fichier en cours...

Page 21: ...tream Vision a l acc s uniquement aux flux vid o partir de l appareil Si illuminateur est en service lors de l entr e dans le mode REVIEW il s arr te Alors la valeur de niveau de puissance de l illumi...

Page 22: ...on REC 12 IR 13 s lectionnez le format de temps voulu 24 AM PM Pour passez au setting de valeur de l heure fa tes un appui instantan sur le bouton ZOOM Avec les boutons de navigation s lectionnez la v...

Page 23: ...d amplification de dispositif ZOOM 14 La valeur d amplification totale est affich e elle repr sente la somme d amplification optique et num rique 11 Yes enclencher l enregistrement sonore de dispositi...

Page 24: ...tes les fonctions sont accessibles Si la fonction DISPLAYOFF est activ e Tous les organes de commande sauf le bouton ON ne sont pas actifs L enregistrement vid o se poursuit si l enregistrement tait e...

Page 25: ...ides agressifs et vitez de l utiliser dans des conditions pouvant causer son endommagement L appareil n est pas r sistante l eau ENTRETIEN ET STOCKAGE Le corps de l appareil peut tre nettoy avec un ti...

Page 26: ...isibilit directe de fonctionnement de signal Wi Fi Cause probable Rem de D faut Une mauvaise qualit de l image Verifiez l ajustage de l oculaire et de l objectif conformement a la NOTICE D UTILISATION...

Page 27: ...enl nge nm Wi Fi Kanal Frequenz Standard Aufnahmereichweite bei der Sichtverbindung Die tats chliche Kapazit t kann abweichen DEUTSCH 2 LIEFERUMFANG Digitales Monokular Ranger RT 6 5x42 6 5x42S Micro...

Page 28: ...5 V oder einem Computer Laptop gespeist werden Schlie en Sie den Stecker des USB Kabels 5 an den USB Port 4 des Monokulars Schlie en Sie den anderen Stecker des USB Kabels an eine Power bank oder eine...

Page 29: ...r entferntes Objekt richten Drehen Sie das Objektiv 8 bis Sie ein scharfes Bild des Objektes erhalten Drehen Sie den Einstellring 7 um die Bildhelligkeit einzustellen Das Piktogramm Helligkeit und der...

Page 30: ...nzeige der Videoaufnahme auf dem Display Anstelle des VIDEO Piktogramms wird das REC Piktogramm angezeigt Anstelle der aktuellen Zeit wird der Videoaufnahmetimer angezeigt W hrend der Videoaufnahme we...

Page 31: ...deodateien Nummer der aktuellen Datei Gesamtzahl der Dateien Pfeile zum Bl ttern nach links nach rechts Aufl sung der aktuellen angezeigten Datei Anzeigen PLAY und PAUSE f r Videodateien Anzeige Datei...

Page 32: ...anstelle der PAUSE Anzeige Die n chste kurze Bet tigung der Taste REC 12 erm glicht die Wiedergabe der Datei von der Stelle an der die Videowiedergabe unterbrochen wurde Zur ck zumAnfang der Wiederga...

Page 33: ...rlassen unm glich Die Wi Fi Funktion wird mit dem Piktogramm im Display des Ger tes wiedergegeben Das Wi Fi Piktogramm leuchtet Wi Fi ist aktiv Das Wi Fi Piktogramm blinkt Verbindung ist bereit Wi Fi...

Page 34: ...gew nschte Uhrzeitformat 24 AM PM Um zur Einstellung der Stunde zu bergehen bet tigen Sie kurz dieTaste ZOOM Mit den Navigationstasten w hlen Sie den Stundenwert REC Wert erh hen IR Wert verringern 3...

Page 35: ...chsten Einschaltung des Ger tes betr gt der Wert der vollen Vergr erung 6 5x EINGEBAUTER IR STRAHLER Das Ger t ist mit zwei IR Strahler ausgestattet der IR Strahler f r nahe Distanzen schaltet sich au...

Page 36: ...haltung der Funktion DISPLAYOFF erfolgt ANSCHLUSS VON USB 14 Man kann das Ger t an einen Computer ber die USB Buchse 4 anschlie en Dabei wird das Ger t vom Computer automatisch erkannt Treiberinstalla...

Page 37: ...etreiben solcher Betriebsmodus wird dem Ger t keinen Schaden bringen Wenn das Ger t bei der K lte betrieben und danach in einen warmen Raum gebracht wurde soll es aus der Aufbewahrungstasche im Laufe...

Page 38: ...Bei Anwendung am Tag schlie en Sie das Objektiv mit dem Schutzdeckel Reinigen Sie die Linsen mit einem in Spiritus angefeuchteten Tuch Die Signal bertragung ber WLAN fehlt oder wird unterbrochen Das G...

Page 39: ...aci n externa Tiempo m ximo de funcionamiento con conjunto de bater as con t 22 C solamente dispositivo encendido IR encendido Wi Fi activado horas Tama o del encofrado de la rosca para el tr pode Tem...

Page 40: ...distancia corta Puerto micro USB Cable micro USB Rueda de ajuste di ptrico del ocular Rueda de ajuste de la luminosidad de la pantalla Objetivo Los monoculares digitales de visi n nocturna Ranger RT s...

Page 41: ...ectar el dispositivo presione y mantenga presionado el bot n ON por m s de tres segundos En la pantalla aparecer un mensaje Switch off recuento de tiempo desde 3 hasta 1 segundos y el dispositivoo se...

Page 42: ...e representa con ayuda del pictograma La indicaci n de la conexi n de la funci n Grabaci n del sonido se representa en la pantalla en forma del pictograma La indicaci n del aumento total se representa...

Page 43: ...archivo grabado Indicaci n del modo en la pantalla Adem s de la imagen en la pantalla se muestra la informaci n siguiente El pictograma del tipo de archivo foto o video La duraci n del video se repre...

Page 44: ...inversa de la duraci n del video 22 18 2016 08 05 Modo REVIEW VIDEO Flecha de navegaci n a la izquierda Flecha de navegaci n a la derecha Resoluci n de video Borrar el archivo corriente Fecha y ora de...

Page 45: ...n el submen con la salida simult nea al men principal una presi n prolongada salida desde el submen sin la confirmaci n de la elecci n en ciertos casos con la confirmaci n que ha sido acordada por sep...

Page 46: ...a presionado el bot n ZOOM por m s de un segundo Ajuste de la hora Entre al submen por medio de una presi n breve del bot n ZOOM 7 La fecha se muestra como formato hora minuto ej 24 06 51 Con los boto...

Page 47: ...ORPORADO IR El monocular dispone de dos infrarrojos IR el infrarrojo IR de distancia corta se enciende autom ticamente al encender el dispositivo El infrarrojo IR de distancia larga 10 se activa manua...

Page 48: ...l dispositivo no es necesaria la instalaci n de un driver conductor USB Mass storage device Al elegir la presente opci n el dispositivo es reconocido por el ordenador como tarjeta flash El dispositivo...

Page 49: ...dos de funcionamiento del dispositivo Opci n de conexi n Modo de funcionamiento Estado del dispositivo USB Video Photo 15 16 17 18 Ud puede sin peligro emplear el dispositivo tambi n de d a tal modo e...

Page 50: ...rese de que el contacto central de la fuente de alimentaci n externa est intacto Verifique la integridad del cable USB Cargue la fuente de alimentaci n si es necesario Coloque las bater as en corresp...

Page 51: ...ODELLO SKU Caratteristiche ottiche Ingrandimento Zoom digitale Obiettivo La distanza mass di osservazione per animale alto 1 7 m IR inc attivo m Angolo del campo visivo 6 5x grado m per 100m Distanza...

Page 52: ...ed orientamento notturno Sorveglianza sul funzionamento dell attrezzatura tecnologica 3 5 6 ELEMENTI DI COMMANDO 5 6 7 8 1 2 3 4 Vano batterie Coperchietto del vano batterie Illuminatore IR a breve di...

Page 53: ...pulsante ON 15 attivate l apparecchio apparir l indicatore 16 di colore verde Sul display si vede anche il pittogramma della batteria L illuminatore IR a breve distanza 3 passa automaticamente IR Disa...

Page 54: ...tempo reale si visualizza il timer della registrazione del video 13x 04 23pm Regime VIDEO SUONO ZOOM Ora 01 42 Per atttivare registrazione video premete brevemente il pulsante REC 12 L indicatore LED...

Page 55: ...e Le frecce per sfogliare a sinistra a destra La risoluzione del file corrente quello che viene visualizzato Gli indicatori PLAY e PAUSE per i file video L indicatore di eliminazione del file La data...

Page 56: ...to con l attivazione del regime REVIEW si disattiva Il valore del livello della capacit dell illuminatore IR viene salvato Con la disattivazione del regime REVIEW l illuminatore IR sar attivato con il...

Page 57: ...IR 13 diminuzione del valore Per lo spostamento premete brevemente il pulsante ZOOM Per salvare la password e uscire dal menu secondario premete e tenete premuto il pulsante ZOOM pi di un secondo i Qu...

Page 58: ...te ZOOM Con l aiuto dei pulsanti di navigazione scegliete il valore per minuti il pulsante REC aumento del valore il pulsante IR diminuzione del valore Per salvare l impostazione di ora e uscire dal m...

Page 59: ...za d onda di 850nm Il controllo dell illuminatore IR possibile nei regimi Video e Photo Per attivare premete brevemente il pulsante IR 13 L indicazione del livello di capacit dell illuminatore IR Quan...

Page 60: ...to del pittogramma della batteria apparir il pittogramma dell alimentazione esterna L apparecchio continua a fuzionare tutte le funzioni sono accessibili Per il passaggio ciclico tra i varianti di con...

Page 61: ...conessione Power PRECAUZIONI DELL USO 16 Potete usare l apparecchio senza timore anche durante il giorno tale regime previsto e non porter nessun danno al prodotto Se l aparecchio stato usato al fredd...

Page 62: ...le uso Seguire le istruzioni per impostare lo strumento Pulire la lente con la stofa impregnata di alcohol Assicurarsi che la lente non ha la condensa ne contaminata Mettere il coperchio della lente d...

Page 63: ...0x116x76 6 7x3 3x3 0 65 320x240 640 480 320 240 640 480 1280 960 avi jpg 8 7 4 1 40 940 940 2 4 802 11 b g n 15 SKU 1 7 100 6 5x 780 25 915 25 22 C t Wi Fi x x LED Wi Fi 2 120 119 6 5x10 5 2 8x10 4 RA...

Page 64: ...Power Bank 5V micro USB 5 USB 4 USB Power Bank Power Bank 14 3 5 6 REC IR ZOOM ON 9 10 11 12 13 14 15 16 ON ZOOM REC Video Photo Video Photo 1 Wi Fi 2 Wi Fi Wi Fi 1 3 Photo Review Review Review Video...

Page 65: ...7 8 1 2 3 15 13x 8 ON 15 16 ON DISPLAYOFF ON ON 3 Switch off 1 6 20 30 8 7 0 20 8 7 IR 13 IR 1 3 IR IR 12 ZOOM 14 REC 12 16 124 123 Wi Fi...

Page 66: ...iew Video REC 12 Video Photo Review Video VIDEO Video Video 6 5x 13x VIDEO ZOOM 13x 01 42 9 04 23pm REC 12 16 Flash VIDEO Rec 13x 00 02 VIDEO ZOOM REC 00 42 VIDEO 0 20 Wi Fi Wi Fi 13x VIDEO 15 01 42 0...

Page 67: ...PHOTO Wi Fi REVIEW Review x y 04 23pm PHOTO 999 PHOTO Photo PHOTO ZOOM 13x 999 PLAY PAUSE REVIEW 2 123 960p 22 18 2016 08 05 REVIEW PHOTO 128 127...

Page 68: ...ZOOM IR ON Yes ZOOM No ON 480p 5 123 480p 00 05 YES NO 22 18 2016 08 05 22 18 2016 08 05 PAUSE PLAY REVIEW ZOOM 14 IR 13 REC 12 2 123 480p 00 05 REVIEW VIDEO 22 18 2016 08 05 5 123 00 05 REVIEW VIDEO...

Page 69: ...Wi Fi i ZOOM 14 12345 REC 12 IR 13 ZOOM ZOOM Wi Fi Wi Fi Wi Fi Wi Fi Wi Fi Stream Vision Owner Stream Vision Guest Stream Vision Stream Vision Stream Vision Wi Fi Ranger RT 6 5x42 Wi Fi Stream Vision...

Page 70: ...40x480 1280x960 ZOOM 14 IR 13 REC 12 ZOOM 240p 320x240 480p 640x480 960p 1280x960 REVIEW ZOOM 14 2016 07 12 REC 13 IR 5 ZOOM ZOOM ZOOM 14 24 06 51 IR 13 REC 12 24 AM PM ZOOM REC IR ZOOM REC IR ZOOM ZO...

Page 71: ...13x 6 5x 6 5x 12 10 28047 940 28048 850 Video Photo IR 13 Zoom ZOOM 11 Name Ranger RT 6 5x42 SKU 28047 Serial 70119307 FW 12 34 567 HW MNV001 IR1 IR2 IR3 IR IR1 IR2 IR3 IR1 IR Video Photo REVIEW REVIE...

Page 72: ...r USB Power USB Zoom 960p 04 23pm DISPLAY OFF VIDEO PHOTO ON 15 DISPLAYOFF ON DISPLAYOFF ON DISPLAYOFF Wi Fi DISPLAYOFF ON USB power bank USB Mass storage device USB USB Video Photo Review Video Photo...

Page 73: ...power bank ON Power USB USB Mass storage device 15 16 2 3 17 USB 18 140 139...

Page 74: ...Wi Fi Wi Fi c Wi Fi 1 REC ZOOM 2 ON REC ZOOM 3 4 REC ZOOM 5 1 6 142 141...

Page 75: ...DE AU FR BE IT ES...

Page 76: ...NOTES NOTES...

Reviews: