background image

352867-UIM-A-0208

6

Unitary Products Group

4.

Total system charge = item 1 + item 2 + item 3.

5.

Permanently stamp the unit data plate with the total amount of
refrigerant in the system.

Use the following charging method whenever additional refrigerant is
required for the system charge.

If a calibrated charging cylinder or accurate weighing device is avail-
able, add refrigerant accordingly. Otherwise, model-specific charging
charts are provided on the access panel of the unit.

SUPERHEAT CHARGING METHOD - 

PISTON INDOOR

1.

Set the system running in cooling mode by setting the thermostat
at least 6°F below the room temperature and operate system for at
least 10 – 15 minutes.

2.

Refer to the technical guide  for the recommended airflow and ver-
ify indoor airflow (it should be about 400 SCFM per ton)

3.

Measure and record the outdoor ambient (DB) temperature and
the suction pressure at the suction service valve.

4.

Using the charging chart located on the unit, find the intersection
of the outdoor ambient dry bulb and the suction pressure obtained
in step 3. This is the recommended suction tube temperature at
the service valve.

5.

Measure and record the suction tube temperature at the service
valve and compare to the recommended temperature obtained in
step 4.

6.

Add charge if the measured suction temperature in step 5 is above
the recommended value.  Remove / recover refrigerant if the mea-
sured suction temperature is below the recommended value.

SUBCOOLING CHARGING METHOD - TXV INDOOR

For cooling operation, unless otherwise specified, the default subcool-
ing is 10°F.

1.

Set the system running in cooling mode by setting the thermostat
at least 6°F below the room temperature and operate system for at
least 10 – 15 minutes.

2.

Refer to the technical guide for the recommended indoor airflow
and verify it is correct (it should be about 400 SCFM per ton).

3.

Measure and record the indoor wet bulb (WB) and the outdoor
ambient dry bulb (DB) temperature.

4.

Using the charging chart located on the unit, find the intersection
of the indoor wet bulb and the outdoor dry bulb.  This is the recom-
mended liquid pressure (and subcooling value).

5.

Measure and record the pressure at the liquid valve pressure port
and compare to the value obtained in step 4.

6.

Add charge if the measured liquid pressure is lower than the rec-
ommended value. Remove / recover charge if the measured liquid
pressure is above the recommended value.

Condenser subcooling is obtained by calculating the difference of the
saturated refrigerant temperature of the pressure measured at the liquid
base valve and the liquid tube temperature as measured at the liquid
base valve.

Subcooling Temp. (TC) = Saturated Temp. (TS) – Liquid Temp. (T)

Refrigerant charging should only be carried out by a qualified air
conditioning contractor.

Compressor damage will occur if system is improperly charged. On
new system installations, charge system per tabular data sheet for
the matched coil and follow guidelines in this instruction.

Example: The suction tube temperature listed on the table at the 
intersection of the outdoor DB and the suction pressure is 63°.  Tem-
perature of the suction tube at the service valve is 68°.  It would be 
necessary to add refrigerant to drop the suction tube temperature to 
63°.

Example: The liquid pressure listed at the intersection of the indoor 
WB and the outdoor DB 320 psig.  Pressure at the liquid valve is 305 
psig.  It would be necessary to add refrigerant to increase the liquid 
pressure to 320 psig.

IT IS UNLAWFUL TO KNOWINGLY VENT, RELEASE OR DIS-
CHARGE REFRIGERANT INTO THE OPEN AIR DURING
REPAIR, SERVICE, MAINTENANCE OR THE FINAL DISPOSAL
OF THIS UNIT.
WHEN THE SYSTEM IS FUNCTIONING PROPERLY AND THE
OWNER HAS BEEN FULLY INSTRUCTED, SECURE THE
OWNER’S APPROVAL.

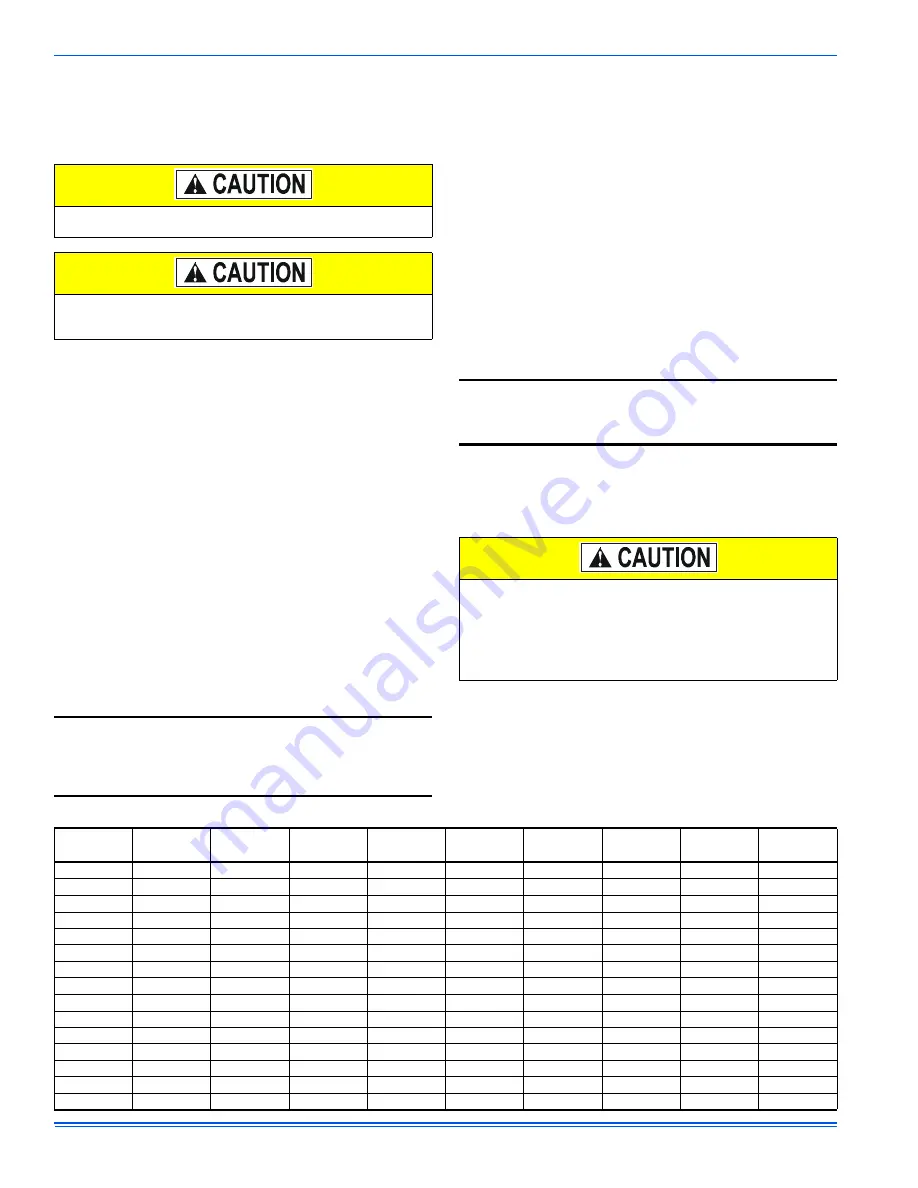
TABLE 2: 

R-410A Saturation Properties

TEMP. 

°

F

PRESSURE 

PSIG

TEMP. 

°

F

PRESSURE 

PSIG

TEMP. 

°

F

PRESSURE 

PSIG

TEMP. 

°

F

PRESSURE 

PSIG

TEMP. 

°

F

PRESSURE 

PSIG

45

130

60

170

75

217

90

274

105

341

46

132

61

173

76

221

91

278

106

345

47

135

62

176

77

224

92

282

107

350

48

137

63

179

78

228

93

287

108

355

49

140

64

182

79

232

94

291

109

360

50

142

65

185

80

235

95

295

110

365

51

145

66

188

81

239

96

299

111

370

52

147

67

191

82

243

97

304

112

375

53

150

68

194

83

247

98

308

113

380

54

153

69

197

84

250

99

313

114

385

55

156

70

201

85

254

100

317

115

391

56

158

71

204

86

258

101

322

116

396

57

161

72

207

87

262

102

326.

117

401

58

164

73

211

88

266

103

331

118

407

59

167

74

214

89

270

104

336

119

412

Summary of Contents for 13 Seer-CCJD Series

Page 1: ...es refrigerant containers and recovery system must be designed to handle the POE type oils and the higher pressures of R 410A Manifold sets should be 800 PSIG high side and 250 PSIG low side with 550 PSIG low side restart All hoses must have a 700 PSIG service pressure rating Leak detectors should be designed to detect HFC refrigerant Recovery equipment including refrigerant recovery containers mu...

Page 2: ... and performance Line set change out is also recommended 1 Change out of the indoor coil to an approved R 410A coil con densing unit combination with the appropriate metering device 2 Change out of the line set when replacing an R 22 unit with an R410 A unit is highly recommended to reduce cross contamina tion of oils and refrigerants 3 If change out of the line set is not practical then the follo...

Page 3: ...ufficient refrigerant flow Slope horizontal vapor lines at least 1 every 20 feet toward the outdoor unit to facilitate proper oil return PRECAUTIONS DURING LINE INSTALLATION 1 Install the lines with as few bends as possible Care must be taken not to damage the couplings or kink the tubing Use clean hard drawn copper tubing where no appreciable amount of bending around obstruction is necessary If s...

Page 4: ...s including the service port flare caps to be sure they are leak tight DO NOT OVER TIGHTEN between 40 and 60 inch lbs maximum NOTE Line set and indoor coil can be pressurized to 250 psig with dry nitrogen and leak tested with a bubble type leak detector Then release the nitrogen charge NOTE Do not use the system refrigerant in the outdoor unit to purge or leak test 10 Evacuate the vapor line evapo...

Page 5: ...possible The bulb should be installed on top of the line b If bulb installation is made on a vertical run the bulb should be located at least 16 inches from any bend and on the tub ing sides opposite the plane of the bend The bulb should be positioned with the bulb tail at the top so that the bulb acts as a reservoir c Bulb should be insulated using thermal insulation provided to protect it from t...

Page 6: ...ing value 5 Measure and record the pressure at the liquid valve pressure port and compare to the value obtained in step 4 6 Add charge if the measured liquid pressure is lower than the rec ommended value Remove recover charge if the measured liquid pressure is above the recommended value Condenser subcooling is obtained by calculating the difference of the saturated refrigerant temperature of the ...

Page 7: ... to be in accordance with national electrical codes NEC and or local city codes NOTE A Start Assist Kit is available and recommended for long line set applications or in areas of known low voltage problems 5 Mount the thermostat about 5 ft above the floor where it will be exposed to normal room air circulation Do not place it on an out side wall or where it is exposed to the radiant effect from ex...

Page 8: ...tric heat on thermostat is not necessary MA SHP AHP ID MODELS Other Part Numbers SAP Legacy 265902 031 09167 2 Part Numbers SAP Legacy 159480 031 09156 1 COM 24 Volt Common R 24 Volt Hot W2 Second Stage Heat O Reversing Valve Energized in Cool X L Malfunction Light HUM Humidity Switch Open on Humidity Rise PSC AIR HANDLER CONTROL G Fan PSC AIR HANDLER 1 EAC 24 VAC out Electronic Air Cleaner HUM OU...

Page 9: ...ngle Stage Compressor Y Y2 Second or Full Stage Compressor W1 First Stage Heat Y Full Stage Compressor G Fan BP11C50124 BN11C01124 DP11C40124 DN11C00124 THERMOSTAT RH 24 Volt Hot Heat XFMR RC 24 Volt Hot Cool XFMR W Full Stage Heat Selection of GAS ELEC switch on thermostat is not necessary C 24 Volt Common Y Full Stage Compressor G Fan BN11C00124 THERMOSTAT RH 24 Volt Hot Heat XFMR RC 24 Volt Hot...

Page 10: ...age Heat Clipping Jumper W914 for electric heat on thermostat is not necessary 24VAC Humidifier Optional C 24 Volt Common Y Compressor SINGLE STAGE AIR CONDITIONER Y Compressor Contactor SINGLE STAGE AIR CONDITIONER SINGLE STAGE AIR CONDITIONER G8C L Y M 8S G 9F G 8 9 S ID MODELS G T GLS TG 8 9 S LF8 GF 8 9 C 24 Volt Common R 24 Volt Hot W Full Stage Heat SINGLE STAGE PSC FURNACE G Fan SINGLE STAG...

Page 11: ...tat is not necessary C 24 Volt Common Y Full Stage Compressor G Fan BN11C00124 THERMOSTAT RH 24 Volt Hot Heat XFMR RC 24 Volt Hot Cool XFMR W Full Stage Heat Thermostat Installer Setup 1 System Type must be set to 0 C 24 Volt Common Thermostat Installer Setup 15 Compressor Protection must be set to 5 External Humidistat Optional Open on Humidity Rise G8C L Y M 8S G 9F G 8 9 S ID MODELS G T GLS TG ...

Page 12: ...e installer should also instruct the owner on proper operation and maintenance of all other system components MAINTENANCE 1 Dirt should not be allowed to accumulate on the outdoor coils or other parts in the air circuit Clean as often as necessary to keep the unit clean Use a brush vacuum cleaner attachment or other suitable means 2 The outdoor fan motor is permanently lubricated and does not requ...

Reviews: