background image


network. A dialogue box (Image 6.2) will appears if a new device is found 

d)


Enter camera password and click on add button (image 6.2) 

e)


Added device will be shown in left side device menu (screen 6.3) 


            Image 6.1                                      Image 6.2                                    Image 6.3 

f)


To view live video, right click on device list and 

select option ‘All Connect’. Image 6.4


g)


To start recording, right click on device list and select option ‘Start Recording’. Image 6.5


                      Image 6.4                                                        Image 6.5 


To connect with cameras on Wide Area Network (outside home network): 

a)


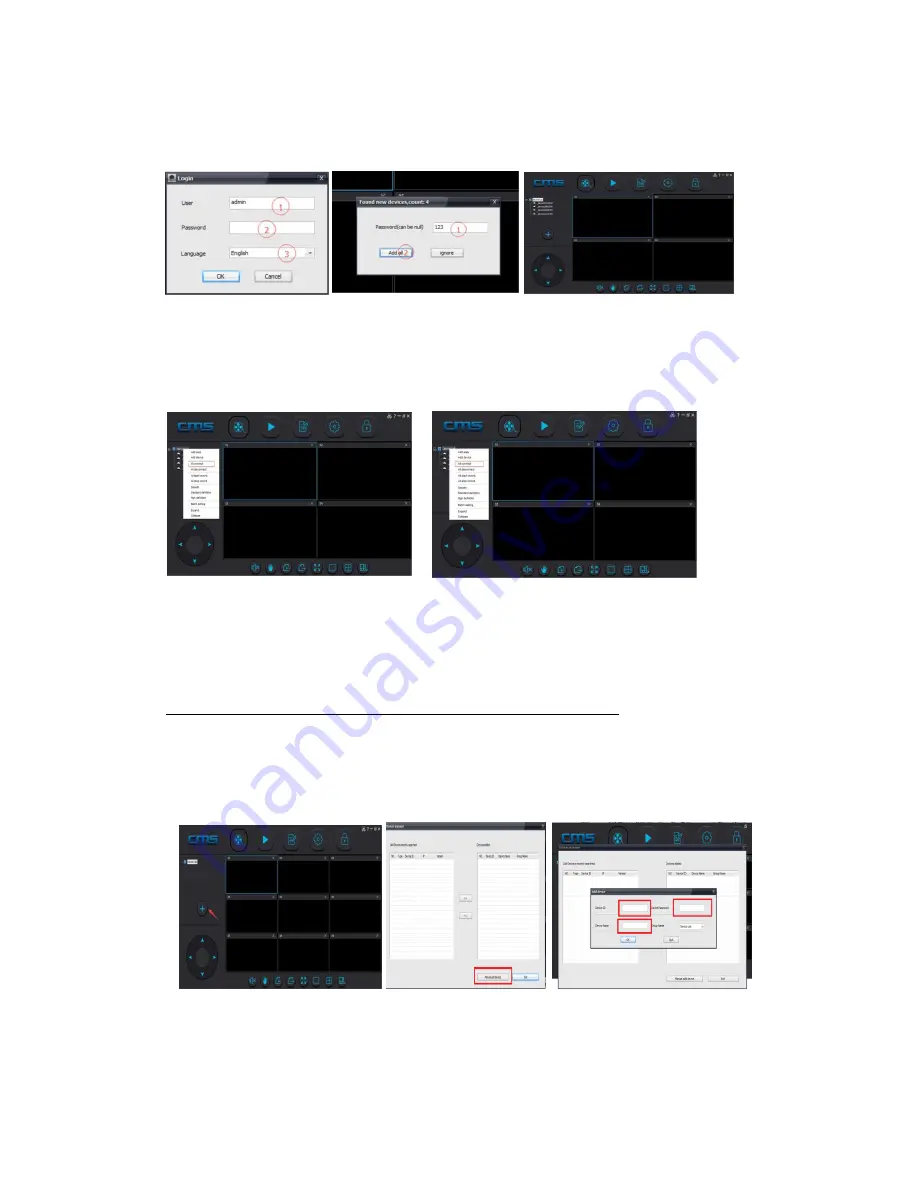
After login on CMS application, click on Add camera button (Image 6.6) 

b)


Click on ‘Manual Add Device’ (Image 6.7)


c)


Enter device id, password, name and click on OK button (image 6.8) 


Image 6.6                                        Image 6.7                                    Image 6.8 


Summary of Contents for D3D

Page 1: ...D3D Security Pvt ltd...

Page 2: ...authorization is illegal Here D3D stated without the license of D3D everyone is prohibited copying the instruction in any way by any means for transcription electronic mechanical optical and other com...

Page 3: ...e starting the mobile app configuration it is advised to reset the camera using reset button To reset keep press the Reset button for 30 seconds This will remove any pre existing configuration setting...

Page 4: ...a s default password is mentioned on the sticker of camera Step 1 Step 2 Step 3 Step 4 Step 5 Step 6 Step 7 Step 8 Step 9 Note During step 5 for some models there will be no Beep sound from camera Ple...

Page 5: ...2 2_Wired Connection recommend for outdoor cameras Wired connections are mainly used for the outdoor camera where the Wi Fi signals are week Steps to follow Step 1 Step 2 Step 3 Step 4 Step 5 Step 6...

Page 6: ...n of each button on that screen Weak password icon Suggest to revise password when this icon is on Defense succeeded disarming succeeded This button must be switch on to activate sensors Video playbac...

Page 7: ...on Firmware version We need to know firmware information when something happens to firmware 4 2_Time settings Set device s time and time zone 4 3_Picture and sound set device video format volume video...

Page 8: ...oor sensor fire gas sensors etc To Add a sensor Click on button Trigger the sensor Message will be displayed that sensor added successfully To activate the sensor a Make sure that the buzzer button is...

Page 9: ...tected by camera or configured sensor Steps to follow 6_Access camera on computer via CMS application CMS software allow the D3D camera to be accessed via computer To connect with cameras on local are...

Page 10: ...ght click on device list and select option All Connect Image 6 4 g To start recording right click on device list and select option Start Recording Image 6 5 Image 6 4 Image 6 5 To connect with cameras...

Page 11: ...if phone APP can t get any notifications A Check whether alarm items alarm notifications in alarm settings section 5 1 are switched on and make sure you have deployed alarm successfully Make sure the...

Page 12: ...unt default user name and password are admin empty Account system of mobile phone client is cloud account which requires registering from the server to obtain account Q What is the difference between...

Reviews: