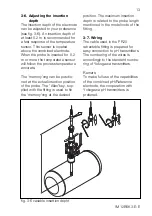
IM 12B6K3-E-E
14
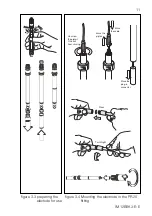
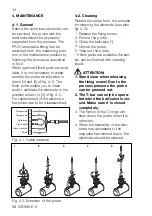
Temperature 11
Temperature 12
Reference 13
Liquid Earth 14
Glass electrode 15
Shield 16
Transparent
Yellow
Red
Black
Black
Blue
1
2
3
4
5
4. MAINTENANCE
4-1. General
Before the combined electrode can
be serviced, the probe with the
electrode should be physically
separated from the process. The
PR20 retractable fitting can be
retracted from the measuring posi-
tion in the maintenance position by
following the procedure described
in §4-2.
When (optional) flush ports are avai-
lable, it is not necessary to disas-
semble the probe as indicated in
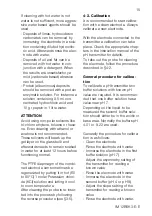
items [4] and [5] of fig. 4-2. The
flush ports enable you to clean
and/or calibrate the electrode in the
position shown in [3] of fig. 4-2.
For replacement of the electrode
the probe has to be disassembled.
4-2. Cleaning
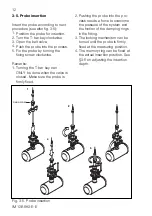
Retract the probe from the process
for cleaning the electrode (see also
fig. 4-2):
1. Release the fixing screw.
2. Pull out the probe.
3. Close the ball-valve (*).
4. Unlock the probe.
5. Take out the probe.
* If flush ports are available the sen-
sor can be flushed with cleaning
liquid.
ATTENTION:
1. Stand clear when releasing
the fixing screw! Due to the
process pressure the probe
can be pressed out.
2. The T-bar can only be opera-
ted when the ball-valve is clo-
sed. Make sure it is closed
completely.
3. The friction of the O-rings will
slow down the probe when it is
retracted.
4. When the sensitivity of the elec-
trode has decreased or the
response has slowed down, the
electrode should be cleaned.
Fig. 4.2. Exsertion of the probe
Fig. 4.1. Cable markers


