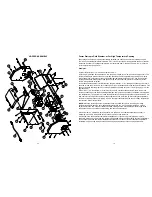
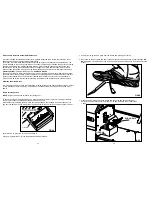
Yoder Smokers YS 640 Operation Manual Download Page 29

31

Igniter

When inspecting the 

 rebox assembly, con

 rm that the igniter assembly, tube and igniter rod are free of 

ash or other debris. Periodically check the four set screws that secure the igniter rod into the tube. (See 

FIG 31). Verify that the igniter rod is centered in the tube and that the tip of the igniter rod is extended 

approximately 1/8” out from the igniter tube.

Extending 1/8”

out of igniter tube. 

FIG 31

28

Grill Maintenance

Notice:  Damage caused by improper maintenance can lead to costly repairs and may not be covered 

by warranty.  Perform maintenance work only if the required information and proper tools are available.  

If they are not, or repairs beyond the scope of this manual are required, see your local dealer or contact 

Yoder Smokers to have trained technicians do the work.

Preparing the Grill for the Season

Begin with a thorough inspection of the entire grill correcting any issues you 

 nd. Follow the steps found 

in the Pre-Grill checklist (Page 16).

Painted Surfaces

Yoder smokers are painted with high heat silicone paint. When cleaning the smoker, surfaces should 

be washed down with warm soapy water using a neutral detergent, then rinsed with clean water. The 

paint should be periodically inspected and touched up when scu

 s or bare spots are exposed. For more 

information about high heat paint that can be used for touch-up, contact 

[email protected].

Cooking Grates

When new, wash thoroughly with warm soapy water, place back in the smoker and lightly coat with 

vegetable oil. Condition the grates during the burn o

  process.

When you begin the next cooking session, bring the grill up to the desired cooking temperature and use 

a long-handled grill brush to clean the grates before evenly coating the grates with vegetable oil.
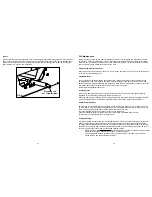
Heat Di

 user/Drip Plate

This requires very little maintenance if the plate is lined with foil (non-stick foil). If foil is used, it can not 

be more than 2” longer than the heat di

 user plate. The foil must be folded up tight to the bottom of the 

plate. Any foil hanging o

  the front will e

 ect the performance of the grill.

It is recommended that you change the foil every one to three uses.

If the heat di

 user/drip plate is used without foil, it will need to be cleaned after each use. 

Failure to do so creates the potential for a grease 

 re.

Cooking Chamber

It is recommended that each time you run through the steps in the Pre-Grill Checklist (Page 16) that you 

inspect and thoroughly clean the interior of the cooking chamber. Any excess grease can be cleaned 

up using a plastic scraper and paper towels. Pay particular attention to the grease channels on the right 

hand side of the cooking body. At the beginning of the season, and as necessary throughout the rest of 

the year, de-grease the interior with a citrus based cleaning solution.

• 

Ensure that the grill is

 completely cold

 before using a shop vacuum or before scooping out and 

disposing of the ashes. Dispose of the ashes in a metal container.

• 

Use a citrus based cleaning solution to clean the entire inside of the body. This will control 
grease build-up and the possibility of 

 are-ups.

Summary of Contents for YS 640

Page 1: ......

Page 2: ...t Usage 9 Yoder YS Series Control Panel 10 Selecting Heat Up Modes 11 Selecting Fahrenheit or Celcius 11 The Controller In Depth 13 How Heat Up Modes Work 13 Faster Startup in Cold Weather or For High...

Page 3: ...ring the Grill For Season 28 PaintedSurfaces 28 CookingGrates 28 Heat Di user Drip Plate 28 Cooking Chamber 28 Firebox and Burn Grate Assembly Maintenance 29 Stainless Steel Burn Grate 29 Burn Grate I...

Page 4: ...re is out If the Yoder fails to initially light after pressing the START button or goes out during operation due to a power surge or power failure do not restart the Yoder without removing the cookin...

Page 5: ...e temperature inside the cooking chamber falls below 125 F whichever occurs rst During this period the cooking chamber door must remain closed Failure to do so can cause burn back in the hopper Longer...

Page 6: ...the breast to make a at even piece of meat Marinate in Smoke on Wheels BBQ Marinade for one hour Meanwhile over low heat cook the shallots in a tablespoon of oil with a pinch of salt until lightly bro...

Page 7: ...stu ed dust with John Henry Pecan Rub Step 3 Grill the chops on medium high heat for about 6 minutes on each side Turn each chop 45 degrees after 3 minutes to mark Remove from the grill when the inte...

Page 8: ...rubs to the pork Cover the meat with equal parts Cattleman s Grill Steakhouse and Cattleman s Grill Tri tip Rest meat for 10 minutes Cook at 325 F until internal temperature reaches 140 F 145 F Remove...

Page 9: ...ing Serve with Chipotle Aioli Chipotle Aioli Ingredients 1 egg yolk 1 chipotle in adobo sauce 1 2 tsp adobo sauce 1 clove garlic chopped 1 Tbsp lime juice 1 2 cup grape seed or vegetable oil don t use...

Page 10: ...temperatures ambient air temperature wind and whether or not the Yoder is equipped with a thermal jacket Generally usage is about 2 pounds per hour at grilling temperatures 350 to 450 F At smoking te...

Page 11: ...Yoder YS Series Control Panel 1 Power Switch turns the power to your Yoder on and o 2 Increase increase the temperature setting in 5 degree increments 3 Decrease decrease the temperature setting in 5...

Page 12: ...nto the bowl of a stand mixer Combine the salt bread our all purpose our and 2 tablespoons of melted butter then add to the bowl Mix on low for about 5 6 minutes Dough should be pulled away from the s...

Page 13: ...il soft and browning about 45 minutes IPA Jalape o Cheese Sauce 1 cup heavy whipping cream 6 oz white american cheese grated 6 oz pepper jack grated 6 oz your favorite IPA beer 1 Tbsp Grannie s Hickor...

Page 14: ...startup the program automatically begins in H1 8 minutes into the start up cycle the program calculates the di erence between the set point and the actual cooker temperature and changes the H mode if...

Page 15: ...ieve set point It is simply doing it in a less aggressive way When H2 or H3 is selected it is common for the pit to overshoot the set temperature How much overshoot depends on the startup initial pell...

Page 16: ...T DESCRIPTION QTY 1 A90491 YS PELLET CHAMBER ASSEMBLY 640 1 2 W90551 YS WELDMENT 640 COMP CART BASE 1 3 90725 YS CASTER FLATFREE TIRE 8 DIA RIGID MARATHON 2 4 90724 YS CASTER FLATFREE TIRE 8 DIA SWIVE...

Page 17: ...ove the heat di user drip plate remove and discard previously used protective foil cover if foil has been applied Install a new layer of protective foil Select heavy duty foil that is wide enough to w...

Page 18: ...de of the burn grate on the rebox and then pressing down on the left hand side of the burn grate until fully seated When the burn grate is properly seated it rests rmly on the right hand side of the r...

Page 19: ...de of the grill to channel grease into the grease container 8 Reinstall the cooking grates and optional second shelf See FIG 9 9 Inspect chimney stack to be certain that the internal end of the stack...

Page 20: ...eceptacle If an extension cord is required see caution notes Page 3 3 Load the hopper with food grade pellets DO NOT use heating grade pellets The hopper will hold 20 pounds of pellets allowing 5 to 1...

Page 21: ...e rebox 8 Place 1 8 cup about a palm full of pellets on the burn grate NOTE This step is only necessary when the unit is rst put into service or if it runs out of pellets 9 Reinstall the heat di user...

Page 22: ...he igniter and the combustion air from the fans will have a small smoldering re started NOTE The only way to reactivate the igniter is to turn the cooker o and let it go through the cool down cycle or...

Page 23: ...apply if the igniter has developed a dead short and is tripping the GFCI or blowing the fuse 1 Be sure the unit power cord is unplugged Remove the cooking grates di user plate and burn grate 2 Reach...

Page 24: ...ng to touch any hot surfaces TO CONTROL BOX TO IGNITER IN COOKING CHAMBER FIG 21 36 ITEM PART DESCRIPTION QTY 1 90737 HINGE STAINLESS 2 2 1024X12FHMSSS FLATHEAD MACHINE SCREW STAINLESS 8 3 1024WHN 12...

Page 25: ...re management is not important when you are doing short cooks where you are opening and closing the pit frequently Find a set temperature that works well for the type of food you are grilling for inst...

Page 26: ...egrees Remove the heat di user plate set the variable displacement damper in the full open position See FIG 27 and install the Grill Grates on the left side of the cooker With the heat di user drip pl...

Page 27: ...to the touch before moving it inside Inspect the hopper and cooking chamber for any remaining embers before storing the unit FIG 33 26 Variable Displacement Damper The YS640 is tted with a variable di...

Page 28: ...metal auger area and remove any debris or sawdust that may have built up 4 Using a 5 16 socket you can remove the 11 screws securing the end panel to the hopper assembly See FIG 32 This will allow yo...

Page 29: ...r place back in the smoker and lightly coat with vegetable oil Condition the grates during the burn o process When you begin the next cooking session bring the grill up to the desired cooking temperat...

Page 30: ...rate It is important to regularly check the combustion air holes located on the oor and sides of the burn grate for any blockage or build ups Using a wire brush or at head screwdriver scrape o any bui...

Reviews: