


13
The Controller… In-Depth
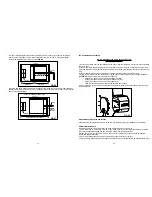
This is an in-depth overview of the controller’s feature set.
The controller has been designed to make it as hands-o
ff
and user-friendly as possible. At its most basic
level, the cooker has three modes of operation: Heat-up, Maintenance and Cool Down.
Beyond these basic modes are the concepts of aggressiveness, anticipation and micromanagement that
have been learned as the result of many thousands of hours of testing. When the cooker is displaying
maintenance mode, it is not idle. It is constantly checking and re-evaluating the grill’s temperature and
making incremental adjustments to maintain the cooking temperature as close to the desired set point as
possible – think of it as micromanagement.
Just like in the maintenance mode, the controller is constantly evaluating the grill status while in “heat
up” and “cool down” modes. This is where “aggressiveness” and “anticipation” have been written into
the program. If the controller senses the grill is not heating up very quickly, it will increase the pellet feed
rate above what the normal heat up rate would be for a given set point, and it will continue to do so
until the heat up rate is where it should be. The inverse is true of the cool down mode – if the grill is not
cooling fast enough, the controller will get more aggressive with cool down until the grill temperature is
where it should be.
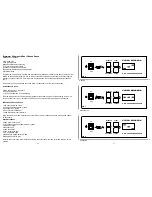
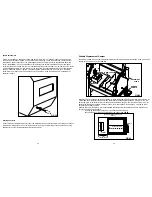
How the Heat Up Modes Work
In addition to the intelligence previously described, the program also contains three internal heat up
modes. Left on its own, the controller makes a series of small incremental adjustments as described
above. The various heat up modes are designed to speed the heat up process.
The selection of the heat up modes is automatically selected by the program. At startup the program
automatically begins in H1. 8 minutes into the start-up cycle, the program calculates the di
ff
erence
between the set point and the actual cooker temperature and changes the “H” mode if necessary. The
program will make the same calculation again at the 12-minute mark, and if an “H” mode other than the
mode currently running is required, the program makes the required change. If a mode other than H1 has
been selected, it will remain in that mode until it breaks that target set point at which time the program
will enter maintenance mode.
Once the controller enters maintenance mode, the pit temperature must rise or fall 35 degrees above or
below set point before the program enters the heat up or cool down mode.
46
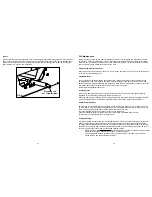
ITEM #
PART #
DESCRIPTION
QTY
.
1
90101
BODY, FRONT, FEED COMPARTMENT
1
2
90102
BULKHEAD, MOUNT, HOPPER
1
3
90106
COVER, END, FEED COMPARTMENT
1
4
W90791
HOPPER, PELLET SMOKER
1
5
90022
BUSHING, AUGER
1
6
90023
BUSHING, AUGER
1
7
W90019
AUGER
1
8
90027
PLATE, ANTI-TORQUE
1
9
90001
MOTOR, PELLET AUGER
1
10
90060
INNER FAN, 115 CFM
1
11
1420X12SHCS
SOCKET HEAD CAP SCREW, 1/4-20 X 0.05 LONG
2
12
10X34HHSDS
SCREW, HEX HEAD, SELF DRILLING 10 X 3/4
37
13
A90152
CONTROLLER
1
14
516X12SHSB
SCREW, SHOULDER, .313 X .50, SOCKET HEAD 1/4-20
1
15
51618X12SHSS
SCREW, SET, SOCKET HEAD, 5/16-18 X 1/2
1
16
1024X12HHSTS
SCREW, SLOTTED, HEX HEAD, SELF TAPPING, 10-24 X 1/2
4
17
22866
HANDLE, SPRING
1
18
1420WHN
NUT, WHIZ, 1/4-20
1
19
W90790
HOPPER BACK
1
20
W90788
HOPPER DOOR
1
21
90312
SOCKET, 15 AMP
1
22
632X38MS
SCREW, MACHINE, ROUND HEAD, 6-32 X 3/8 LONG
4
23
632HN
NUT, HEX, 6-32
4
24
832HN
NUT, HEX, 8-32
4
25
91435
FUSE, 1.6A
1
26
90412
FUSE HOLDER
1
27
W90553
FAN HOUSING
1
28
832X12MS
SCREW, MACHINE, PHILLIPS HEAD, 8-32 X 1/2 LONG
4
29
90686
OUTER FAN, 68 CFM
1
30
90893
PLATE, FAN AIR DIVERTER
1
31
23985
VELCRO
1
32
90313
POWER CORD
1
33
W90026
IGNITER TUBE
1
34
A90494
IGNITER ASSEMBLY
1
35
1420X14SHSS
SCREW, SET, SOCKET HEAD, 1/4-20 X 1/4
4
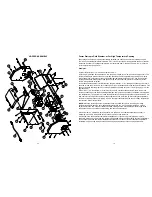
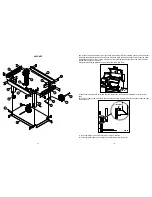
HOPPER ASSEMBLY
Summary of Contents for YS 640
Page 1: ......


