


27
•
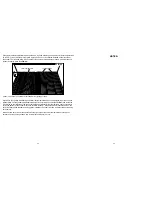
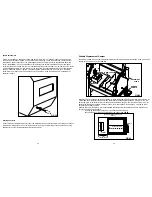
You can create dissimilar side-to-side temperature which is useful, for example, for cooking
poultry on the left at 300° F and a butt or brisket on the right at 240° F. This puts di
ff
erent
surface temperatures to work for you. (See
FIG 26
)
•
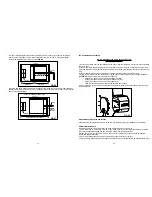
When the damper is positioned about 5 inches from the stack end of the pit (full open position),
the temperature is even from end to end, creating the ideal environment for slow cooking similar
cuts of meat. (See
FIG 27
)
EXAMPLE: DIVIDED AREAS
(Top View)
FIREBOX
DAMPER POSITION
HANDLE
HEAT ZONE
@300 DEG. F
HEAT ZONE
@240 DEG. F
FIG 26
EXAMPLE: DAMPER ALL THE WAY OPEN
(Top view)
FIREBOX
DAMPER
POSITION
HANDLE
HEAT DISTRIBUTED THROUGHOUT
FIG 27
32
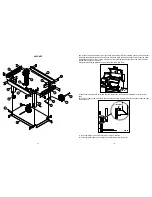
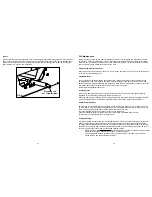
Fan Cooled Hopper Assembly
Always disconnect the power to the grill before
performing any service
1. Remove any debris from the combustion air fan intake. Use compressed air to remove dust and debris
from both fans.
2. Inspect and clean the pellet hopper area. The interior hopper surface can be wiped down using warm
water and detergent. To protect the surface and promote smooth pellet feeding, coat the surface with car
wax.
3. Inspect the metal auger area and remove any debris or sawdust that may have built up.
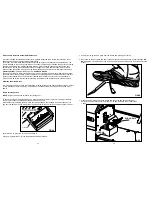
4. Using a 5/16” socket you can remove the 11 screws securing the end panel to the hopper assembly
(See
FIG 32
). This will allow you to perform the following:
•
Check and clean any debris within the hopper housing.
•
Check and clean any debris in the fan blades or housing.
•
Check and clean any debris from the auger motor.
•
Visually inspect the wiring harnesses and terminal connections.
5. Upon inspection (and any required maintenance) replace all screws. Hand start each screw to ensure
proper threading.
Grease Management Area and Bucket
Always be sure the grease catch area is clean and free of debris; empty the grease bucket regularly.
Additional Maintenance:
In addition to regular cleaning, perform the following procedures every 30 days:
1. Use a sti
ff
brush to remove any build-up on the inside walls of your grill. Inspect and clean the inside
of the lid, the heat di
ff
user/drip tray and the inside walls of the cooking chamber.
2. When your grill is cool to the touch, use a shop vacuum to thoroughly clean the cooking chamber,
fi
rebox and hopper assembly.
3. Use a citrus based cleaning solution to thoroughly clean the inside of the grill.
4. Finally, visually inspect the painted surfaces and touch up any scratches with high heat
fl
at black paint.
FIG 32
Summary of Contents for YS 640
Page 1: ......


